WIPER / WASHER FRONT WIPER MOTOR REMOVAL
CAUTION / NOTICE / HINT
- HINT:
- ·
Use the same procedure for LHD and RHD vehicles.
·The procedure listed below is for LHD vehicles.
PROCEDURE

 1. PRECAUTION
- NOTICE:
-
After turning the ignition switch off, waiting time may be required before disconnecting the cable from the battery terminal. Therefore, make sure to read the disconnecting the cable from the battery terminal notice before proceeding with work (See page General>INTRODUCTION>REPAIR INSTRUCTION>PRECAUTION).
2.DISCONNECT CABLE FROM NEGATIVE BATTERY TERMINAL
- NOTICE:
-
When disconnecting the cable, some systems need to be initialized after the cable is reconnected (See page General>INTRODUCTION>REPAIR INSTRUCTION>INITIALIZATION).
53292A
3.REMOVE UPPER RADIATOR SUPPORT SEAL
53883F
4.REMOVE FRONT FENDER MAIN SEAL LH
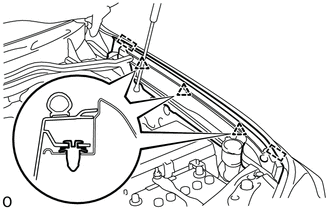
Detach the 2 guides and 3 clips and remove the front fender main seal LH.
53882H
5.REMOVE FRONT FENDER MAIN SEAL RH
- HINT:
-
Use the same procedure described for the LH side.
85292B
6.REMOVE FRONT WIPER ARM HEAD CAP
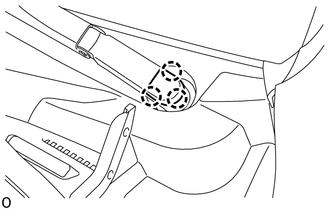
Detach the 3 claws and remove the front wiper arm head cap.
- HINT:
-
Use the same procedure for both front wiper arm head caps.
7.REMOVE FRONT WIPER ARM AND BLADE ASSEMBLY LH
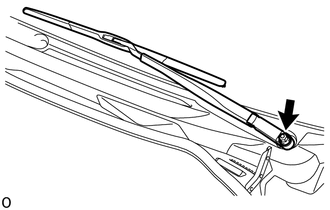
Remove the nut and the front wiper arm and blade assembly LH.
8.REMOVE FRONT WIPER ARM AND BLADE ASSEMBLY RH
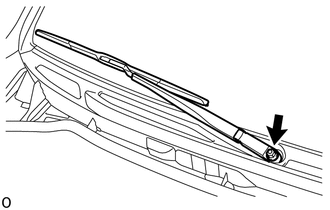
Remove the nut and the front wiper arm and blade assembly RH.
53383
9.REMOVE HOOD TO COWL TOP SEAL
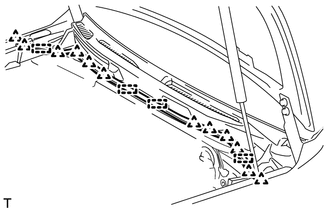
Using a clip remover, detach the 12 clips, 4 clamps and remove the hood to cowl top seal.
55781E
10.REMOVE COWL TOP VENTILATOR LOUVER SUB-ASSEMBLY
w/ PTC Heater:
Disconnect the connector.
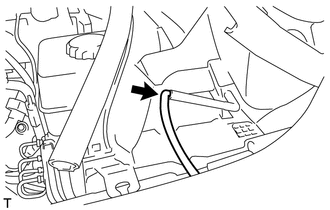
Remove the washer hose.
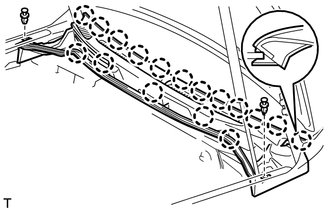
Remove the 2 clips.
Detach the 17 claws and remove the cowl top ventilator louver sub-assembly.
11.REMOVE WINDSHIELD WIPER MOTOR AND LINK ASSEMBLY
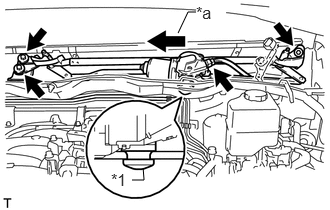
Disconnect the connector.
| *1 | Motor Grommet |
| *a | Slide |
Remove the 3 bolts.
Slide the windshield wiper motor and link assembly to detach the motor grommet as shown in the illustration and remove the wind shield wiper motor and link assembly.
85110
12.REMOVE WINDSHIELD WIPER MOTOR ASSEMBLY
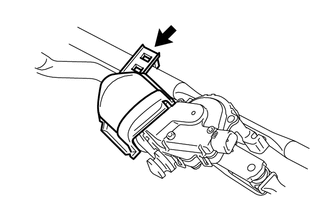
Detach the clamp and remove the wiper motor cover.
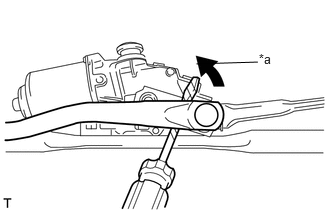
Using a screwdriver with the tip wrapped with protective tape, disconnect the rod of the windshield wiper link assembly from the crank arm pivot of the windshield wiper motor assembly as shown in the illustration.
- HINT:
-
Tape the screwdriver tip before use.
| *a | Protective Tape |
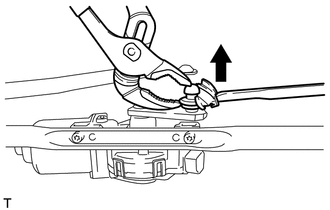
Using a pair of water pump pliers, pull back the boot, taking care not to damage it, and remove the wiper arm from the crank arm pivot as shown in the illustration.
- NOTICE:
-
Do not damage the pivot.
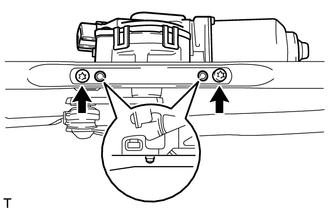
Using a T30 "TORX" socket, remove the 2 "TORX" screws and windshield wiper motor assembly from the windshield wiper link.