RM2660E
_59
Vehicle Exterior
_052855
LIGHTING (EXT)
_0255807
AUTOMATIC LIGHT CONTROL SENSOR
G
LIGHTING (EXT) AUTOMATIC LIGHT CONTROL SENSOR ON-VEHICLE INSPECTION
PROCEDURE

 1.INSPECT AUTOMATIC LIGHT CONTROL SENSOR
a.
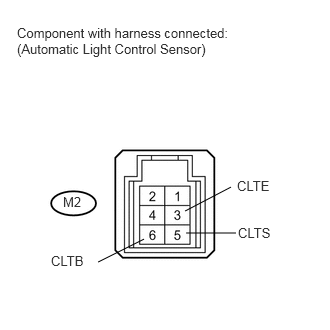
1.927,2.198 2.406,1.948
false
1.021,2.729 1.5,2.49
false
1.938,2.427 2.458,2.427
false
0.177,0.26 2.667,0.625
2.49,0.365
10
false
Component with harness connected: (Automatic Light Control Sensor)
0.531,2.635 0.917,2.802
0.385,0.167
10
false
CLTB
2.469,1.854 2.885,2.021
0.417,0.167
10
false
CLTE
2.479,2.344 2.854,2.521
0.375,0.177
10
false
CLTS
0.656,2.021 0.865,2.198
0.208,0.177
10
false
M2
Measure the voltage according to the value(s) in the table below.
- Standard Voltage:
Tester Connection Switch Condition Specified Condition M2-6 (CLTB) - M2-3 (CLTE) Engine switch on (IG) 11 to 14 V
b.
Measure the resistance according to the value(s) in the table below.
- Standard Resistance:
Tester Connection Switch Condition Specified Condition M2-3 (CLTE) - Body ground Always Below 1 Ω
c.
Reconnect the M2 sensor connector.
d.
1.813,1.073 1.969,1.25
0.156,0.177
10
false
A
2.917,0.958 3.24,1.135
0.323,0.177
10
false
GND
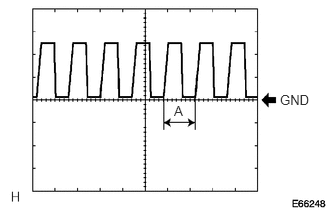
Check the waveform of the M2 sensor connector.
- Waveform:
Tester Connection Tool Setting Switch Condition Specified Condition M2-3 (CLTE) - M2-5 (CLTS) 5 V/DIV., 5 msec./ DIV. Engine switch on (IG), Headlight dimmer switch on AUTO Correct waveform is as shown
- HINT:
-
If the ambient light becomes brighter, width A becomes narrower.
-
If the result is not as specified, there may be a malfunction in the sensor.