EXTERIOR PANELS / TRIM REAR DOOR WINDOW FRAME MOULDING INSTALLATION
CAUTION / NOTICE / HINT
- HINT:
- ·
Use the same procedure for the RH and LH sides.
·The procedure listed below is for the LH side.
·When installing the window frame moulding, heat the vehicle body and window frame moulding using a heat light.
- Standard Heating Temperature:
Item Temperature Vehicle Body 40 to 60°C (104 to 140°F) Window Frame Moulding 20 to 30°C (68 to 86°F)
- NOTICE:
-
Do not heat the vehicle body and window frame moulding excessively.
PROCEDURE

 75762A
1.INSTALL REAR DOOR FRONT WINDOW FRAME MOULDING LH
Clean the vehicle body surface.
Using a heat light, heat the vehicle body surface.
Remove the double-sided tape from the vehicle body surface.
Wipe off any tape adhesive residue with cleaner.
Install a new window frame moulding.
Using a heat light, heat a new window frame moulding and the vehicle body surface.
Remove the peeling paper from the face of the window frame moulding.
- HINT:
-
After removing the peeling paper, keep the exposed adhesive free from foreign matter.
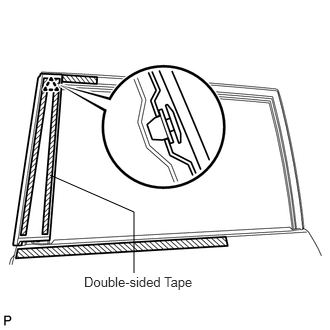
Attach the clip and double-sided tape to install the window frame moulding.
- HINT:
-
Press the window frame moulding firmly to install it.
75740
2.INSTALL REAR DOOR BELT MOULDING ASSEMBLY LH
68104
3.INSTALL REAR DOOR GLASS SUB-ASSEMBLY LH
68124C
4.INSTALL REAR DOOR QUARTER WINDOW GLASS LH
67408F
5.INSTALL REAR DOOR REAR LOWER WINDOW FRAME SUB-ASSEMBLY LH
68152C
6.INSTALL REAR DOOR GLASS RUN LH
67842E
7.INSTALL REAR DOOR SERVICE HOLE COVER LH
68174C
8.INSTALL REAR INNER DOOR GLASS WEATHERSTRIP LH
67604
9.INSTALL REAR DOOR TRIM BOARD SUB-ASSEMBLY LH
74611C
10.INSTALL ASSIST GRIP COVER LH
74280
11.INSTALL REAR DOOR ARMREST BASE PANEL ASSEMBLY LH
69278C
12.INSTALL REAR DOOR INSIDE HANDLE BEZEL LH
13.CONNECT CABLE TO NEGATIVE BATTERY TERMINAL
- NOTICE:
-
When disconnecting the cable, some systems need to be initialized after the cable is reconnected (See page General>INTRODUCTION>REPAIR INSTRUCTION>INITIALIZATION).