EXTERIOR PANELS / TRIM REAR DOOR OUTSIDE MOULDING REASSEMBLY
CAUTION / NOTICE / HINT
- HINT:
- ·
Use the same procedure for the RH and LH sides.
·The procedure listed below is for the LH side.
PROCEDURE

 75797C
1.INSTALL REAR DOOR UPPER NO. 2 OUTSIDE MOULDING PAD
- HINT:
-
When installing the rear door upper No. 2 outside moulding pad, heat the rear door outside moulding using a heat light.
- Standard:
Item Temperature Rear Door Outside Moulding 20 to 30°C (68 to 86°F)
- NOTICE:
-
Do not heat the rear door outside moulding excessively.
When using a new rear door outside moulding:
Clean the surface of a new rear door outside moulding.
Using a heat light, heat the rear door outside moulding surface.
When reusing the rear door outside moulding:
Using a heat light, heat the rear door outside moulding surface.
Remove the double-sided tape from the rear door outside moulding.
Wipe off any tape adhesive residue with cleaner.
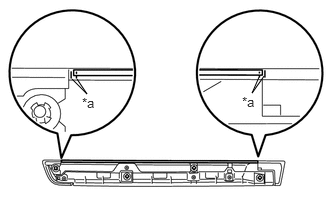
Install a new rear door upper No. 2 outside moulding pad.
Remove the peeling paper from the face of a new rear door upper No. 2 outside moulding pad.
- HINT:
-
After removing the peeling paper, keep the exposed adhesive free from foreign matter.
Align the rear door upper No. 2 outside moulding pad with the mark-off line of the rear door outside moulding and install it as shown in the illustration.
- HINT:
-
Press the rear door upper No. 2 outside moulding pad firmly to install it.
| *a | Mark-off Line |
75798B
2.INSTALL REAR DOOR REAR NO. 2 OUTSIDE MOULDING PAD
- HINT:
-
When installing the rear door rear No. 2 outside moulding pad, heat the rear door outside moulding using a heat light.
- Standard:
Item Temperature Rear Door Outside Moulding 20 to 30°C (68 to 86°F)
- NOTICE:
-
Do not heat the rear door outside moulding excessively.
When using a new rear door outside moulding:
Clean the surface of a new rear door outside moulding.
Using a heat light, heat the rear door outside moulding surface.
When reusing the rear door outside moulding:
Using a heat light, heat the rear door outside moulding surface.
Remove the double-sided tape from the rear door outside moulding.
Wipe off any tape adhesive residue with cleaner.
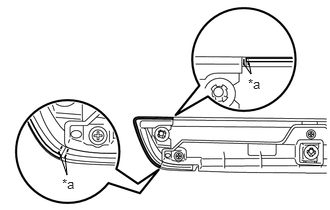
Install a new rear door rear No. 2 outside moulding pad.
Remove the peeling paper from the face of a new rear door rear No. 2 outside moulding pad.
- HINT:
-
After removing the peeling paper, keep the exposed adhesive free from foreign matter.
Align the rear door rear No. 2 outside moulding pad with the mark-off line of the rear door outside moulding and install it as shown in the illustration.
- HINT:
-
Press the rear door rear No. 2 outside moulding pad firmly to install it.
| *a | Mark-off Line |
75797C
3.INSTALL REAR DOOR UPPER NO. 1 OUTSIDE MOULDING PAD
- HINT:
-
When installing the rear door upper No. 1 outside moulding pad, heat the rear door outside moulding using a heat light.
- Standard:
Item Temperature Rear Door Outside Moulding 20 to 30°C (68 to 86°F)
- NOTICE:
-
Do not heat the rear door outside moulding excessively.
When using a new rear door outside moulding:
Clean the surface of a new rear door outside moulding.
Using a heat light, heat the rear door outside moulding surface.
When reusing the rear door outside moulding:
Using a heat light, heat the rear door outside moulding surface.
Remove the double-sided tape from the rear door outside moulding.
Wipe off any tape adhesive residue with cleaner.
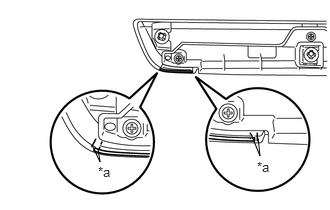
Install a new rear door upper No. 1 outside moulding pad.
Remove the peeling paper from the face of a new rear door upper No. 1 outside moulding pad.
- HINT:
-
After removing the peeling paper, keep the exposed adhesive free from foreign matter.
Align the rear door upper No. 1 outside moulding pad with the mark-off line of the rear door outside moulding and install it as shown in the illustration.
- HINT:
-
Press the rear door upper No. 1 outside moulding pad firmly to install it.
| *a | Mark-off Line |