EXTERIOR PANELS / TRIM SIDE STEP(w/ Foot light) REASSEMBLY
CAUTION / NOTICE / HINT
- HINT:
- ·
Use the same procedure for the RH side and LH side.
·The procedure listed below is for the LH side.
·A bolt without a torque specification is shown in the standard bolt chart (See page General>SPECIFICATIONS>STANDARD BOLT>SPECIFIED TORQUE FOR STANDARD BOLTS).
PROCEDURE

 51759A
1.INSTALL REAR SIDE DOOR STEP PLATE COVER LH
Attach the 19 claws to install the rear side door step plate cover LH.
51788A
2.INSTALL STEP COVER REINFORCEMENT LH
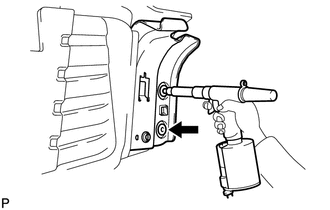
Install a nose piece to an air riveter or hand riveter.
Insert the mandrel part of a new rivet into the nose piece.
Using the riveter, install the step cover reinforcement LH as shown in the illustration.
- HINT:
-
If the rivet cannot be cut, pull it once and cut it.
- NOTICE:
- ·
 1.229,1.115 1.083,1.646 1.083,1.646 1.24,2.208 false 1.073,1.646 0.802,1.646 false 1.771,0.906 2.052,1.656 2.052,1.656 1.792,2.531 false 2.063,1.667 2.344,1.667 false 2.271,0.604 2.469,0.802 0.198,0.198 10 false *a 2.167,2.448 2.385,2.646 0.219,0.198 10 false *b 0.604,1.573 0.792,1.771 0.188,0.198 10 false *1 2.406,1.583 2.625,1.802 0.219,0.219 10 false *2
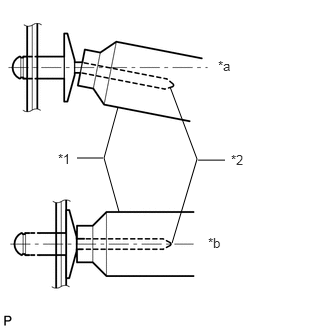
Do not pry the rivet with the riveter, as this will cause damage to the riveter and mandrel.
Text in Illustration *1 Riveter *2 Mandrel *a INCORRECT *b CORRECT
· 2.325,0.536 2.513,0.713 0.188,0.177 10 *a 2.325,1.527 2.499,1.704 0.175,0.177 10 *a 2.434,2.73 2.634,2.907 0.200,0.177 10 *b 0.72,0.066 1.023,0.066 false 0.818,1.11 1.018,1.11 false 1.043,2.324 1.223,2.477 0.180,0.152 10 *1 1.043,1.044 1.223,1.196 0.180,0.152 10 *1 1.043,0.004 1.223,0.156 0.180,0.152 10 *1 0.818,2.402 1.018,2.402 false
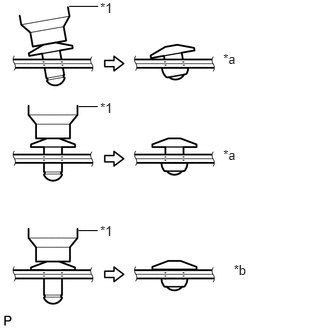
Confirm that the rivets are seated properly against the step cover reinforcement LH.
Text in Illustration *1 Riveter *a INCORRECT *b CORRECT
·Do not tilt the riveter when installing the rivet to the step cover reinforcement LH.
·Do not leave any space between the rivet head and step cover reinforcement LH.
· 2.304,0.996 2.503,1.173 0.200,0.177 10 *a 2.408,2.434 2.619,2.611 0.211,0.177 10 *b 0.978,0.515 1.172,0.685 0.195,0.171 10 *1 0.735,0.603 0.941,0.603 false 0.973,2.023 1.182,2.194 0.208,0.171 10 *1 0.731,2.111 0.937,2.111 false
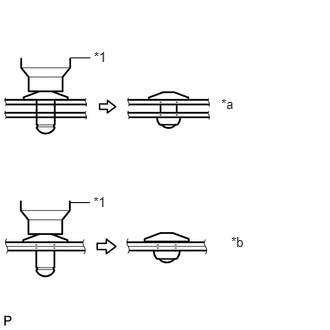
Do not leave any space between the step cover reinforcement LH and rear side door step plate cover. Firmly hold together the 2 items while installing the rivet.
Text in Illustration *1 Riveter *a INCORRECT *b CORRECT
51792
3.INSTALL NO. 2 STEP PLATE STAY
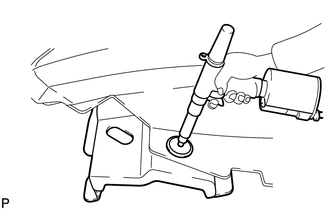
Install a nose piece to an air riveter or hand riveter.
Insert the mandrel part of a new rivet into the nose piece.
Using the riveter, install the No. 2 step plate stay as shown in the illustration.
- HINT:
-
If the rivet cannot be cut, pull it once and cut it.
- NOTICE:
- ·
1.229,1.115 1.083,1.646 1.083,1.646 1.24,2.208 false 1.073,1.646 0.802,1.646 false 1.771,0.906 2.052,1.656 2.052,1.656 1.792,2.531 false 2.063,1.667 2.344,1.667 false 2.271,0.604 2.469,0.802 0.198,0.198 10 false *a 2.167,2.448 2.385,2.646 0.219,0.198 10 false *b 0.604,1.573 0.792,1.771 0.188,0.198 10 false *1 2.406,1.583 2.625,1.802 0.219,0.219 10 false *2
Do not pry the rivet with the riveter, as this will cause damage to the riveter and mandrel.
Text in Illustration *1 Riveter *2 Mandrel *a INCORRECT *b CORRECT
·
2.325,0.536 2.513,0.713 0.188,0.177 10 *a 2.325,1.527 2.499,1.704 0.175,0.177 10 *a 2.434,2.73 2.634,2.907 0.200,0.177 10 *b 0.72,0.066 1.023,0.066 false 0.818,1.11 1.018,1.11 false 1.043,2.324 1.223,2.477 0.180,0.152 10 *1 1.043,1.044 1.223,1.196 0.180,0.152 10 *1 1.043,0.004 1.223,0.156 0.180,0.152 10 *1 0.818,2.402 1.018,2.402 false
Confirm that the rivet is seated properly against the No. 2 step plate stay.
Text in Illustration *1 Riveter *a INCORRECT *b CORRECT
·Do not tilt the riveter when installing the rivet to the No. 2 step plate stay.
·Do not leave any space between the rivet head and No. 2 step plate stay.
·
2.304,0.996 2.503,1.173 0.200,0.177 10 *a 2.408,2.434 2.619,2.611 0.211,0.177 10 *b 0.978,0.515 1.172,0.685 0.195,0.171 10 *1 0.735,0.603 0.941,0.603 false 0.973,2.023 1.182,2.194 0.208,0.171 10 *1 0.731,2.111 0.937,2.111 false
Do not leave any space between the No. 2 step plate stay and rear side step plate cover. Firmly hold together the 2 items while installing the rivet.
Text in Illustration *1 Riveter *a INCORRECT *b CORRECT
51782
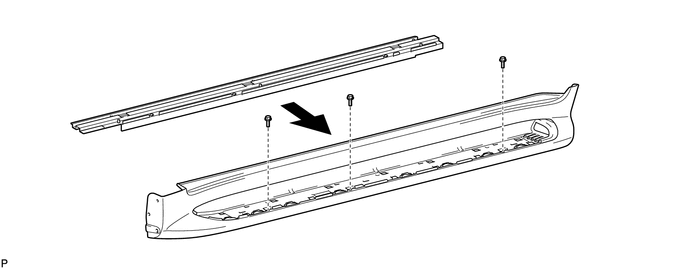
4.INSTALL STEP PANEL LH
Install the step panel LH with the 3 bolts.
- Torque:
- 5.0 N*m (51 kgf*cm, 44 in.*lbf)
51772D
5.INSTALL STEP PLATE LH
Attach the 16 clips to install the step plate LH.
81380D
6.INSTALL STEP LIGHT ASSEMBLY
Install the step light assembly with the screw.
82158B
7.INSTALL REAR STEP FLOOR WIRE LH
Attach the 4 clamps to install the rear step floor wire LH.
Connect the connector.
51797A
8.INSTALL NO. 3 SIDE STEP BRACKET LH
Install the No. 3 side step bracket LH with the 2 bolts.
- Torque:
- 5.0 N*m (51 kgf*cm, 44 in.*lbf)
51796
9.INSTALL NO. 2 SIDE STEP BRACKET LH
Install the No. 2 side step bracket LH with the 2 bolts.
- Torque:
- 5.0 N*m (51 kgf*cm, 44 in.*lbf)
Attach the clamp.
51793B
10.INSTALL NO. 1 SIDE STEP BRACKET LH
Install the No. 1 side step bracket LH with the 2 bolts.
- Torque:
- 5.0 N*m (51 kgf*cm, 44 in.*lbf)