LIGHTING (EXT) HEADLIGHT ASSEMBLY(for LED Headlight) REASSEMBLY
CAUTION / NOTICE / HINT
- NOTICE:
- ·
Handle components indoors as much as possible to prevent foreign matter from entering and adhering to headlight assembly components.
·Do not reuse parts which have reduced fastening ability due to thread damage.
·Do not touch the inner surface of the lens and metallic surfaces as much as possible, or they may become dirty.
·Do not allow metallic surfaces to become dirty, as such surfaces become damaged even if they are only lightly wiped with a soft cloth.
·When installing components, make sure that the wire harness is not pinched or pulled.
·Do not use solvent to clean components. Only clean them with a dry cloth.
- HINT:
- ·
Use the same procedure for the RH and LH sides.
·The procedure listed below is for the LH side.
PROCEDURE

 85669
1.INSTALL HEADLIGHT LEVELING MOTOR BASE PACKING
Install a new headlight leveling motor base packing to the headlight leveling motor LH.
85662
2.INSTALL HEADLIGHT LEVELING MOTOR LH
Insert and turn the headlight leveling motor LH clockwise to install it.
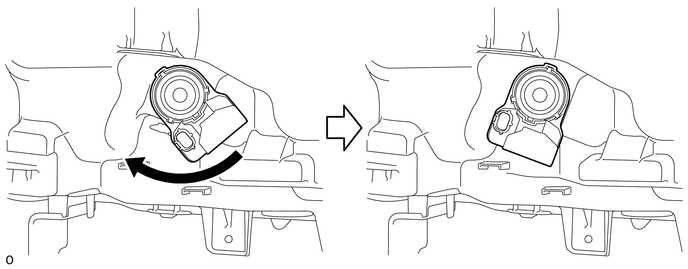
Connect the connector.
85967
3.INSTALL LIGHT CONTROL ECU
Connect the connector.
Install the light control ECU with the 2 screws.
81171A
4.INSTALL HEADLIGHT UNIT LH
- NOTICE:
- ·
Prevention of static electricity is required during this procedure.
·Use static electricity countermeasures SST (desktop anti-static mat set) and observe all precautions to prevent damage to the system by electrostatic discharge (ESD).
·Perform work using clean rubber gloves.
·Do not touch the headlight unit LH with bare hands.
·Do not allow metallic surfaces to become dirty, as such surfaces become damaged even if they are only lightly wiped with a soft cloth.
- SST
- 09890-47010 (09891-04010, 09891-04020, 09891-04030, 09891-04040)
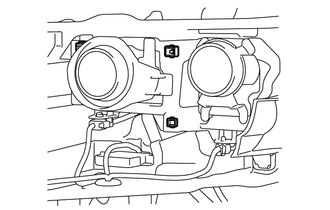
Set the headlight unit LH to the horizontal and vertical aiming screw.
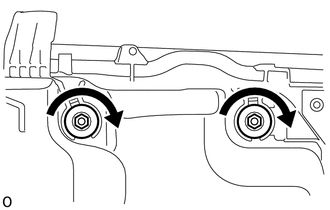
While holding the headlight unit LH with one hand so that it does not fall over, tighten the horizontal and vertical aiming screw 10 rotations until the headlight unit LH is connected.
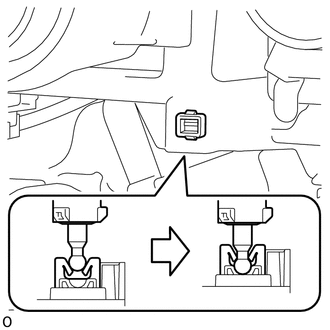
Lightly push the leveling motor joint to connect the leveling motor joint and headlight leveling motor LH.
Tighten the horizontal and vertical aiming screw until the protrusion amount is the same as that recorded.
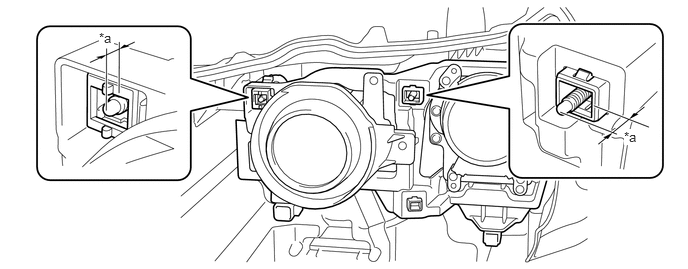
| *a | Protrusion Amount Measurement Area | - | - |
Connect the 2 connectors.
81132B
5.INSTALL HEADLIGHT LENS GASKET
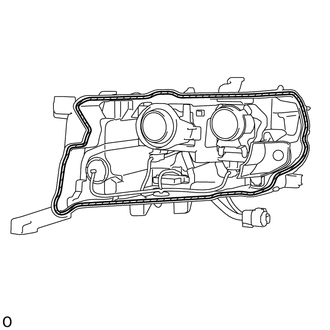
Clean the headlight lens gasket installation groove.

|
Area to Clean |
Prepare 2 screwdrivers, fold a piece of peeling paper over the tip of each screwdriver and fix the pieces of peeling paper in place with tape.
- HINT:
-
Use the peeling paper that is supplied with the headlight lens gasket.
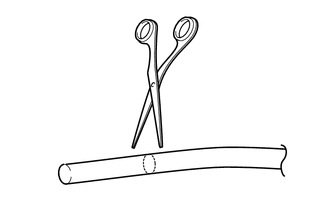
Using scissors, cut the headlight lens gasket at a 90°.
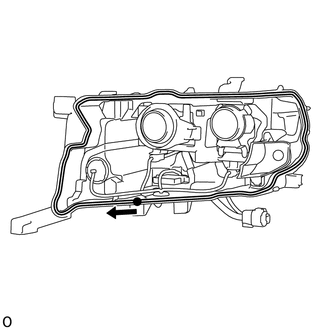
Starting from the position shown in the illustration, set the headlight lens gasket into the straight groove counterclockwise until it meets the corner groove.

|
Starting Point |
- NOTICE:
-
Lightly set the gasket in place without pulling.
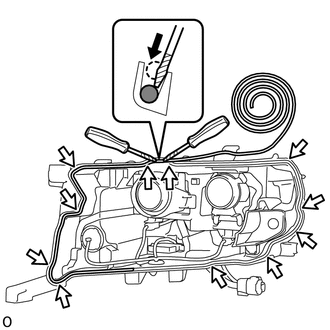
Set the headlight lens gasket into the corner groove and using 2 screwdrivers with their tips wrapped with peeling paper, push the gasket into the bottom of the groove.

|
Corner Groove |

|
Headlight Lens Gasket |
|
|
Peeling Paper |
- NOTICE:
- ·
Lightly set the gasket in place without pulling.
·If the headlight lens gasket is set while pulled, the gasket will be pushed up at the corner groove.
Repeat the following order while working in a circle back to the starting point.
Set headlight lens gasket into straight groove.
Push into bottom of groove.
Set into corner groove.
Push into bottom of groove.
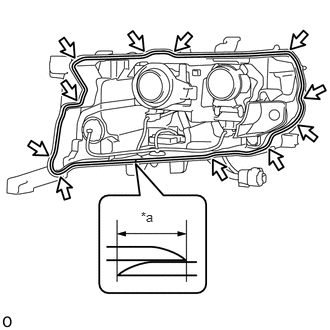
Using scissors, cut the headlight lens gasket at a 45°angle at the starting point so that the gasket overlaps itself 20 mm (0.7874 in.) and set the gasket in place.
| *a | 20 mm (0.7874 in.) |
|
|
Corner Groove |
Check the installation condition of the headlight lens gasket.
- OK:
Gasket not pushed up or protruding.
No gap where gasket overlaps.
- NOTICE:
-
Check the corners carefully since the gasket can easily become pushed up in those areas.
81171B
6.INSTALL HEADLIGHT LENS LH
- NOTICE:
- ·
Perform work using clean rubber gloves.
·Use static electricity countermeasures SST (desktop anti-static mat set) and observe all precautions to prevent damage to the system by electrostatic discharge (ESD).
·Do not touch the inner surface of the lens with bare hands.
·If dirty, lightly wipe with a soft cloth.
·Prevention of static electricity is required during this procedure.
- SST
- 09890-47010 (09891-04010, 09891-04020, 09891-04030, 09891-04040)
Clean the headlight lens gasket contact surface.
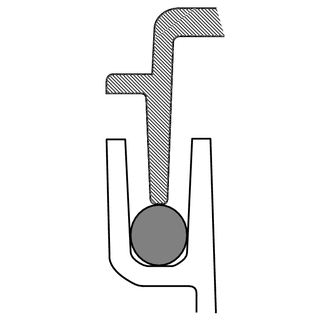
Set the headlight lens LH in place.
- NOTICE:
-
Set the headlight lens LH in the middle of the headlight lens gasket as shown in the illustration.
Text in Illustration
Headlight Lens Gasket 
Head Light Housing
Headlight Lens LH
Check that the entire circumference of the headlight lens LH is positioned above the middle of the headlight lens gasket.
Attach the claws in the following order to install the headlight lens LH: The 2 claws D, 2 claws C, claw B, and then 2 claws A.
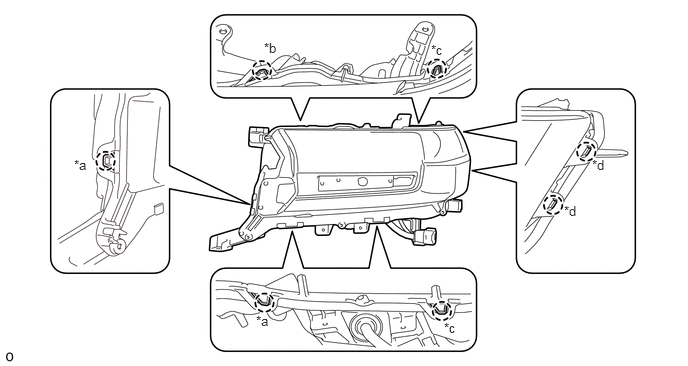
| *a | Claw A | *b | Claw B |
| *c | Claw C | *d | Claw D |
Install the 7 screws.
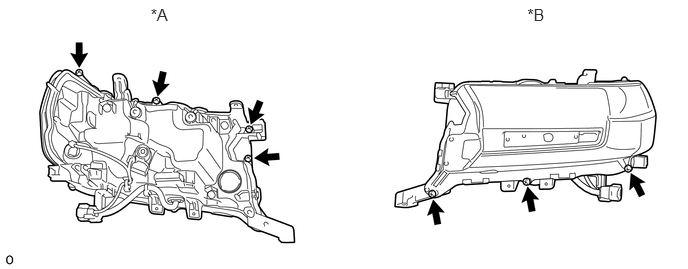
| *A | Headlight Assembly LH Backside | *B | Headlight Assembly LH Surface |
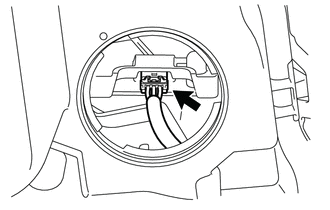
Connect the connector.
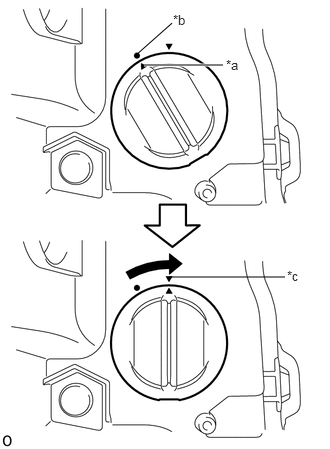
Align the matchmark of the locking cap with the unlock position mark, and then rotate the locking cap clockwise until the lock position mark to install the locking cap.
| *a | Matchmark |
| *b | Unlock Position Mark |
| *c | Lock Position Mark |
Install the outer bracket with the 2 screws.
Install the inner bracket with the 2 screws.
52134J
7.INSTALL FRONT BUMPER BAR REINFORCEMENT LH
Attach the 2 guides to install the front bumper bar reinforcement LH.
Install the 2 screws.
81158
8.INSTALL HEADLIGHT BRACKET LH
Install the headlight bracket LH with the 3 screws.
81156A
9.INSTALL HEADLIGHT BRACKET LH
Install the headlight bracket LH with the 3 screws.
81515B
10.INSTALL FRONT TURN SIGNAL LIGHT SOCKET
Connect the connector to install the front turn signal light socket.
81510C
11.INSTALL FRONT TURN SIGNAL LIGHT BULB
Install the front turn signal light bulb to the front turn signal light socket.
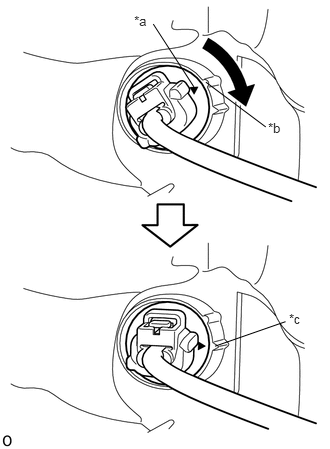
Align the matchmark of the front turn signal light socket with the unlock position mark, and then rotate the front turn signal light socket clockwise until the lock position mark to connect the front turn signal light socket.
| *a | Matchmark |
| *b | Unlock Position Mark |
| *c | Lock Position Mark |
81194A
12.INSTALL HEADLIGHT PROTECTOR LH
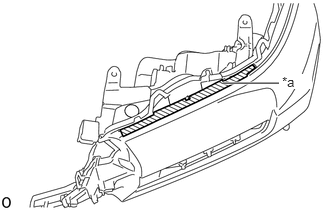
Clean the installation area of the headlight protector LH shown in the illustration.
- NOTICE:
-
Remove any remaining double-sided tape, and then clean the area with non-residue solvent.
| *a | Cleaning Area |
Remove approximately 30 mm (1.18 in.) of the release paper from a new headlight protector LH.
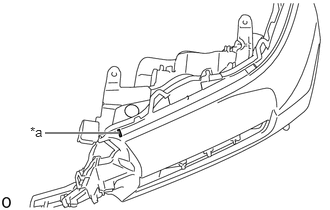
Align the exposed end of the headlight protector LH with the line.
| *a | Line |
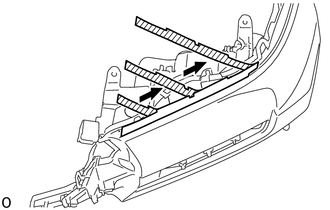
Gradually remove the release paper and temporarily install the headlight protector LH while keeping it aligned with the curve of the headlight unit assembly.
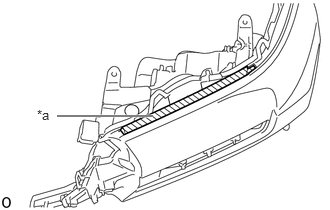
Press the entire length of the headlight protector LH to install it.
- NOTICE:
-
When pressing, do not slide your finger, as doing so may stretch the part.
| *a | Press Area |