SEAT FRONT POWER SEAT CONTROL SYSTEM(w/ Memory) B2652 Front Vertical Sensor Malfunction
DESCRIPTION
When the position control ECU assembly does not receive a front vertical motor position sensor signal despite the seat having been moved upward or downward by power seat motor operation, this DTC is stored.
| DTC No. | Detection Item | DTC Detection Condition | Trouble Area | DTC Output from | Priority |
|---|---|---|---|---|---|
| B2652 | Front Vertical Sensor Malfunction | Front vertical motor position sensor signal not received when power seat moved upward or downward |
·
Position control ECU assembly
·
Front vertical motor (front seat adjuster assembly LH) (for LHD)
·
Front vertical motor (front seat adjuster assembly RH) (for RHD)
·
Harness or connector |
Driver Seat | A |
WIRING DIAGRAM
for LHD:
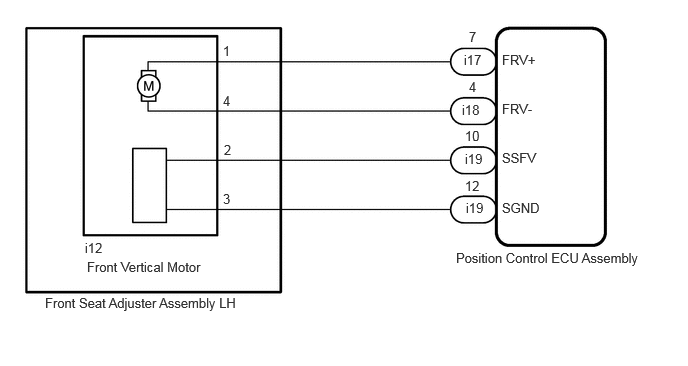
for RHD:
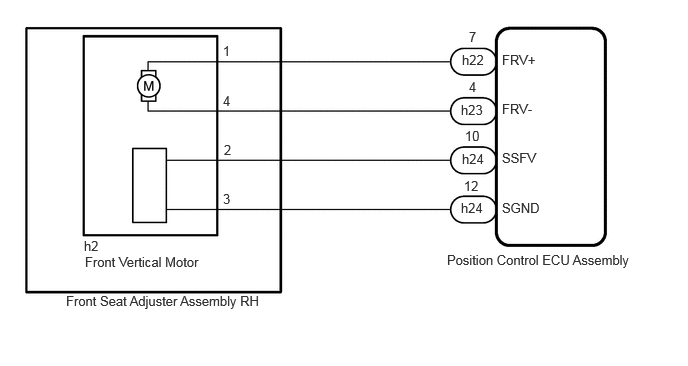
CAUTION / NOTICE / HINT
- NOTICE:
-
Initializing the position control ECU assembly will clear the seat position memory.
- HINT:
-
Make sure to initialize the position control ECU assembly after replacing the seat assembly or any related parts (including removal and installation).
-
Click hereVehicle Interior>SEAT>FRONT POWER SEAT CONTROL SYSTEM (w/ Memory)>REGISTRATION
PROCEDURE
Check the vehicle type.
- Result:
-
Result Proceed to for LHD A for RHD B
A
B
Clear the DTCs.
- Body Electrical > Driver Seat > Clear DTCs
- 50002 162
- Result:
-
Proceed to NEXT
NEXT
Check for DTCs.
- Body Electrical > Driver Seat > Trouble Codes
- 50001 162
- Result:
-
Result Proceed to B2652 is not output A B2652 is output B
A
Click hereGeneral>INTRODUCTION>HOW TO TROUBLESHOOT ECU CONTROLLED SYSTEMS>HOW TO PROCEED WITH TROUBLESHOOTING
B
Perform the Active Test according to the display on the GTS.
- Body Electrical > Driver Seat > Active Test
-
Tester Display Measurement Item Control Range Diagnostic Note Front Vertical Operation Seat front vertical operation OFF/Down/Up -
- Body Electrical > Driver Seat > Active Test
-
Tester Display Front Vertical Operation - 50004 162 3
- OK:
-
Front vertical motor operates normally.
- Result:
-
Proceed to OK NG
OK
NG
Pre-procedure1
Disconnect the i12 front vertical motor (front seat adjuster assembly LH) connector.
Procedure1
Measure the voltage according to the value(s) in the table below.
- Standard Voltage:
-
Tester Connection Condition Specified Condition Click Location & Routing(i12)Location & Routingewd_type=routing;type=c;code=i12
Click Connector(i12)Seat>Front Seat Wire LH>Power Seat Tilt Motor LH (Front Seat Adjuster Assembly LH)ewd_type=component;type=c;code=i12;pinno=2,3
i12-2 - i12-3 Front vertical switch on 4.8 to 5.1 V
- Result:
-
Proceed to OK NG
Post-procedure1
None
OK
NG
Measure the voltage according to the value(s) in the table below.
- Standard Voltage:
-
Tester Connection Condition Specified Condition Click Location & Routing(i12)Location & Routingewd_type=routing;type=c;code=i12
Click Connector(i12)Seat>Front Seat Wire LH>Power Seat Tilt Motor LH (Front Seat Adjuster Assembly LH)ewd_type=component;type=c;code=i12;pinno=2
i12-2 - Body ground Front vertical motor operating 4.5 to 4.8 V
- Result:
-
Proceed to OK NG
OK
NG
Pre-procedure1
Disconnect the i19 position control ECU assembly connector.
Disconnect the i12 front vertical motor (front seat adjuster assembly LH) connector.
Procedure1
Measure the resistance according to the value(s) in the table below.
- Standard Resistance:
-
Tester Connection Condition Specified Condition Click Location & Routing(i19,i12)Location & Routingewd_type=routing;type=c,c;code=i19,i12
Click Connector(i19)Seat>Front Seat Wire LH>Front Position Control ECU Assembly LHewd_type=component;type=c;code=i19;pinno=10,12
Click Connector(i12)Seat>Front Seat Wire LH>Power Seat Tilt Motor LH (Front Seat Adjuster Assembly LH)ewd_type=component;type=c;code=i12;pinno=2,3
i19-10 (SSFV) - i12-2 Always Below 1 Ω i19-10 (SSFV) or i12-2 - Body ground Always 10 kΩ or higher i19-12 (SGND) - i12-3 Always Below 1 Ω i19-12 (SGND) or i12-3 - Body ground Always 10 kΩ or higher
- Result:
-
Proceed to OK NG
Post-procedure1
None
OK
NG
Click hereVehicle Interior>SEAT>FRONT SEAT ASSEMBLY (for Power Seat)>INSPECTION
- Result:
-
Proceed to OK NG
OK
NG
Pre-procedure1
Disconnect the i17 and i18 position control ECU assembly connectors.
Disconnect the i12 front vertical motor (front seat adjuster assembly LH) connector.
Procedure1
Measure the resistance according to the value(s) in the table below.
- Standard Resistance:
-
Tester Connection Condition Specified Condition Click Location & Routing(i17,i12,i18)Location & Routingewd_type=routing;type=c,c,c;code=i17,i12,i18
Click Connector(i17)Seat>Front Seat Wire LH>Front Position Control ECU Assembly LHewd_type=component;type=c;code=i17;pinno=7
Click Connector(i12)Seat>Front Seat Wire LH>Power Seat Tilt Motor LH (Front Seat Adjuster Assembly LH)ewd_type=component;type=c;code=i12;pinno=1,4
Click Connector(i18)Seat>Front Seat Wire LH>Front Position Control ECU Assembly LHewd_type=component;type=c;code=i18;pinno=4
i17-7 (FRV+) - i12-1 Always Below 1 Ω i17-7 (FRV+) or i12-1 - Body ground Always 10 kΩ or higher i18-4 (FRV-) - i12-4 Always Below 1 Ω i18-4 (FRV-) or i12-4 - Body ground Always 10 kΩ or higher
- Result:
-
Proceed to OK NG
Post-procedure1
None
OK
NG
Clear the DTCs.
- Body Electrical > Driver Seat > Clear DTCs
- 50002 162
- Result:
-
Proceed to NEXT
NEXT
Check for DTCs.
- Body Electrical > Driver Seat > Trouble Codes
- 50001 162
- Result:
-
Result Proceed to B2652 is not output A B2652 is output B
A
Click hereGeneral>INTRODUCTION>HOW TO TROUBLESHOOT ECU CONTROLLED SYSTEMS>HOW TO PROCEED WITH TROUBLESHOOTING
B
Perform the Active Test according to the display on the GTS.
- Body Electrical > Driver Seat > Active Test
-
Tester Display Measurement Item Control Range Diagnostic Note Front Vertical Operation Seat front vertical operation OFF/Down/Up -
- Body Electrical > Driver Seat > Active Test
-
Tester Display Front Vertical Operation - 50004 162 3
- OK:
-
Front vertical motor operates normally.
- Result:
-
Proceed to OK NG
OK
NG
Pre-procedure1
Disconnect the h2 front vertical motor (front seat adjuster assembly RH) connector.
Procedure1
Measure the voltage according to the value(s) in the table below.
- Standard Voltage:
-
Tester Connection Condition Specified Condition Click Location & Routing(h2)Location & Routingewd_type=routing;type=c;code=h2
Click Connector(h2)Seat>Front Seat Wire RH>Power Seat Tilt Motor RH (Front Seat Adjuster Assembly RH)ewd_type=component;type=c;code=h2;pinno=2,3
h2-2 - h2-3 Front vertical switch on 4.8 to 5.1 V
- Result:
-
Proceed to OK NG
Post-procedure1
None
OK
NG
Measure the voltage according to the value(s) in the table below.
- Standard Voltage:
-
Tester Connection Condition Specified Condition Click Location & Routing(h2)Location & Routingewd_type=routing;type=c;code=h2
Click Connector(h2)Seat>Front Seat Wire RH>Power Seat Tilt Motor RH (Front Seat Adjuster Assembly RH)ewd_type=component;type=c;code=h2;pinno=2
h2-2 - Body ground Front vertical motor operating 4.5 to 4.8 V
- Result:
-
Proceed to OK NG
OK
NG
Pre-procedure1
Disconnect the h24 position control ECU assembly connector.
Disconnect the h2 front vertical motor (front seat adjuster assembly RH) connector.
Procedure1
Measure the resistance according to the value(s) in the table below.
- Standard Resistance:
-
Tester Connection Condition Specified Condition Click Location & Routing(h24,h2)Location & Routingewd_type=routing;type=c,c;code=h24,h2
Click Connector(h24)Seat>Front Seat Wire RH>Front Position Control ECU Assembly RHewd_type=component;type=c;code=h24;pinno=10,12
Click Connector(h2)Seat>Front Seat Wire RH>Power Seat Tilt Motor RH (Front Seat Adjuster Assembly RH)ewd_type=component;type=c;code=h2;pinno=2,3
h24-10 (SSFV) - h2-2 Always Below 1 Ω h24-10 (SSFV) or h2-2 - Body ground Always 10 kΩ or higher h24-12 (SGND) - h2-3 Always Below 1 Ω h24-12 (SGND) or h2-3 - Body ground Always 10 kΩ or higher
- Result:
-
Proceed to OK NG
Post-procedure1
None
OK
NG
Click hereVehicle Interior>SEAT>FRONT SEAT ASSEMBLY (for Power Seat)>INSPECTION
- Result:
-
Proceed to OK NG
OK
NG
Pre-procedure1
Disconnect the h22 and h23 position control ECU assembly connectors.
Disconnect the h2 front vertical motor (front seat adjuster assembly RH) connector.
Procedure1
Measure the resistance according to the value(s) in the table below.
- Standard Resistance:
-
Tester Connection Condition Specified Condition Click Location & Routing(h22,h2,h23)Location & Routingewd_type=routing;type=c,c,c;code=h22,h2,h23
Click Connector(h22)Seat>Front Seat Wire RH>Front Position Control ECU Assembly RHewd_type=component;type=c;code=h22;pinno=7
Click Connector(h2)Seat>Front Seat Wire RH>Power Seat Tilt Motor RH (Front Seat Adjuster Assembly RH)ewd_type=component;type=c;code=h2;pinno=1,4
Click Connector(h23)Seat>Front Seat Wire RH>Front Position Control ECU Assembly RHewd_type=component;type=c;code=h23;pinno=4
h22-7 (FRV+) - h2-1 Always Below 1 Ω h22-7 (FRV+) or h2-1 - Body ground Always 10 kΩ or higher h23-4 (FRV-) - h2-4 Always Below 1 Ω h23-4 (FRV-) or h2-4 - Body ground Always 10 kΩ or higher
- Result:
-
Proceed to OK NG
Post-procedure1
None
OK
NG