HEATING / AIR CONDITIONING PTC HEATER ASSEMBLY INSTALLATION
CAUTION / NOTICE / HINT
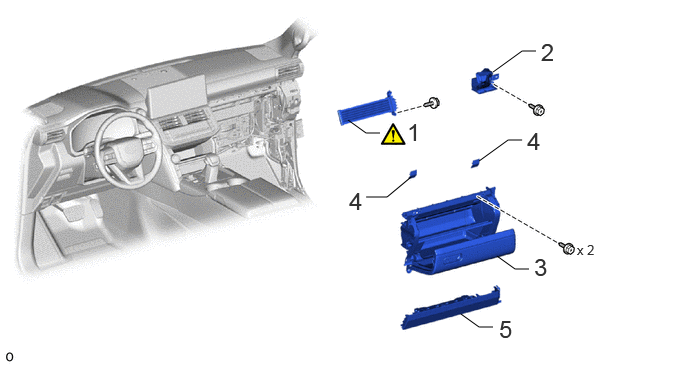
| Procedure | Part Name Code |

|

|

|
|
|---|---|---|---|---|---|
| 1 | QUICK HEATER ASSEMBLY | 87710G | ( ) |
- | - |
| 2 | NO. 1 AIR DUCT SUB-ASSEMBLY | 87201 | - | - | - |
| 3 | LOWER NO. 2 INSTRUMENT PANEL ASSEMBLY | 55320 | - | - | - |
| 4 | INSTRUMENT PANEL BOX DOOR COVER | 55443A | - | - | - |
| 5 | LOWER NO. 2 INSTRUMENT PANEL AIRBAG ASSEMBLY | 73990 | - | - | - |
CAUTION / NOTICE / HINT
- HINT:
-
·
Use the same procedure for RHD and LHD vehicles.
·The procedure listed below is for LHD vehicles.
·A bolt without a torque specification is shown in the standard bolt chart.
Click hereGeneral>SPECIFICATIONS>STANDARD BOLT>SPECIFIED TORQUE FOR STANDARD BOLTS
PROCEDURE

 87710G 1.INSTALL QUICK HEATER ASSEMBLY
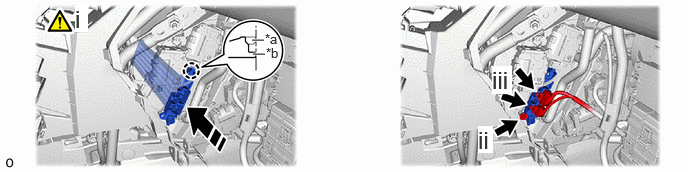
| *a | Heater Case Fitting Surface | *b | Quick Heater Claw |

|
Install in this Direction | - | - |
Insert the quick heater assembly into the heater case and attach the claw as shown in the illustration.
- NOTICE:
-
·
 0.677,1.646 0.677,1 true 0.188,1.646 0.188,0.896 0.188,0.896 0.5,0.896 true 0.604,1.667 0.917,1.865 0.313,0.198 10 false *a 0.115,1.667 0.427,1.865 0.313,0.198 10 false *b
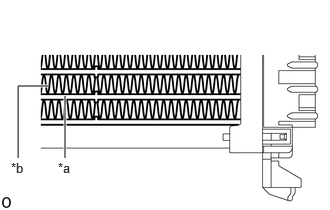
*a Element *b Fin
Do not hold the quick heater assembly by the element or fin. Also, do not damage the quick heater assembly.
·Foul odors may occur due to oil adhering to the quick heater assembly.
·Check that the heights of the claw fitting surface on the heater case and the claw of the quick heater assembly are aligned.
- HINT:
-
 1.885,0.458 2.552,0.458 true 1.792,2.885 2.458,2.885 true 2.594,0.365 2.906,0.563 0.313,0.198 10 false *a 2.5,2.781 2.813,2.979 0.313,0.198 10 false *a 0.104,0.073 0.448,0.292 0.344,0.219 12 false *A 0.104,2.458 0.448,2.677 0.344,0.219 12 false *B
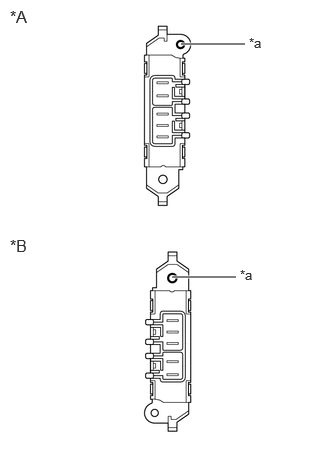
*A for RHD *B for LHD *a Screw Insertion Hole
-
If the claws of the quick heater assembly are damaged, install the quick heater assembly with screw (90159-60431).
Install the quick heater assembly with the screw.
Connect the 2 connectors.
87201 2.INSTALL NO. 1 AIR DUCT SUB-ASSEMBLY
55320 3.INSTALL LOWER NO. 2 INSTRUMENT PANEL ASSEMBLY
55443A 4.INSTALL INSTRUMENT PANEL BOX DOOR COVER
73990 5.INSTALL LOWER NO. 2 INSTRUMENT PANEL AIRBAG ASSEMBLY