HEATING / AIR CONDITIONING REAR COOLING UNIT REASSEMBLY
CAUTION / NOTICE / HINT
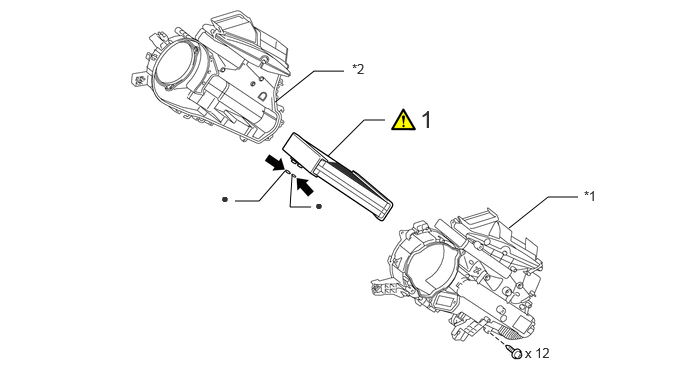
| Procedure | Part Name Code |

|

|

|
|
|---|---|---|---|---|---|
| 1 | EVAPORATOR SUB-ASSEMBLY (REAR) | 88501R | ( ) |
- | - |
| *1 | COOLING UNIT CASE LH | *2 | COOLING UNIT CASE RH |
| ● | Non-reusable part |

|
Compressor oil ND-OIL 8 or equivalent |
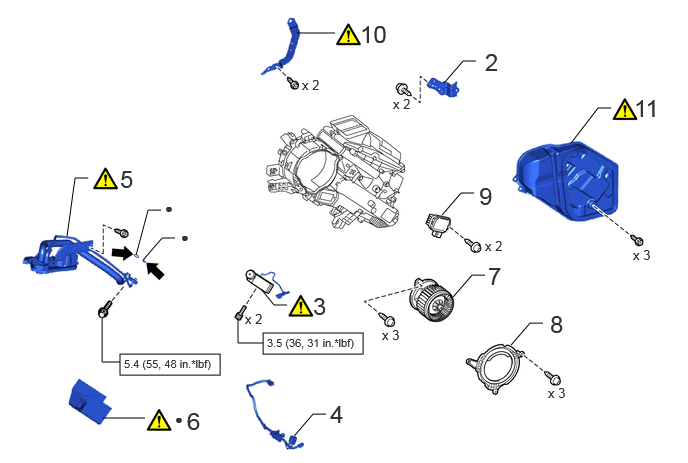
| Procedure | Part Name Code |
|
|
|
|
|---|---|---|---|---|---|
| 2 | REAR NO. 1 AIR CONDITIONING UNIT BRACKET | 88F88G | - | - | - |
| 3 | REAR COOLING UNIT EXPANSION VALVE | 88515B | () |
- | - |
| 4 | NO. 1 COOLER WIRING HARNESS SUB-ASSEMBLY | 88605 | - | - | - |
| 5 | NO. 6 AIR CONDITIONING TUBE AND ACCESSORY ASSEMBLY | 88G10B | () |
- | - |
| 6 | REAR NO. 1 AIR CONDITIONING UNIT PACKING | 88561P | () |
- | - |
| 7 | REAR BLOWER MOTOR WITH FAN SUB-ASSEMBLY | 87103D | - | - | - |
| 8 | HEATER BLOWER COVER | 87236C | - | - | - |
| 9 | BLOWER MOTOR CONTROL | 87165C | - | - | - |
| 10 | BRACKET | 88688Z | () |
- | - |
| 11 | REAR NO. 2 SIDE AIR DUCT | 87217E | () |
- | - |

|
N*m (kgf*cm, ft.*lbf): Specified torque | ● | Non-reusable part |
|
|
Compressor oil ND-OIL 8 or equivalent | - | - |
PROCEDURE

 88501R 1.INSTALL EVAPORATOR SUB-ASSEMBLY (REAR)

|
Install in this Direction | - | - |
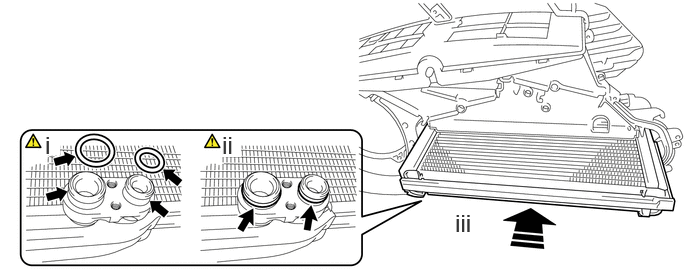
Remove the vinyl tape from the air conditioning tube assembly and then apply a sufficient amount of compressor oil to 2 new O-rings and the fitting surface of the evaporator sub-assembly (rear).
- Compressor Oil:
-
ND-OIL 8 or equivalent
Install the 2 O-rings to the evaporator sub-assembly (rear).
- NOTICE:
-
Keep the O-rings and O-ring fitting surfaces free of foreign matter.
Install the evaporator sub-assembly (rear) as shown in the illustration.
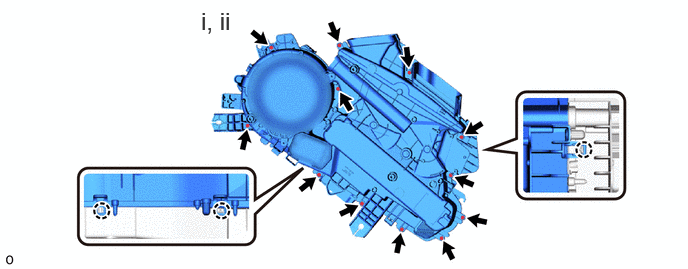
Attach the claw and install the cooling unit case LH.
Install the 12 screws.
88F88G 2.INSTALL REAR NO. 1 AIR CONDITIONING UNIT BRACKET
88515B 3.INSTALL REAR COOLING UNIT EXPANSION VALVE

Remove the vinyl tape from the rear cooling unit expansion valve.
Using a 4 mm hexagon socket wrench, install the rear cooling unit expansion valve with the 2 hexagon bolts.
- Torque:
- 3.5 N*m (36 kgf*cm, 31 in.*lbf)
- NOTICE:
-
Make sure not to cut the O-ring while installing it. (Cut O-rings cannot be installed.)
Attach the clamp.
88605 4.INSTALL NO. 1 COOLER WIRING HARNESS SUB-ASSEMBLY
88G10B 5.INSTALL NO. 6 AIR CONDITIONING TUBE AND ACCESSORY ASSEMBLY
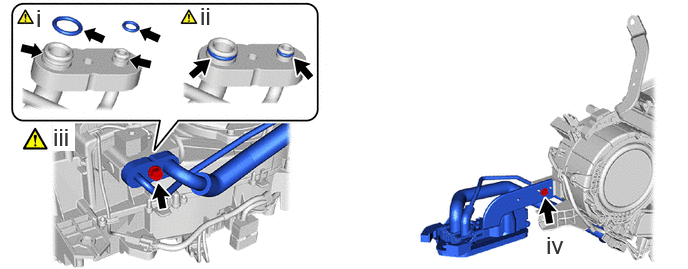
Remove the vinyl tape from the No. 6 air conditioning tube and accessory assembly and then apply a sufficient amount of compressor oil to 2 new O-rings and the fitting surface of the rear cooling unit expansion valve and No. 6 air conditioning tube and accessory assembly.
- Compressor Oil:
-
ND-OIL 8 or equivalent
Install the 2 O-rings to the No. 6 air conditioning tube and accessory assembly.
- NOTICE:
-
Keep the O-rings and O-ring fitting surfaces free of foreign matter.
Install the No. 6 air conditioning tube and accessory assembly with the bolt.
- Torque:
- 5.4 N*m (55 kgf*cm, 48 in.*lbf)
- NOTICE:
-
Make sure not to cut the O-ring while installing it. (Cut O-rings cannot be installed.)
Install the screw.
88561P 6.INSTALL REAR NO. 1 AIR CONDITIONING UNIT PACKING
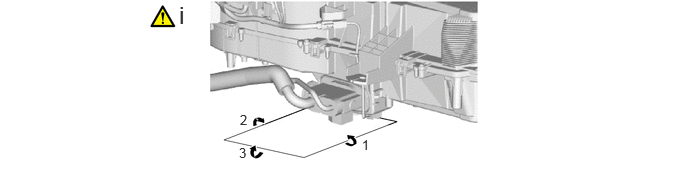
Apply the rear No. 1 air conditioning unit packing in the order shown in the illustration so that the piping section is not exposed.
87103D 7.INSTALL REAR BLOWER MOTOR WITH FAN SUB-ASSEMBLY
87236C 8.INSTALL HEATER BLOWER COVER
87165C 9.INSTALL BLOWER MOTOR CONTROL
88688Z 10.INSTALL BRACKET

Install the bracket with the 2 screws in the order shown in the illustration.
87217E 11.INSTALL REAR NO. 2 SIDE AIR DUCT

Align the guide and install the rear No. 2 side air duct with the 3 screws in the order shown in the illustration.