HEATING / AIR CONDITIONING BLOWER UNIT REASSEMBLY
CAUTION / NOTICE / HINT
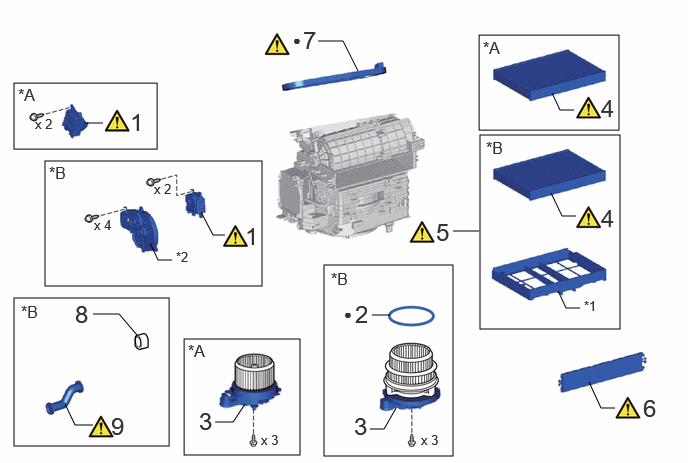
| Procedure | Part Name Code |

|

|

|
|
|---|---|---|---|---|---|
| 1 | NO. 1 BLOWER DAMPER SERVO SUB-ASSEMBLY | 87130K | ( ) |
- | - |
| 2 | NO. 1 BLOWER MOTOR SUB-ASSEMBLY PACKING | 87127C | - | - | - |
| 3 | BLOWER MOTOR WITH FAN SUB-ASSEMBLY | 87103B | - | - | - |
| 4 | CLEAN AIR FILTER | 87139C | () |
- | - |
| 5 | AIR FILTER SUB-ASSEMBLY | - | () |
- | - |
| 6 | AIR FILTER COVER PLATE | 88899M | () |
- | - |
| 7 | NO. 1 COOLER UNIT PACKING | 87429B | () |
- | - |
| 8 | NO. 3 COOLER UNIT DRAIN HOSE | 88539E | - | - | - |
| 9 | NO. 2 COOLER UNIT DRAIN HOSE | 88539C | () |
- | - |
| *A | for 1-tier Type | *B | for 2-tier Type |
| *1 | COOLING UNIT PARTS | *2 | COVER PLATE |
| ● | Non-reusable part | - | - |
CAUTION / NOTICE / HINT
- HINT:
-
·
Use the same procedure for RHD and LHD vehicles.
·The procedure listed below is for LHD vehicles.
PROCEDURE

 87130K 1.INSTALL NO. 1 BLOWER DAMPER SERVO SUB-ASSEMBLY
for 1-tier Type:
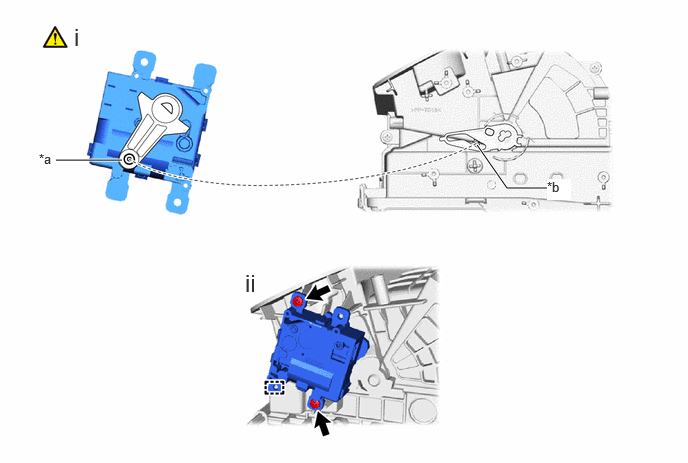
| *a | Link | *b | Hole |
Connect the link of the blower assembly to the hole on the plate of the No. 1 blower damper servo sub-assembly as shown in the illustration.
Attach the guide and install the No. 1 blower damper servo sub-assembly with the 2 screws.
for 2-tier Type:
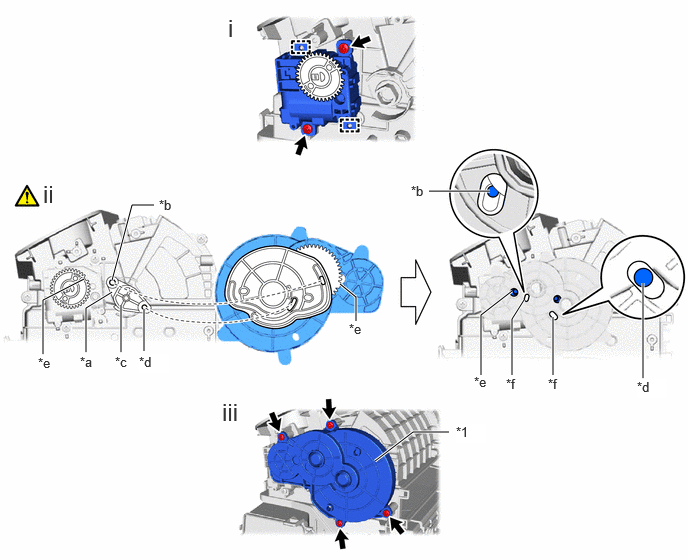
| *1 | Cover Plate | - | - |
| *a | Upper Fan Door Lever | *b | Fitting Surface of Upper Fan Door Lever |
| *c | Lower Fan Door Lever | *d | Fitting Surface of Lower Fan Door Lever |
| *e | Gears of cover plate and No. 1 blower damper servo sub-assembly aligned in standard position. | *f | Check Hole |
Attach the guide and install the No. 1 blower damper servo sub-assembly with the 2 screws.
With the gears of the cover plate and No. 1 blower damper servo sub-assembly aligned in the standard position as shown in the illustration, attach the cover plate to the guide while moving the lever so that the point of engagement on the upper fan door lever and the point of engagement of the lower fan door lever enter the check holes.
- NOTICE:
-
The upper fan door lever engagement cannot be checked from point of engagement with the check hole on the front surface of the cover plate. Therefore, look through the gap to check the engagement.
Install the cover plate with the 4 screws.
87127C 2.INSTALL NO. 1 BLOWER MOTOR SUB-ASSEMBLY PACKING (for 2-tier Type)
87103B 3.INSTALL BLOWER MOTOR WITH FAN SUB-ASSEMBLY
87139C 4.INSTALL CLEAN AIR FILTER
for 1-tier Type:
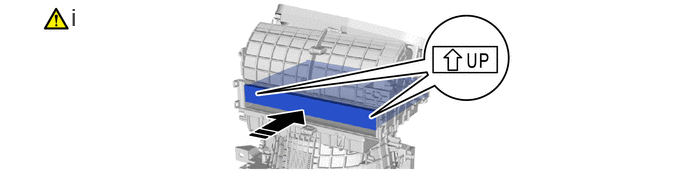

|
Install in this Direction | - | - |
Install the clean air filter as shown in the illustration.
- NOTICE:
-
Insert it with the arrow of the UP mark facing upward.
for 2-tier Type:
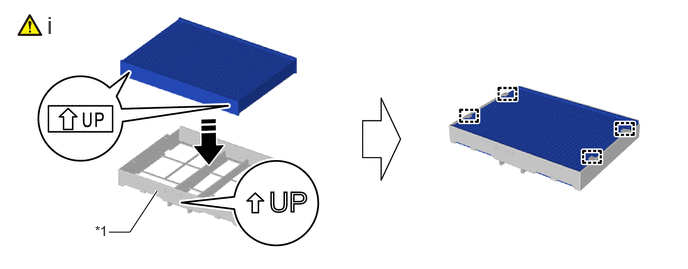
| *1 | Cooling Unit Parts | - | - |
|
|
Install in this Direction | - | - |
Attach the guide and install the clean air filter to the cooling unit parts as shown in the illustration.
- NOTICE:
-
Align with the direction of the UP mark and install.
5.INSTALL AIR FILTER SUB-ASSEMBLY (for 2-tier Type)

|
|
Install in this Direction | - | - |
Install the air filter sub-assembly as shown in the illustration.
- NOTICE:
-
Insert it with the arrow of the UP mark facing upward.
88899M 6.INSTALL AIR FILTER COVER PLATE
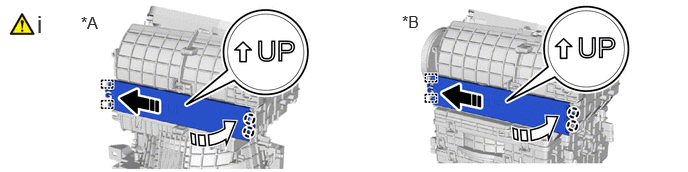
| *A | for 1-tier Type | *B | for 2-tier Type |
|
|
Install in this Direction (1) |

|
Install in this Direction (2) |
Attach the guide and claw and install the air filter cover plate as shown in the illustration.
- NOTICE:
-
Insert it with the arrow of the UP mark facing upward.
87429B 7.INSTALL NO. 1 COOLER UNIT PACKING
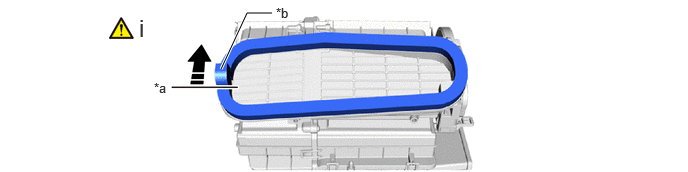
| *a | Reference Line | *b | Wrap Portion |
|
|
Apply in this Direction | - | - |
Remove the peeling paper on a new No. 1 cooler unit packing trying not to touch the adhesional surface and install it to the blower assembly.
- NOTICE:
-
·
Check that any remaining No. 1 cooler unit packing has been completely removed from the blower assembly.
·Attach so that there are no gaps in the entire circumference.
·Start application from the reference line and follow the direction of the arrow.
·Wrap and attach the No. 1 cooler unit packing. Do not cut it.
88539E 8.INSTALL NO. 3 COOLER UNIT DRAIN HOSE (for 2-tier Type)
88539C 9.INSTALL NO. 2 COOLER UNIT DRAIN HOSE (for 2-tier Type)
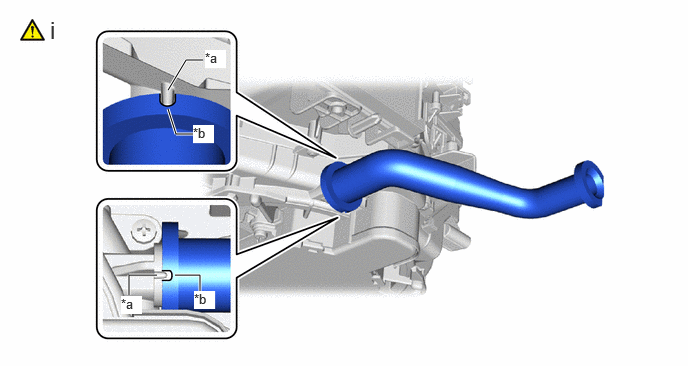
| *a | Protrusion | *b | Cutout |
Align the cutout of the No. 2 cooler unit drain hose with the protrusion of the heater case and install the No. 2 cooler unit drain hose.