EXTERIOR PANELS / TRIM ROOF CARRIER REASSEMBLY
CAUTION / NOTICE / HINT
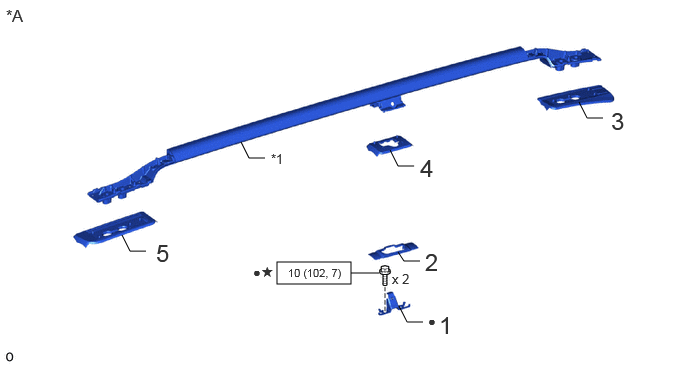
| Procedure | Part Name Code |

|

|

|
|
|---|---|---|---|---|---|
| 1 | NO. 2 ROOF DRIP SIDE FINISH MOULDING RETAINER | 75564B | - | - | - |
| 2 | ROOF RACK COVER | 63419A | - | - | - |
| 3 | REAR ROOF RACK LEG CUSHION LH | 63489 | - | - | - |
| 4 | CENTER ROOF RACK LEG CUSHION LH | 63485A | - | - | - |
| 5 | FRONT ROOF RACK LEG CUSHION LH | 63487A | - | - | - |
| *A | for Type A | - | - |
| *1 | ROOF CARRIER | - | - |

|
N*m (kgf*cm, ft.*lbf): Specified torque | ● | Non-reusable part |
| ★ | Precoated part | - | - |
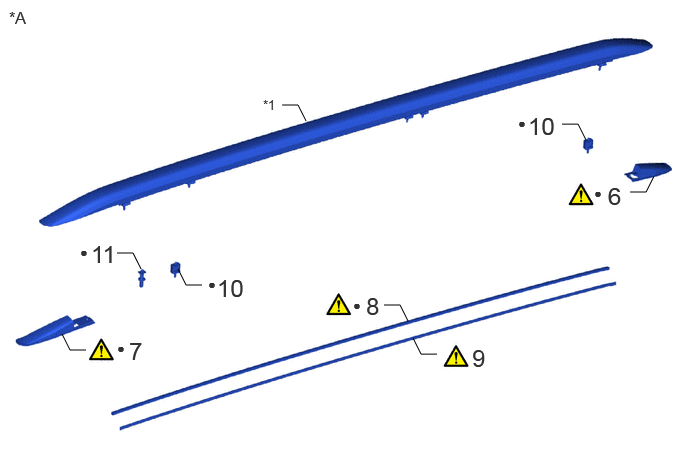
| Procedure | Part Name Code |
|
|
|
|
|---|---|---|---|---|---|
| 6 | REAR ROOF RACK LEG CUSHION LH | 63489 | ( ) |
- | - |
| 7 | FRONT ROOF RACK LEG CUSHION LH | 63487A | () |
- | - |
| 8 | NO. 1 ROOF CARRIER PROTECTOR | 63444 | () |
- | - |
| 9 | NO. 2 ROOF CARRIER PROTECTOR | 63445 | () |
- | - |
| 10 | REAR ROOF RACK RETAINER LH | 63454F | - | - | - |
| 11 | FRONT ROOF RACK RETAINER LH | 63453F | - | - | - |
| *A | for Type B | - | - |
| *1 | ROOF CARRIER BAR LH | - | - |
| ● | Non-reusable part | - | - |
PROCEDURE

 75564B 1.INSTALL NO. 2 ROOF DRIP SIDE FINISH MOULDING RETAINER (for Type A)
- Torque:
- 10 N*m (102 kgf*cm, 7 ft.*lbf)
63419A 2.INSTALL ROOF RACK COVER (for Type A)
63489 3.INSTALL REAR ROOF RACK LEG CUSHION LH (for Type A)
63485A 4.INSTALL CENTER ROOF RACK LEG CUSHION LH (for Type A)
63487A 5.INSTALL FRONT ROOF RACK LEG CUSHION LH (for Type A)
63489 6.INSTALL REAR ROOF RACK LEG CUSHION LH (for Type B)
|
|
|
- Standard Value:
-
Part Temperature Roof Carrier Bar LH 40 to 60°C (104 to 140°F) Rear Roof Rack Leg Cushion LH 20 to 30°C (68 to 86°F)
- CAUTION:
-
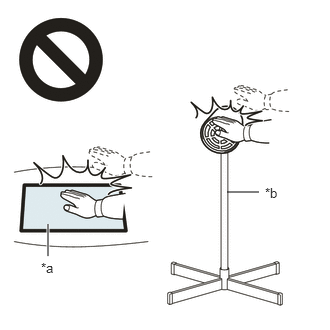 2.365,2 2.698,2 false 0.5,2.333 0.5,2.667 true 0.427,2.708 0.74,2.865 0.313,0.156 10 false *a 2.76,1.927 3.073,2.083 0.313,0.156 10 false *b
*a Heated Part *b Heat Light
-
·
Do not touch the heat light and heated parts.
·Touching the heat light may result in burns.
·Touching heated parts for a long time may result in burns.
- NOTICE:
-
Do not heat the rear roof rack leg cushion LH and roof carrier bar LH excessively.
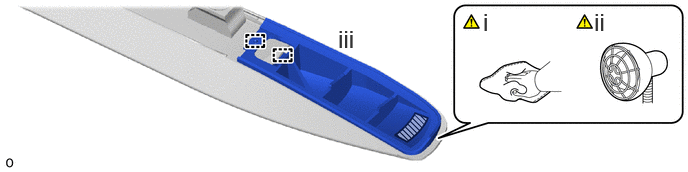

|
Double-sided Tape | - | - |
Clean the roof carrier bar LH surface.
1. When reusing the roof carrier bar LH, remove remaining double-sided tape from the roof carrier bar LH.
2. Using a heat light, heat the roof carrier bar LH surface.
3. Remove any remaining double-sided tape from the roof carrier bar LH and wipe off any tape adhesive residue with cleaner.
4. Clean the installation area surface.
- NOTICE:
-
·
Installing the rear roof rack leg cushion LH with some double-sided tape remaining may cause poor adhesion. Perform this procedure until the tape is sufficiently removed.
·Make sure to use a cloth when removing. Using a screwdriver, etc., may cause damage and poor adhesion.
·Also, clean a new roof carrier bar LH surface.
Using a heat light, heat the roof carrier bar LH and a new rear roof rack leg cushion LH.
Attach the guide and install the rear roof rack leg cushion LH in the position shown in the illustration.
- NOTICE:
-
The application strength of the rear roof rack leg cushion LH will weaken if reapplied. If reapplication is necessary, be sure to replace it with a new one.
- HINT:
-
Apply pressure so that it does not lift up from the roof carrier bar LH.
63487A 7.INSTALL FRONT ROOF RACK LEG CUSHION LH (for Type B)
|
|
|
- Standard Value:
-
Part Temperature Roof Carrier Bar LH 40 to 60°C (104 to 140°F) Front Roof Rack Leg Cushion LH 20 to 30°C (68 to 86°F)
- CAUTION:
-
2.365,2 2.698,2 false 0.5,2.333 0.5,2.667 true 0.427,2.708 0.74,2.865 0.313,0.156 10 false *a 2.76,1.927 3.073,2.083 0.313,0.156 10 false *b
*a Heated Part *b Heat Light
-
·
Do not touch the heat light and heated parts.
·Touching the heat light may result in burns.
·Touching heated parts for a long time may result in burns.
- NOTICE:
-
Do not heat the front roof rack leg cushion LH and roof carrier bar LH excessively.
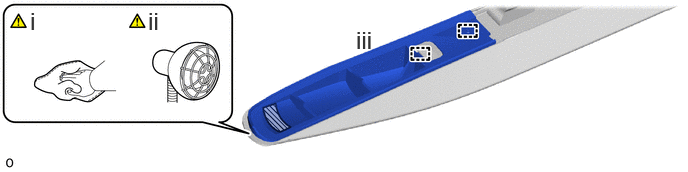
|
|
Double-sided Tape | - | - |
Clean the roof carrier bar LH surface.
1. When reusing the roof carrier bar LH, remove remaining double-sided tape from the roof carrier bar LH.
2. Using a heat light, heat the roof carrier bar LH surface.
3. Remove any remaining double-sided tape from the roof carrier bar LH and wipe off any tape adhesive residue with cleaner.
4. Clean the installation area surface.
- NOTICE:
-
·
Installing the front roof rack leg cushion LH with some double-sided tape remaining may cause poor adhesion. Perform this procedure until the tape is sufficiently removed.
·Make sure to use a cloth when removing. Using a screwdriver, etc., may cause damage and poor adhesion.
·Also, clean a new roof carrier bar LH surface.
Using a heat light, heat the roof carrier bar LH and a new front roof rack leg cushion LH.
Attach the guide and install the front roof rack leg cushion LH in the position shown in the illustration.
- NOTICE:
-
The application strength of the front roof rack leg cushion LH will weaken if reapplied. If reapplication is necessary, be sure to replace it with a new one.
- HINT:
-
Apply pressure so that it does not lift up from the roof carrier bar LH.
63444 8.INSTALL NO. 1 ROOF CARRIER PROTECTOR (for Type B)
|
|
|
- Standard Value:
-
Part Temperature Roof Carrier Bar LH 40 to 60°C (104 to 140°F) No. 1 Roof Carrier Protector 20 to 30°C (68 to 86°F)
- CAUTION:
-
2.365,2 2.698,2 false 0.5,2.333 0.5,2.667 true 0.427,2.708 0.74,2.865 0.313,0.156 10 false *a 2.76,1.927 3.073,2.083 0.313,0.156 10 false *b
*a Heated Part *b Heat Light
-
·
Do not touch the heat light and heated parts.
·Touching the heat light may result in burns.
·Touching heated parts for a long time may result in burns.
- NOTICE:
-
Do not heat the No. 1 roof carrier protector and roof carrier bar LH excessively.
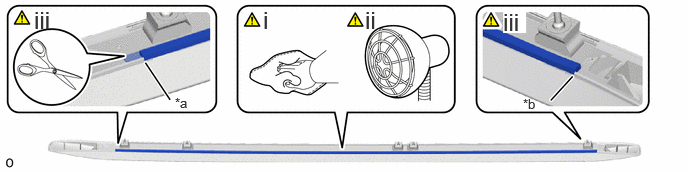
| *a | Edge of Front Roof Rack Leg Cushion LH | *b | Edge of Rear Roof Rack Leg Cushion LH |
Clean the roof carrier bar LH surface.
1. When reusing the roof carrier bar LH, remove remaining double-sided tape from the roof carrier bar LH.
2. Using a heat light, heat the roof carrier bar LH surface.
3. Remove any remaining double-sided tape from the roof carrier bar LH and wipe off any tape adhesive residue with cleaner.
4. Clean the installation area surface.
- NOTICE:
-
·
Installing the No. 1 roof carrier protector with some double-sided tape remaining may cause poor adhesion. Perform this procedure until the tape is sufficiently removed.
·Make sure to use a cloth when removing. Using a screwdriver, etc., may cause damage and poor adhesion.
·Also, clean a new roof carrier bar LH surface.
Using a heat light, heat the roof carrier bar LH and a new No. 1 roof carrier protector.
Install the No. 1 roof carrier protector in the position shown in the illustration.
1. Remove approximately 1/3 of the peeling paper.
2. Align the edge of the No. 1 roof carrier protector with the edge of the rear roof rack leg cushion LH.
3. Completely remove the peeling paper and press the tape until you reach the front side.
4. Cut the No. 1 roof carrier protector to fit the edge of the front roof rack leg cushion LH.
- NOTICE:
-
The application strength of the No. 1 roof carrier protector will weaken if reapplied. If reapplication is necessary, be sure to replace it with a new one.
- HINT:
-
Apply pressure so that it does not lift up from the roof carrier bar LH.
63445 9.INSTALL NO. 2 ROOF CARRIER PROTECTOR (for Type B)
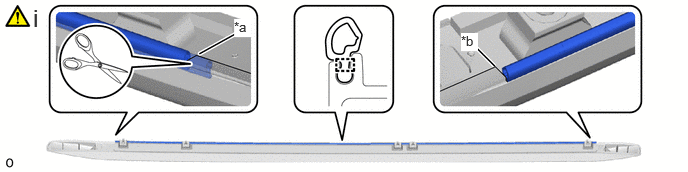
| *a | Edge of Front Roof Rack Leg Cushion LH | *b | Edge of Rear Roof Rack Leg Cushion LH |
Install the No. 2 roof carrier protector in the position shown in the illustration.
1. Align the edge of the No. 2 roof carrier protector with the edge of the rear roof rack leg cushion LH.
2. Install the No. 2 roof carrier protector from the rear side.
3. When replacing a new one, cut the No. 2 roof carrier protector to fit the edge of the front roof rack leg cushion LH.
63454F 10.INSTALL REAR ROOF RACK RETAINER LH (for Type B)
63453F 11.INSTALL FRONT ROOF RACK RETAINER LH (for Type B)