RM38G0E _59 Vehicle Exterior _100866 WINCH _0468114 WINCH UNIT A
WINCH WINCH UNIT INSTALLATION
CAUTION / NOTICE / HINT
COMPONENTS (INSTALLATION)
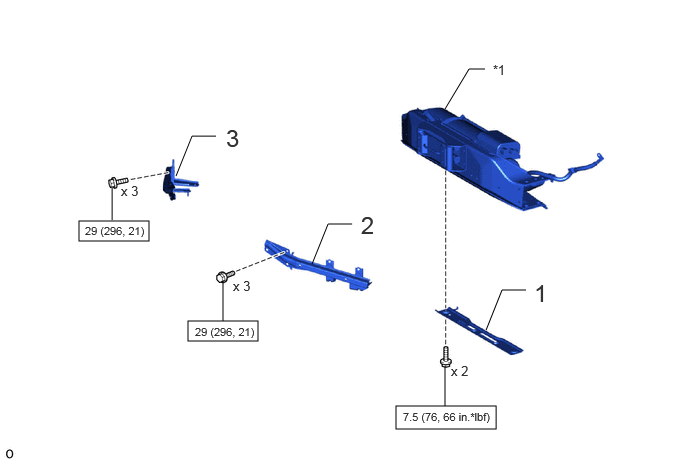
1.958,3.344 2.688,3.552 0.729,0.208 4.125,4.229 5.167,4.469 1.042,0.24 0.823,2.302 1.552,2.51 0.729,0.208 1.833,1.833 2,1.417 2,1.417 2.25,1.417 false 5.063,3.438 5.229,3.021 5.229,3.021 5.479,3.021 false 3.25,2.75 3.417,2.333 3.417,2.333 3.667,2.333 false 4.635,1.135 4.885,0.719 4.885,0.719 5.052,0.719 false 2.323,3.344 2.323,2.927 false 1.167,2.292 1.167,1.958 false 4.635,4.229 4.635,3.813 false 3.76,2.198 4.042,2.552 0.281,0.354 18 false 2 2.354,1.292 2.635,1.646 0.281,0.354 18 false 3 5.563,2.906 5.844,3.26 0.281,0.354 18 false 1 4.698,3.781 5.156,3.979 0.458,0.198 10 false x 2 1.26,1.906 1.719,2.104 0.458,0.198 10 false x 3 2.427,2.896 2.885,3.094 0.458,0.198 10 false x 3 5.135,0.646 5.417,1 0.281,0.354 10 false *1 2.031,3.385 3.5,3.542 1.469,0.156 8 false 29 (296, 21) 0.885,2.333 2.354,2.49 1.469,0.156 8 false 29 (296, 21) 4.198,4.271 6.646,4.479 2.448,0.208 8 false 7.5 (76, 66 in.*lbf)
| Procedure | Part Name Code |

|

|

|
|
|---|---|---|---|---|---|
| 1 | FRONT BUMPER LOWER RETAINER SUB-ASSEMBLY | 52072 | - | - | - |
| 2 | FRONT BUMPER EXTENSION LH | 52113D | - | - | - |
| 3 | FRONT BUMPER EXTENSION RH | 52112D | - | - | - |
| *1 | WINCH ASSEMBLY | - | - |

|
N*m (kgf*cm, ft.*lbf): Specified torque | - | - |
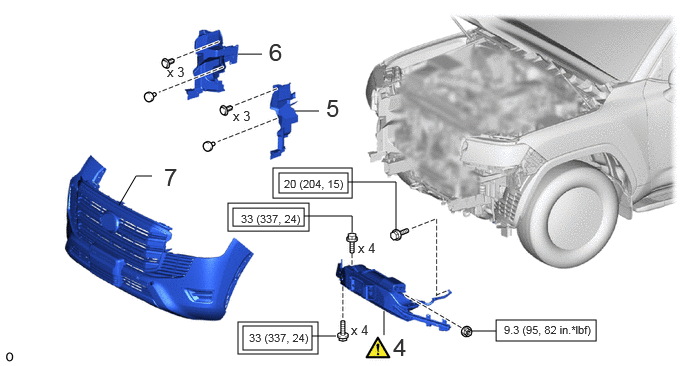
2.427,2.167 3.167,2.354 0.74,0.188 2.531,3.396 3.25,3.646 0.719,0.25 5.167,3.333 6.208,3.552 1.042,0.219 2.844,1.75 3.667,2.063 0.823,0.313 2.906,1.802 3.625,2.01 0.719,0.208 2.375,2.115 3.219,2.406 0.844,0.292 2.479,3.354 3.313,3.688 0.833,0.333 3.25,3.5 3.5,3.5 false 1.24,2.135 1.417,1.833 1.417,1.833 1.583,1.833 false 4,3.49 4,3.24 false 4.917,3.448 5.167,3.448 false 3.667,2.417 3.667,2.25 3.667,2.25 3.167,2.25 false 3.073,1.156 3.323,1.156 false 2.479,0.563 2.729,0.563 false 4.125,2.396 4.125,1.896 4.125,1.896 3.625,1.896 false 4.094,3.469 4.573,3.719 0.479,0.25 18 false 4 1.708,1.698 1.99,2.052 0.281,0.354 18 false 7 3.729,2.5 4.188,2.698 0.458,0.198 10 false x 4 3.656,3.354 4.115,3.552 0.458,0.198 10 false x 4 2.51,2.208 3.313,2.385 0.802,0.177 8 false 33 (337, 24) 2.594,3.448 3.396,3.625 0.802,0.177 8 false 33 (337, 24) 5.25,3.365 6.406,3.594 1.156,0.229 8 false 9.3 (95, 82 in.*lbf) 2.802,0.396 3.083,0.75 0.281,0.354 18 false 6 3.396,0.979 3.677,1.333 0.281,0.354 18 false 5 2.427,1.125 2.885,1.323 0.458,0.198 10 false x 3 1.74,0.667 2.198,0.865 0.458,0.198 10 false x 3 2.958,1.844 4.427,2 1.469,0.156 8 false 20 (204, 15)
| Procedure | Part Name Code |
|
|
|
|
|---|---|---|---|---|---|
| 4 | WINCH ASSEMBLY WITH BRACKET | - | ( ) |
- | - |
| 5 | NO. 1 RADIATOR AIR GUIDE LH | 16595B | - | - | - |
| 6 | NO. 1 RADIATOR AIR GUIDE RH | 16593B | - | - | - |
| 7 | FRONT BUMPER ASSEMBLY | - | - | - | - |

|
Tightening torque for "major areas involving basic vehicle performance such as moving/turning/stopping" : N*m(kgf*cm, ft.*lbf) |
|
N*m (kgf*cm, ft.*lbf): Specified torque |
PROCEDURE

 52072 1.INSTALL FRONT BUMPER LOWER RETAINER SUB-ASSEMBLY
- Torque:
- 7.5 N*m (76 kgf*cm, 66 in.*lbf)
52112D 2.INSTALL FRONT BUMPER EXTENSION RH
- Torque:
- 29 N*m (296 kgf*cm, 21 ft.*lbf)
52113D 3.INSTALL FRONT BUMPER EXTENSION LH
- Torque:
- 29 N*m (296 kgf*cm, 21 ft.*lbf)
4.INSTALL WINCH ASSEMBLY WITH BRACKET
a.
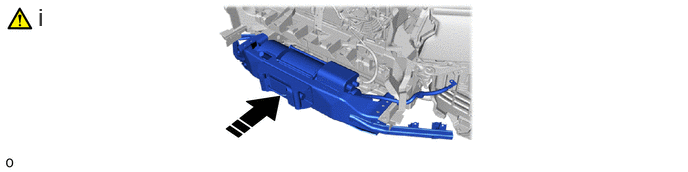
0.396,0.031 0.677,0.385 0.281,0.354 18 false i

|
Install in this Direction | - | - |
i.
Using a crane or equivalent, install the winch assembly with bracket.
- CAUTION:
-
Be careful as the winch assembly is very heavy.
- NOTICE:
-
Be sure to perform the operation with 2 or more people.
b.
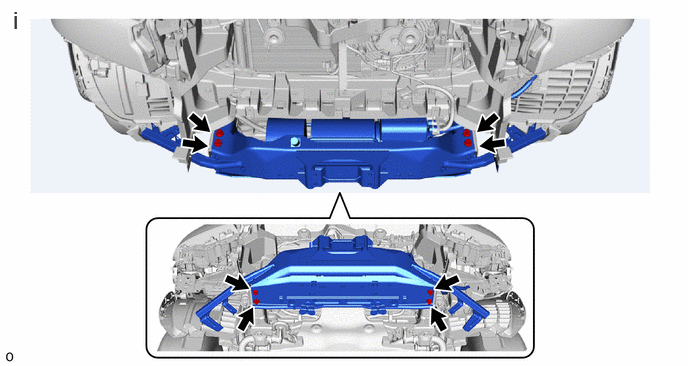
0.135,0.063 0.417,0.417 0.281,0.354 18 false i
i.
Install the 8 bolts.
- Torque:
- 33 N*m (337 kgf*cm, 24 ft.*lbf)
c.
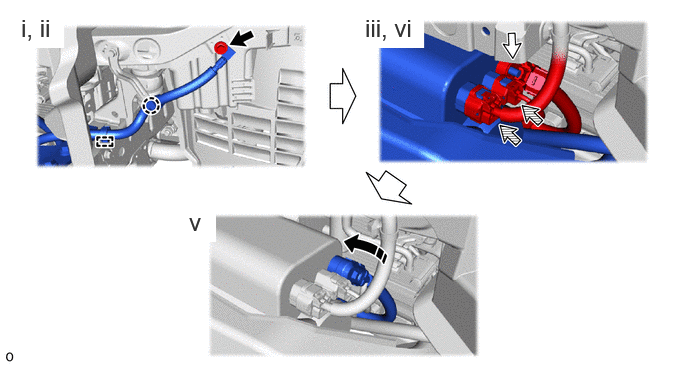
0.219,0.146 0.667,0.5 0.448,0.354 18 true i, ii 3.802,0.146 4.417,0.5 0.615,0.354 18 true iii, vi 1.969,2.167 2.25,2.521 0.281,0.354 18 true v
|
|
Install in this Direction |

|
Bolt |

|
Nut |

|
Connector |
i.
Attach the claw and clamp and connect the ground wire.
ii.
Install the bolt.
- Torque:
- 20 N*m (204 kgf*cm, 15 ft.*lbf)
iii.
Install the nut and connect the wire.
- Torque:
- 9.3 N*m (95 kgf*cm, 82 in.*lbf)
iv.
Connect the 2 connectors.
v.
Move the cover in the direction indicated by the arrow in the illustration.
16595B 5.INSTALL NO. 1 RADIATOR AIR GUIDE LH
16593B 6.INSTALL NO. 1 RADIATOR AIR GUIDE RH
7.INSTALL FRONT BUMPER ASSEMBLY