SEAT REAR NO. 2 SEAT ASSEMBLY(for Manual Seat) REMOVAL
CAUTION / NOTICE / HINT
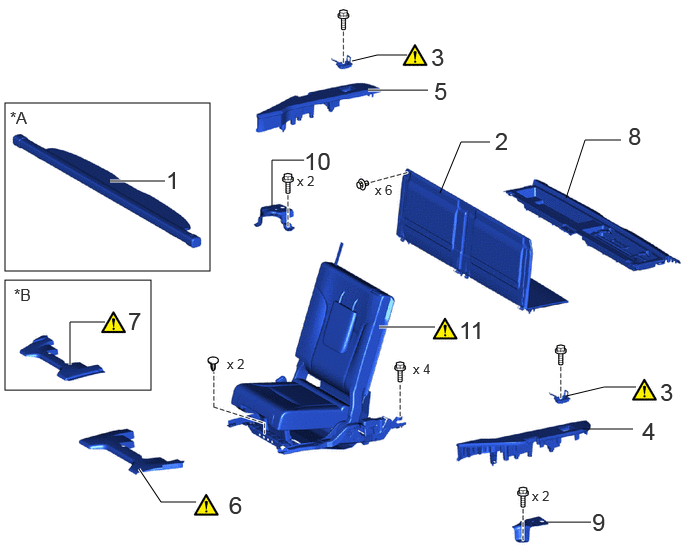
| Procedure | Part Name Code |

|

|

|
|
|---|---|---|---|---|---|
| 1 | TONNEAU COVER ASSEMBLY | 64910M | - | - | - |
| 2 | DECK BOARD ASSEMBLY | 58410B | - | - | - |
| 3 | ROPE HOOK ASSEMBLY | 66310N | ( ) |
- | - |
| 4 | REAR FLOOR BOARD REAR LH | 58418H | - | - | - |
| 5 | REAR FLOOR BOARD REAR RH | 58417B | - | - | - |
| 6 | NO. 2 SEAT NO. 1 LEG COVER LH | 79959J | () |
- | - |
| 7 | NO. 2 SEAT NO. 1 LEG COVER RH | 79959G | () |
- | - |
| 8 | REAR FLOOR MAT REAR SUPPORT PLATE | 58574G | - | - | - |
| 9 | NO. 3 DECK FLOOR BRACKET LH | 58459B | - | - | - |
| 10 | NO. 3 DECK FLOOR BRACKET RH | 58458J | - | - | - |
| 11 | REAR NO. 2 SEAT ASSEMBLY LH | - | () |
- | - |
| *A | w/ Tonneau Cover | *B | for RH Seat |
- CAUTION:
-
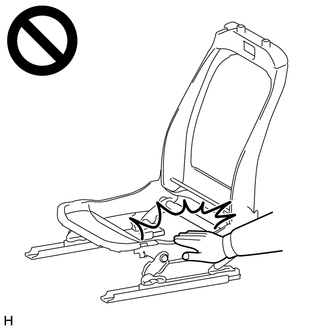
-
·
Wear protective gloves. Sharp areas on the parts may injure your hands.
·There is risk of injury.
- HINT:
-
·
Use the same procedure for the RH and LH sides.
·The following procedure is for the LH side.
PROCEDURE

 64910M 1.REMOVE TONNEAU COVER ASSEMBLY (w/ Tonneau Cover)
58410B 2.REMOVE DECK BOARD ASSEMBLY
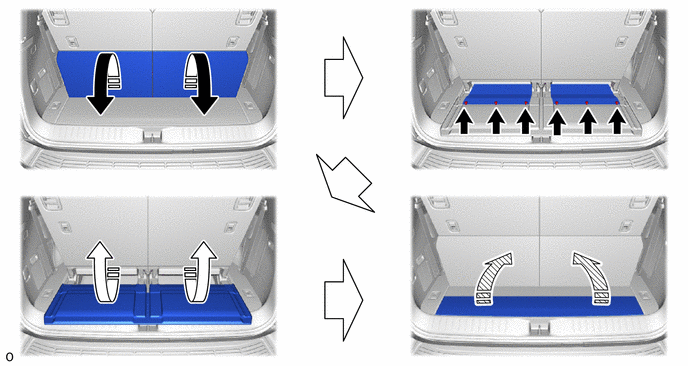

|
Remove in this Direction (1) |

|
Remove in this Direction (2) |

|
Remove in this Direction (3) |

|
Clip |
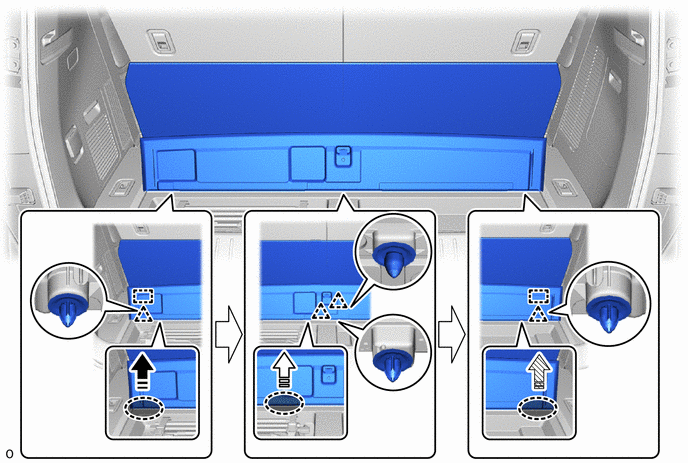

|
Place Hand Here |
|
Remove in this Direction (1) |
|
|
Remove in this Direction (2) |
|
Remove in this Direction (3) |
66310N 3.REMOVE ROPE HOOK ASSEMBLY
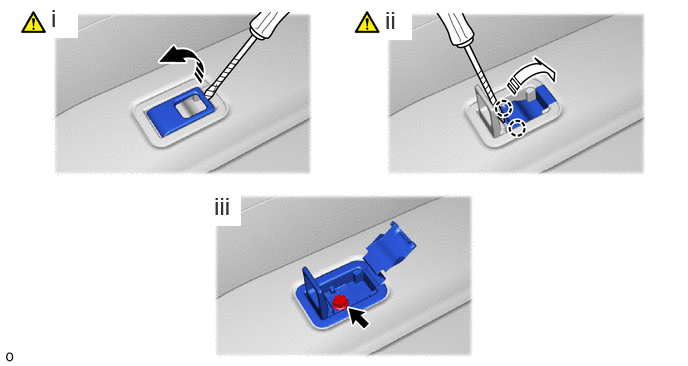
|
|
Remove in this Direction (1) |
|
Remove in this Direction (2) |

|
Protective Tape | - | - |
Using a thin-bladed screwdriver, lift up the rope hook as shown in the illustration.
- HINT:
-
Tape the thin-bladed screwdriver tip before use.
Using a thin-bladed screwdriver, lift up the rope hook case as shown in the illustration.
Remove the bolt and rope hook assembly.
- HINT:
-
Use the same procedure described for the other side.
58418H 4.REMOVE REAR FLOOR BOARD REAR LH
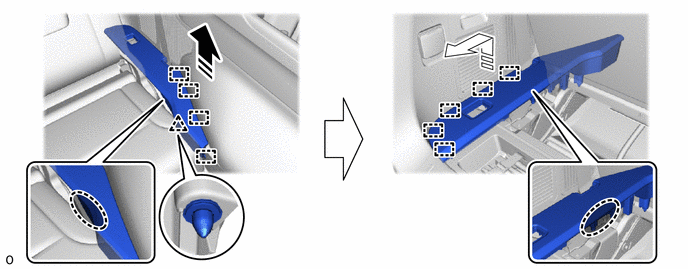
|
|
Place Hand Here |
|
Remove in this Direction (1) |
|
|
Remove in this Direction (2) | - | - |
58417B 5.REMOVE REAR FLOOR BOARD REAR RH
Use the same procedure described for the LH side.
79959J 6.REMOVE NO. 2 SEAT NO. 1 LEG COVER LH
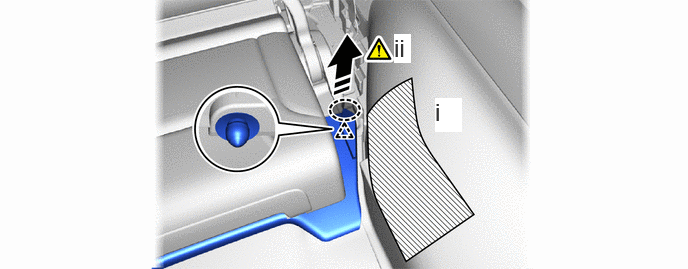
|
|
Place Hand Here |
|
Remove in this Direction |
|
|
Protective Tape | - | - |
Apply the protective tape as shown in the illustration.
Place your hand in the position shown in the illustration and pull up in the removal direction to detach the clip.
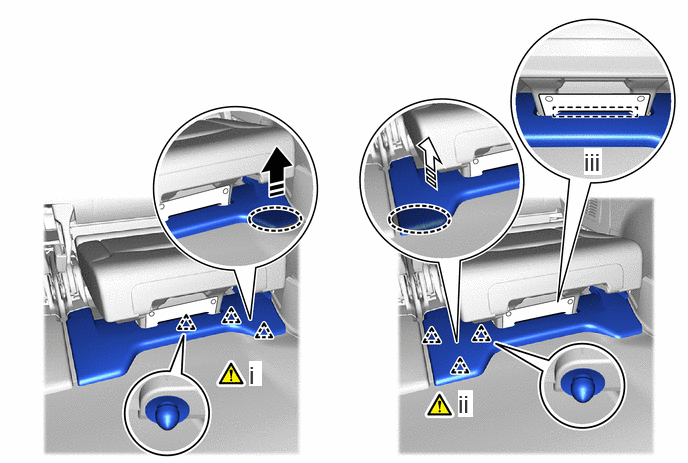
|
|
Place Hand Here |
|
Remove in this Direction |
Place your hand in the position shown in the illustration and pull up in the removal direction to detach the clip.
Place your hand in the position shown in the illustration and pull up in the removal direction to detach the clip.
Remove the No. 2 seat No. 1 leg cover LH from rear No. 2 seat cushion carpet.
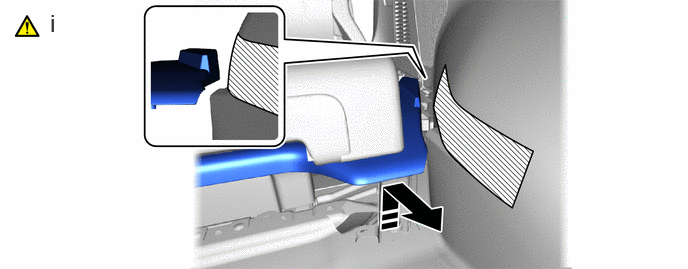
|
|
Remove in this Direction |
|
Protective Tape |
Remove the No. 2 seat No. 1 leg cover LH as shown in the illustration.
79959G 7.REMOVE NO. 2 SEAT NO. 1 LEG COVER RH (for RH Seat)
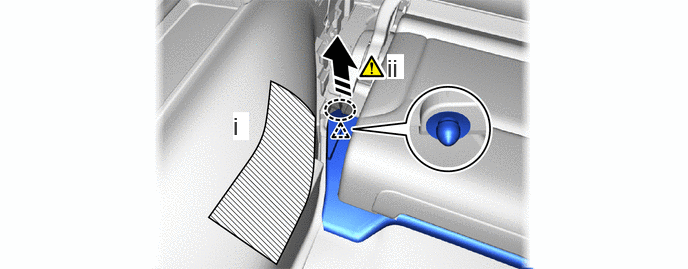
|
|
Place Hand Here |
|
Remove in this Direction |
|
|
Protective Tape | - | - |
Apply the protective tape as shown in the illustration.
Place your hand in the position shown in the illustration and pull up in the removal direction to detach the clip.
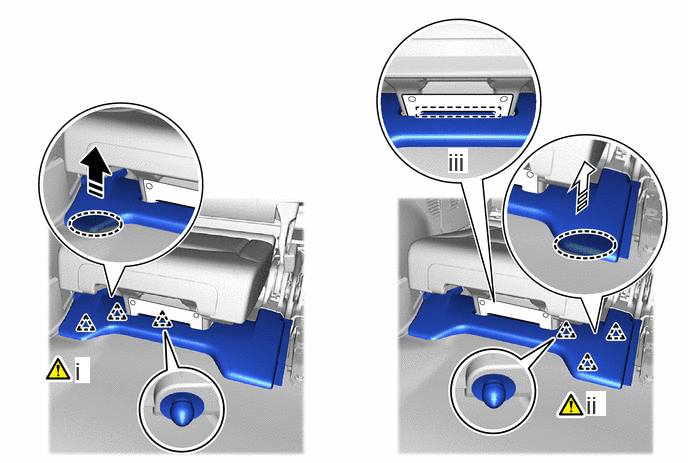
|
|
Place Hand Here |
|
Remove in this Direction |
Place your hand in the position shown in the illustration and pull up in the removal direction to detach the clip.
Place your hand in the position shown in the illustration and pull up in the removal direction to detach the clip and through the slit.
Remove the No. 2 seat No. 1 leg cover RH from rear No. 2 seat cushion carpet.
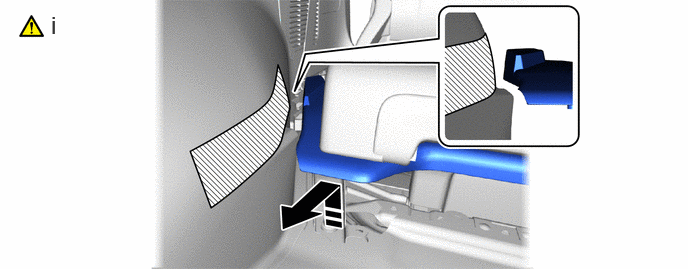
|
|
Remove in this Direction |
|
Protective Tape |
Remove the No. 2 seat No. 1 leg cover RH as shown in the illustration.
58574G 8.REMOVE REAR FLOOR MAT REAR SUPPORT PLATE
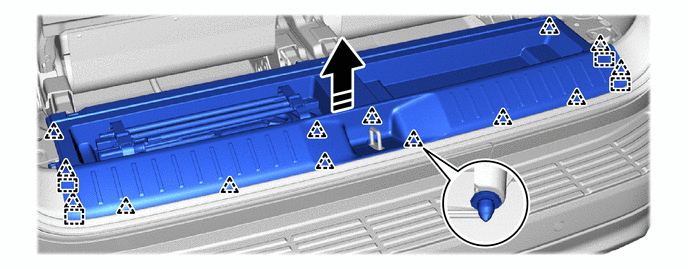
|
|
Remove in this Direction | - | - |
58459B 9.REMOVE NO. 3 DECK FLOOR BRACKET LH

58458J 10.REMOVE NO. 3 DECK FLOOR BRACKET RH
Use the same procedure described for the LH side.
11.REMOVE REAR NO. 2 SEAT ASSEMBLY LH
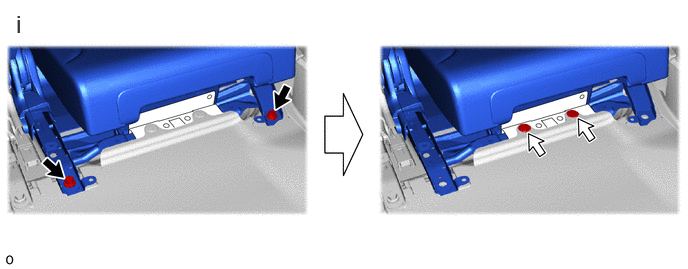
|
|
Bolt |

|
Clip |
Remove the 2 bolts and 2 clips.
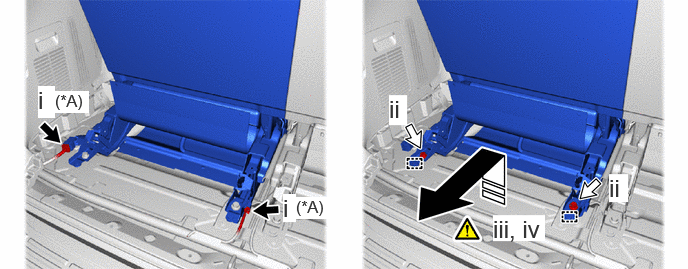
| *A | w/ Seat Belt Warning System | - | - |
|
|
Remove in this Direction |
|
Connector |
|
|
Bolt | - | - |
w/ Seat Belt Warning System:
1. Disconnect the 2 connectors.
Remove the 2 bolts.
Pull out the 2 location pins of the rear No. 2 seat assembly LH.
Remove and carry the rear No. 2 seat assembly LH out of the vehicle.
- NOTICE:
-
·
Protect the rear No. 2 seat legs.
·Carrying the rear No. 2 seat assembly LH from the vehicle must be performed by multiple people.
·Do not damage the rear No. 2 seat assembly LH, body exterior or interior parts.