AUDIO / VIDEO AUDIO AND VISUAL SYSTEM(for Radio Receiver Type) Microphone Circuit
DESCRIPTION
The radio receiver assembly and telephone microphone assembly are connected to each other using the microphone connection detection signal lines.
Using this circuit, the radio receiver assembly sends power to the telephone microphone assembly, and the telephone microphone assembly send microphone signals to the radio receiver assembly.
WIRING DIAGRAM
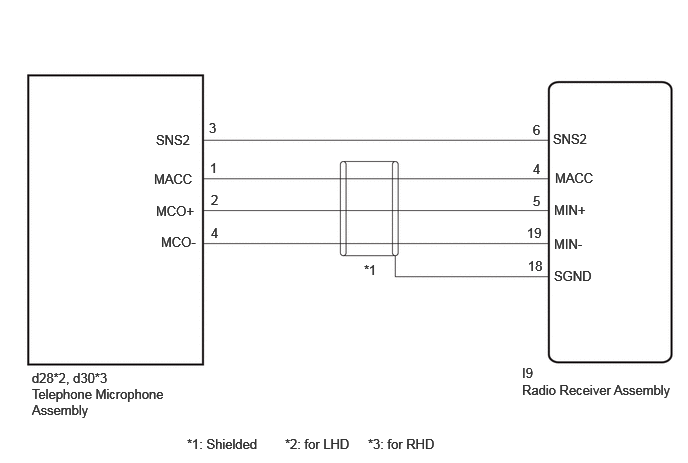
PROCEDURE
Disconnect the I9 radio receiver assembly connector.
Disconnect the d28*1 or d30*2 telephone microphone assembly connector.
*1: for LHD
*2: for RHD
Measure the resistance according to the value(s) in the table below.
- Standard Resistance:
-
for LHD Tester Connection Condition Specified Condition Click Location & Routing(I9,d28)Location & Routingewd_type=routing;type=c,c;code=I9,d28
Click Connector(d28)Body>No. 1 Roof Wire>Telephone Microphone Assembly LHewd_type=component;type=c;code=d28;pinno=3,1,2,4
I9-6 (SNS2) - d28-3 (SNS2) Always Below 1 Ω I9-4 (MACC) - d28-1 (MACC) Always Below 1 Ω I9-5 (MIN+) - d28-2 (MCO+) Always Below 1 Ω I9-19 (MIN-) - d28-4 (MCO-) Always Below 1 Ω I9-18 (SGND) - Body ground Always 10 kΩ or higher I9-6 (SNS2) - Body ground Always 10 kΩ or higher I9-4 (MACC) - Body ground Always 10 kΩ or higher I9-5 (MIN+) - Body ground Always 10 kΩ or higher I9-19 (MIN-) - Body ground Always 10 kΩ or higher
-
for RHD Tester Connection Condition Specified Condition Click Location & Routing(I9,d30)Location & Routingewd_type=routing;type=c,c;code=I9,d30
Click Connector(d30)Body>No. 1 Roof Wire>Telephone Microphone Assembly RHewd_type=component;type=c;code=d30;pinno=3,1,2,4
I9-6 (SNS2) - d30-3 (SNS2) Always Below 1 Ω I9-4 (MACC) - d30-1 (MACC) Always Below 1 Ω I9-5 (MIN+) - d30-2 (MCO+) Always Below 1 Ω I9-19 (MIN-) - d30-4 (MCO-) Always Below 1 Ω I9-18 (SGND) - Body ground Always 10 kΩ or higher I9-6 (SNS2) - Body ground Always 10 kΩ or higher I9-4 (MACC) - Body ground Always 10 kΩ or higher I9-5 (MIN+) - Body ground Always 10 kΩ or higher I9-19 (MIN-) - Body ground Always 10 kΩ or higher
- Result:
-
Proceed to OK NG
OK
NG
Replace the telephone microphone assembly with a new or known good one and check that the malfunction disappears.
Click hereAudio / Visual / Telematics>TELEMATICS>TELEPHONE MICROPHONE ASSEMBLY>REMOVAL
- OK:
-
Malfunction disappears.
- Result:
-
Proceed to OK NG
OK
NG
Click hereAudio / Visual / Telematics>AUDIO / VIDEO>RADIO RECEIVER (for Radio Receiver Type)>REMOVAL