NAVIGATION / MULTI INFO DISPLAY NAVIGATION SYSTEM Microphone Circuit
DESCRIPTION
The radio receiver assembly and telephone microphone assembly are connected to each other using the microphone connection detection signal lines.
Using this circuit, the radio receiver assembly sends power to the telephone microphone assembly, and the telephone microphone assembly sends microphone signals to the radio receiver assembly and navigation ECU assembly.
WIRING DIAGRAM
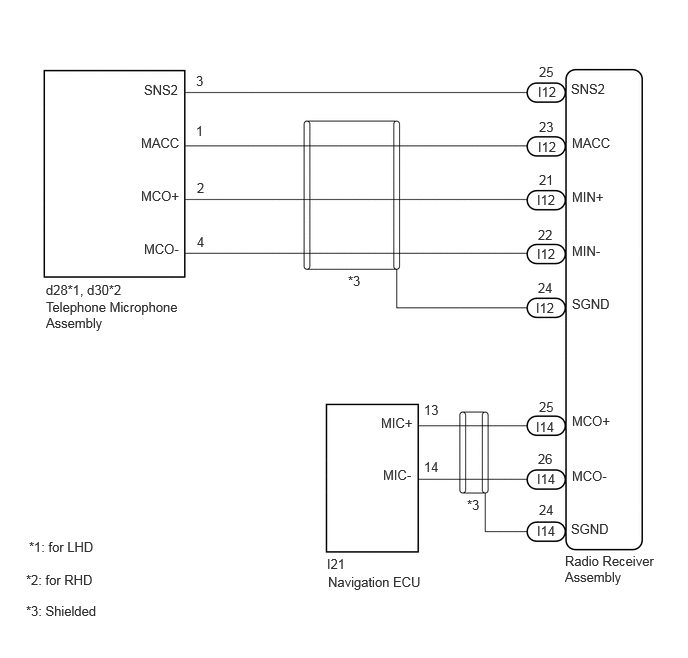
CAUTION / NOTICE / HINT
- NOTICE:
-
Depending on the parts that are replaced during vehicle inspection or maintenance, performing initialization, registration or calibration may be needed. Refer to Precaution for Navigation System.
-
Click hereAudio / Visual / Telematics>NAVIGATION / MULTI INFO DISPLAY>NAVIGATION SYSTEM>PRECAUTION
PROCEDURE
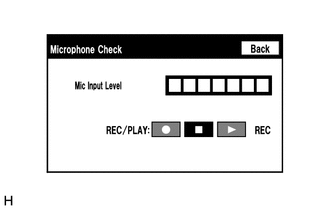
Enter the "Microphone Check" screen. Refer to Check Microphone (Input to navigation ECU assembly) in Operation Check.
Click hereAudio / Visual / Telematics>NAVIGATION / MULTI INFO DISPLAY>NAVIGATION SYSTEM>OPERATION CHECK
When voice is input into the microphone, check that the microphone input level meter changes according to the input voice.
- OK:
-
Check results are normal.
- Result:
-
Proceed to OK NG
OK
Click hereAudio / Visual / Telematics>NAVIGATION / MULTI INFO DISPLAY>NAVIGATION SYSTEM>PROBLEM SYMPTOMS TABLE
NG
Enter the "Microphone Check" screen. Refer to Check Microphone (Input to radio receiver assembly) in Operation Check.
Click hereAudio / Visual / Telematics>NAVIGATION / MULTI INFO DISPLAY>NAVIGATION SYSTEM>OPERATION CHECK
When voice is input into the microphone, check that the microphone input level meter changes according to the input voice.
- OK:
-
Check results are normal.
- Result:
-
Proceed to OK NG
OK
NG
Disconnect the I14 radio receiver assembly connector.
Disconnect the I21 navigation ECU assembly connector.
Measure the resistance according to the value(s) in the table below.
- Standard Resistance:
-
Tester Connection Condition Specified Condition Click Location & Routing(I14,I21)Location & Routingewd_type=routing;type=c,c;code=I14,I21
I14-25 (MCO+) - I21-13 (MIC+) Always Below 1 Ω I14-26 (MCO-) - I21-14 (MIC-) Always Below 1 Ω I14-25 (MCO+) or I21-13 (MIC+) - Body ground Always 10 kΩ or higher I14-26 (MCO-) or I21-14 (MIC-) - Body ground Always 10 kΩ or higher I14-24 (SGND) - Body ground Always 10 kΩ or higher
- Result:
-
Proceed to OK NG
OK
NG
Disconnect the I21 navigation ECU assembly connector.
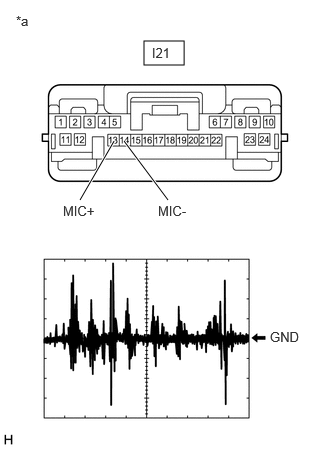
| *a | Front view of wire harness connector (to Navigation ECU Assembly) |
Check the signal waveform according to the condition(s) in the table below.
| Item | Condition |
|---|---|
| Measurement terminal | I21-13 (MIC+) - I21-14 (MIC-) |
| Tool setting | 50 mV/DIV., 500 ms./DIV. |
| Vehicle condition |
1.
Ignition switch ACC.
2.
Sound is input to the telephone microphone assembly when the user is closer than 125 mm (4.92 in.) from the telephone microphone assembly sound holes in the microphone case. |
- OK:
-
The waveform is similar to that shown in the illustration.
- HINT:
-
The oscilloscope waveform shown in the illustration is an example for reference only.
- Result:
-
Proceed to OK NG
OK
Click hereAudio / Visual / Telematics>NAVIGATION / MULTI INFO DISPLAY>NAVIGATION SYSTEM>PROBLEM SYMPTOMS TABLE
NG
Click hereAudio / Visual / Telematics>AUDIO / VIDEO>RADIO RECEIVER (for Radio Receiver Type)>REMOVAL
Disconnect the I12 radio receiver assembly connector.
Disconnect the d28*1 or d30*2 telephone microphone assembly connector.
*1: for LHD
*2: for RHD
Measure the resistance according to the value(s) in the table below.
- Standard Resistance:
-
for LHD Tester Connection Condition Specified Condition Click Location & Routing(I12,d28)Location & Routingewd_type=routing;type=c,c;code=I12,d28
Click Connector(d28)Body>No. 1 Roof Wire>Telephone Microphone Assembly LHewd_type=component;type=c;code=d28;pinno=3,1,2,4
I12-25 (SNS2) - d28-3 (SNS2) Always Below 1 Ω I12-23 (MACC) - d28-1 (MACC) Always Below 1 Ω I12-21 (MIN+) - d28-2 (MCO+) Always Below 1 Ω I12-22 (MIN-) - d28-4 (MCO-) Always Below 1 Ω I12-25 (SNS2) - Body ground Always 10 kΩ or higher I12-23 (MACC) - Body ground Always 10 kΩ or higher I12-21 (MIN+) - Body ground Always 10 kΩ or higher I12-22 (MIN-) - Body ground Always 10 kΩ or higher I12-24 (SGND) - Body ground Always 10 kΩ or higher
-
for RHD Tester Connection Condition Specified Condition Click Location & Routing(I12,d30)Location & Routingewd_type=routing;type=c,c;code=I12,d30
Click Connector(d30)Body>No. 1 Roof Wire>Telephone Microphone Assembly RHewd_type=component;type=c;code=d30;pinno=3,1,2,4
I12-25 (SNS2) - d30-3 (SNS2) Always Below 1 Ω I12-23 (MACC) - d30-1 (MACC) Always Below 1 Ω I12-21 (MIN+) - d30-2 (MCO+) Always Below 1 Ω I12-22 (MIN-) - d30-4 (MCO-) Always Below 1 Ω I12-25 (SNS2) - Body ground Always 10 kΩ or higher I12-23 (MACC) - Body ground Always 10 kΩ or higher I12-21 (MIN+) - Body ground Always 10 kΩ or higher I12-22 (MIN-) - Body ground Always 10 kΩ or higher I12-24 (SGND) - Body ground Always 10 kΩ or higher
- Result:
-
Proceed to OK NG
OK
NG
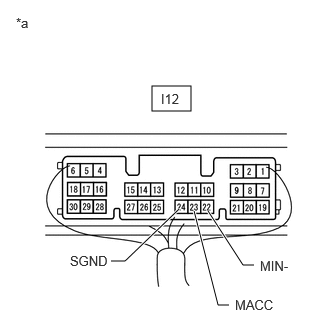
| *a | Component with harness connected (Radio Receiver Assembly) |
Remove the radio receiver assembly with the connector(s) still connected.
Click hereAudio / Visual / Telematics>AUDIO / VIDEO>RADIO RECEIVER (for Radio Receiver Type)>REMOVAL
Measure the voltage according to the value(s) in the table below.
- Standard Voltage:
-
Tester Connection Switch Condition Specified Condition Click Location & Routing(I12)Location & Routingewd_type=routing;type=c;code=I12
I12-23 (MACC) - Body ground Ignition switch ACC 4 to 6 V
Measure the resistance according to the value(s) in the table below.
- Standard Resistance:
-
Tester Connection Condition Specified Condition Click Location & Routing(I12)Location & Routingewd_type=routing;type=c;code=I12
I12-22 (MIN-) - Body ground Always Below 1 Ω I12-24 (SGND) - Body ground Always Below 1 Ω
- Result:
-
Proceed to OK NG
OK
NG
Click hereAudio / Visual / Telematics>AUDIO / VIDEO>RADIO RECEIVER (for Radio Receiver Type)>REMOVAL
*1: for LHD
*2: for RHD
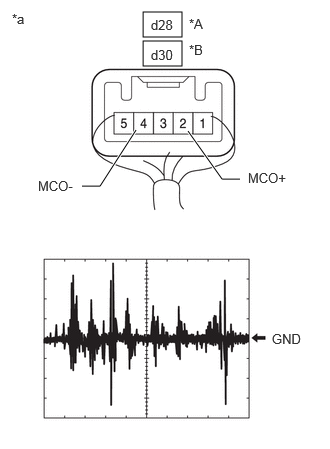
| *A | for LHD |
| *B | for RHD |
| *a | Component with harness connected (Telephone Microphone Assembly) |
Check the output waveform.
Remove the telephone microphone assembly with the connector(s) still connected.
Click hereAudio / Visual / Telematics>TELEMATICS>TELEPHONE MICROPHONE ASSEMBLY>REMOVAL
Check the signal waveform according to the condition(s) in the table below.
| Item | Condition |
|---|---|
| Measurement terminal |
·
d28-2 (MCO+) - d28-4 (MCO-)*1
·
d30-2 (MCO+) - d30-4 (MCO-)*2 |
| Tool setting | 50 mV/DIV., 500 ms/DIV. |
| Vehicle condition |
1.
Ignition switch ON
2.
Sound is input to the telephone microphone assembly when the user is closer than 125 mm (4.92 in.) from the telephone microphone assembly sound holes in the microphone case. |
- OK:
-
The waveform is similar to that shown in the illustration.
- HINT:
-
The oscilloscope waveform shown in the illustration is an example for reference only.
- Result:
-
Proceed to OK NG
OK
Click hereAudio / Visual / Telematics>AUDIO / VIDEO>RADIO RECEIVER (for Radio Receiver Type)>REMOVAL
NG