HEATING / AIR CONDITIONING AIR CONDITIONING SYSTEM PTC Heater Circuit
DESCRIPTION
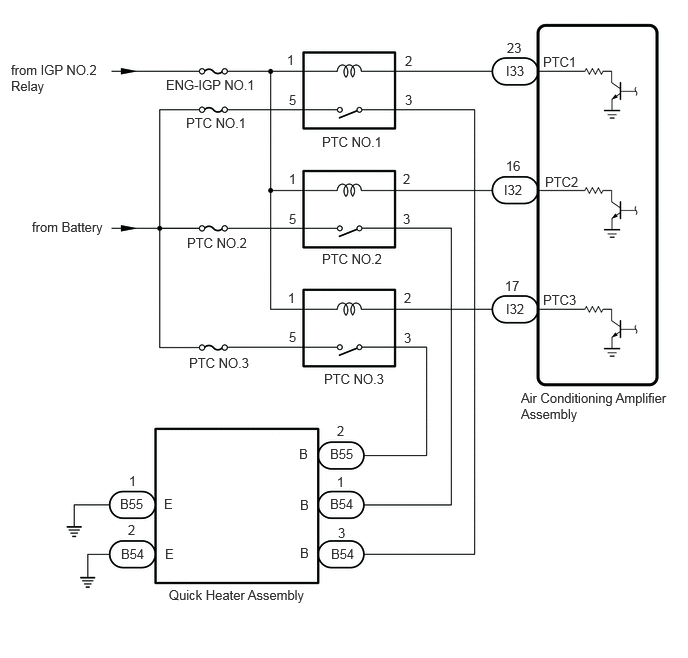
The air conditioning amplifier assembly sends operation signals to the PTC heater relays when quick heater assembly operation conditions are met. Based on the signals from the air conditioning amplifier assembly, the PTC heater relays turn on, and power is supplied to the quick heater assembly installed in the air conditioning radiator assembly.
- HINT:
-
·
When all drive conditions are fulfilled, 3 quick heater assembly elements are driven.
·The number of quick heater assembly elements driven varies depending on the engine coolant temperature.
If the heating performance is poor when it is cold, the following factors may be the cause.
| Malfunction Status | Factor |
|---|---|
| Heating performance is poor when it is cold |
·
Quick heater assembly malfunction
·
Air conditioning amplifier assembly malfunction
·
Harness or connector
·
PTC heater relays |
WIRING DIAGRAM
CAUTION / NOTICE / HINT
- NOTICE:
-
Inspect the fuses for circuits related to this system before performing the following procedure.
PROCEDURE
Disconnect the I32 and I33 air conditioning amplifier assembly connectors.
Measure the voltage according to the value(s) in the table below.
- Standard Voltage:
-
Tester Connection Switch Condition Specified Condition Click Location & Routing(I33,I32)Location & Routingewd_type=routing;type=c,c;code=I33,I32
I33-23 (PTC1) - Body ground Ignition switch off → ON Below 1 V → 11 to 14 V I32-16 (PTC2) - Body ground Ignition switch off → ON Below 1 V → 11 to 14 V I32-17 (PTC3) - Body ground Ignition switch off → ON Below 1 V → 11 to 14 V
- Result:
-
Proceed to OK NG
OK
NG
Perform the Active Test according to the display on the GTS.
- Body Electrical > Air Conditioner > Active Test
-
Tester Display Measurement Item Control Range Diagnostic Note PTC Heater Quick heater assembly Min.: 0
Max.: 3Perform this test when the following conditions are met:
·Ignition switch ON
·Air conditioning system is operated
- Body Electrical > Air Conditioner > Active Test
-
Tester Display PTC Heater - 50004 450 5
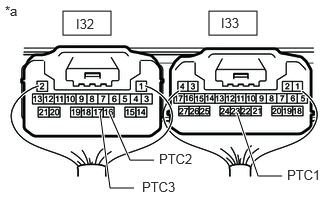
| *a | Component with harness connected (Air Conditioning Amplifier Assembly) |
Measure the voltage according to the value(s) in the table below.
- Standard Voltage:
-
Tester Connection Condition Specified Condition Click Location & Routing(I33,I32)Location & Routingewd_type=routing;type=c,c;code=I33,I32
I33-23 (PTC1) - Body ground ·Perform Active Test and select "OFF" → "ON" item
·Heater level is 1
11 to 14 V → Below 1 V I32-16 (PTC2) - Body ground ·Perform Active Test and select "OFF" → "ON" item
·Heater level is 2
11 to 14 V → Below 1 V I32-17 (PTC3) - Body ground ·Perform Active Test and select "OFF" → "ON" item
·Heater level is 3
11 to 14 V → Below 1 V
- Result:
-
Proceed to OK NG
OK
NG
Perform the Active Test according to the display on the GTS.
- Body Electrical > Air Conditioner > Active Test
-
Tester Display Measurement Item Control Range Diagnostic Note PTC Heater Quick heater assembly Min.: 0
Max.: 3Perform this test when the following conditions are met:
·Engine running
·Air conditioning system is operated
- Body Electrical > Air Conditioner > Active Test
-
Tester Display PTC Heater - 50004 450 5
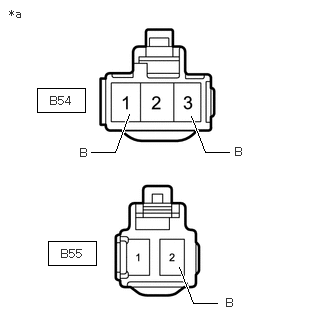
| *a | Front view of wire harness connector (to Quick Heater Assembly) |
Disconnect the quick heater assembly connectors.
Measure the voltage according to the value(s) in the table below.
- Standard Voltage:
-
Tester Connection Condition Specified Condition Click Location & Routing(B54,B55)Location & Routingewd_type=routing;type=c,c;code=B54,B55
Click Connector(B54)Instrument Panel>Engine Room Main Wire / Heater Blower Wire>Quick Heater Assemblyewd_type=component;type=c;code=B54;pinno=3,1
Click Connector(B55)Instrument Panel>Engine Room Main Wire / Heater Blower Wire>Quick Heater Assemblyewd_type=component;type=c;code=B55;pinno=2
B54-3 (B) - Body ground ·Perform Active Test and select "OFF" → "ON" item
·Heater level is 1
Below 1 V → 11 to 14 V B54-1 (B) - Body ground ·Perform Active Test and select "OFF" → "ON" item
·Heater level is 2
Below 1 V → 11 to 14 V B55-2 (B) - Body ground ·Perform Active Test and select "OFF" → "ON" item
·Heater level is 3
Below 1 V → 11 to 14 V
- Result:
-
Proceed to OK NG
OK
NG
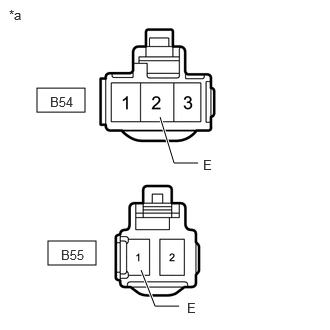
| *a | Front view of wire harness connector (to Quick Heater Assembly) |
Disconnect the quick heater assembly connectors.
Measure the resistance according to the value(s) in the table below.
- Standard Resistance:
-
Tester Connection Condition Specified Condition Click Location & Routing(B55,B54)Location & Routingewd_type=routing;type=c,c;code=B55,B54
Click Connector(B55)Instrument Panel>Engine Room Main Wire / Heater Blower Wire>Quick Heater Assemblyewd_type=component;type=c;code=B55;pinno=1
Click Connector(B54)Instrument Panel>Engine Room Main Wire / Heater Blower Wire>Quick Heater Assemblyewd_type=component;type=c;code=B54;pinno=2
B55-1 (E) - Body ground Always Below 1 Ω B54-2 (E) - Body ground Always Below 1 Ω
- Result:
-
Proceed to OK NG
OK
NG
OK
NG
Remove the PTC heater relays (PTC NO.1, PTC NO.2 and PTC NO.3) from the No. 1 engine room relay block assembly.
Measure the voltage according to the value(s) in the table below.
- Standard Voltage:
-
PTC NO. 1 Relay Tester Connection Switch Condition Specified Condition Relay terminal 1 - Body ground Ignition switch off Below 1 V Ignition switch ON 11 to 14 V
| Tester Connection | Switch Condition | Specified Condition |
|---|---|---|
| Relay terminal 1 - Body ground | Ignition switch off | Below 1 V |
| Ignition switch ON | 11 to 14 V |
| Tester Connection | Switch Condition | Specified Condition |
|---|---|---|
| Relay terminal 1 - Body ground | Ignition switch off | Below 1 V |
| Ignition switch ON | 11 to 14 V |
- Result:
-
Proceed to OK NG
OK
NG
Remove the PTC heater relays (PTC NO.1, PTC NO.2 and PTC NO.3) from the No. 1 engine room relay block assembly.
Disconnect the I32 and I33 air conditioning amplifier assembly connectors.
Measure the resistance according to the value(s) in the table below.
- Standard Resistance:
-
PTC NO. 1 Relay Tester Connection Condition Specified Condition Click Location & Routing(I33)Location & Routingewd_type=routing;type=c;code=I33
Relay terminal 2 - I33-23 (PTC1) Always Below 1 Ω Relay terminal 2 or I33-23 (PTC1) - Other terminals and body ground Always 10 kΩ or higher
| Tester Connection | Condition | Specified Condition |
|---|---|---|
Click Location & Routing(I32)Location & Routingewd_type=routing;type=c;code=I32 |
||
| Relay terminal 2 - I32-16 (PTC2) | Always | Below 1 Ω |
| Relay terminal 2 or I32-16 (PTC2) - Other terminals and body ground | Always | 10 kΩ or higher |
| Tester Connection | Condition | Specified Condition |
|---|---|---|
Click Location & Routing(I32)Location & Routingewd_type=routing;type=c;code=I32 |
||
| Relay terminal 2 - I32-17 (PTC3) | Always | Below 1 Ω |
| Relay terminal 2 or I32-17 (PTC3) - Other terminals and body ground | Always | 10 kΩ or higher |
- Result:
-
Proceed to OK NG
OK
NG