1GR-FE EMISSION CONTROL CANISTER INSTALLATION
CAUTION / NOTICE / HINT
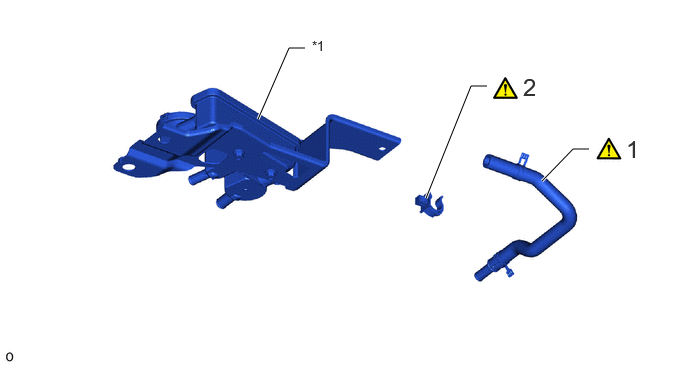
| Procedure | Part Name Code |

|

|

|
|
|---|---|---|---|---|---|
| 1 | NO. 1 EVAPORATION VENT TUBE CLAMP | 77196 | ( ) |
- | - |
| 2 | NO. 2 CHARCOAL CANISTER OUTLET HOSE | 77795 | () |
- | - |
| *1 | FUEL OUTLET VALVE ASSEMBLY | - | - |
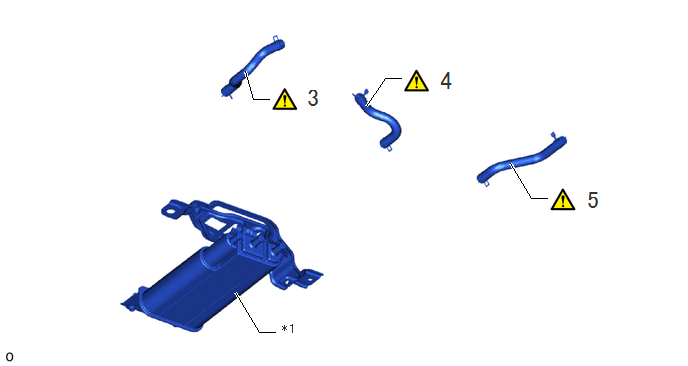
| Procedure | Part Name Code |
|
|
|
|
|---|---|---|---|---|---|
| 3 | CHARCOAL CANISTER OUTLET HOSE | 77754B | () |
- | - |
| 4 | FUEL EMISSION HOSE | 77249A | () |
- | - |
| 5 | NO. 2 CHARCOAL CANISTER OUTLET HOSE | 77754A | () |
- | - |
| *1 | CHARCOAL CANISTER ASSEMBLY | - | - |
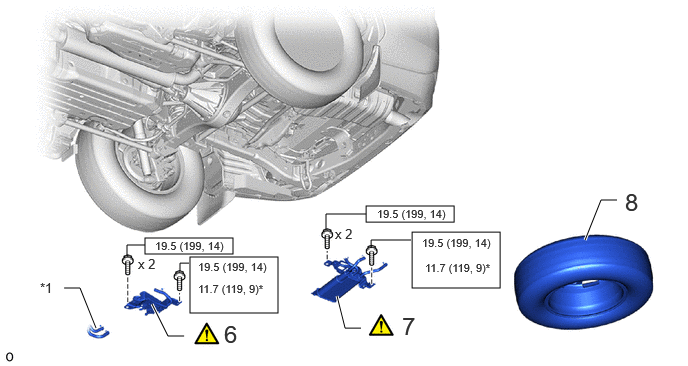
| Procedure | Part Name Code |
|
|
|
|
|---|---|---|---|---|---|
| 6 | FUEL OUTLET VALVE ASSEMBLY | 77720H | () |
- | - |
| 7 | CHARCOAL CANISTER ASSEMBLY | 77740 | () |
- | - |
| 8 | SPARE TIRE | - | - | - | - |
| *1 | FUEL HOSE | - | - |

|
N*m (kgf*cm, ft.*lbf): Specified torque | * | For use with SST |
PROCEDURE

 77196 1.INSTALL NO. 1 EVAPORATION VENT TUBE CLAMP
|
|
|
77795 2.INSTALL NO. 2 CHARCOAL CANISTER OUTLET HOSE
|
|
|
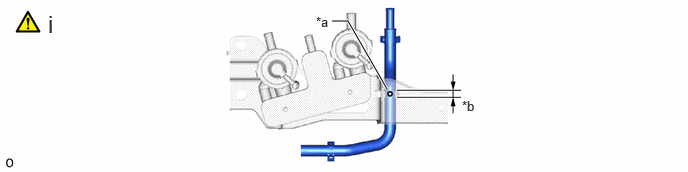
| *a | Paint Mark | *b | Clamp Width |
Install the No. 2 charcoal canister outlet hose to the fuel outlet valve assembly as shown in the illustration.
- NOTICE:
-
·
Paint mark should be not hidden in the clamp.
·Paint mark is within the clamp width.
77754B 3.INSTALL CHARCOAL CANISTER OUTLET HOSE
|
|
|
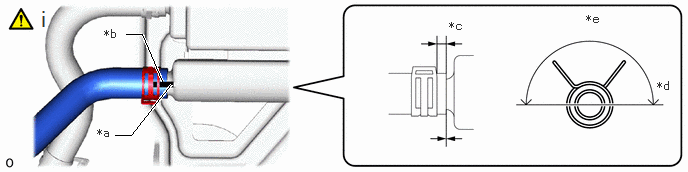
| *a | Charcoal Canister Assembly Rib | *b | Paint Mark |
| *c | 4 to 7 mm (0.1575 to 0.2755 in.) | *d | 180° |
| *e | Upper Side | - | - |
Connect the charcoal canister outlet hose to the charcoal canister assembly and slide the hose clip to secure it.
- NOTICE:
-
·
Align the hose and the hose clip at the locations shown in the illustration and install them.
·Make sure the charcoal canister outlet hose is securely inserted to the stopper.
77249A 4.INSTALL FUEL EMISSION HOSE
|
|
|
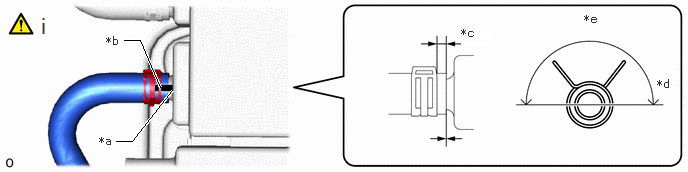
| *a | Charcoal Canister Assembly Rib | *b | Paint Mark |
| *c | 4 to 7 mm (0.1575 to 0.2755 in.) | *d | 180° |
| *e | Upper Side | - | - |
Connect the fuel emission hose to the charcoal canister assembly and slide the hose clip to secure it.
- NOTICE:
-
·
Align the hose and the hose clip at the locations shown in the illustration and install them.
·Make sure the fuel emission hose is securely inserted to the stopper.
77754A 5.INSTALL NO. 2 CHARCOAL CANISTER OUTLET HOSE
|
|
|
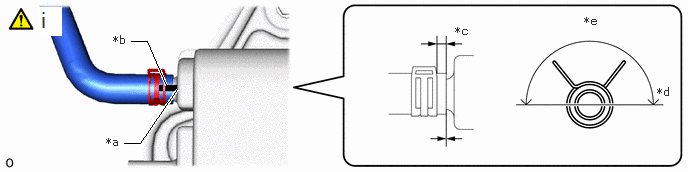
| *a | Charcoal Canister Assembly Rib | *b | Paint Mark |
| *c | 4 to 7 mm (0.1575 to 0.2755 in.) | *d | 180° |
| *e | Upper Side | - | - |
Connect the No. 2 charcoal canister outlet hose to the charcoal canister assembly and slide the hose clip to secure it.
- NOTICE:
-
·
Align the hose and the hose clip at the locations shown in the illustration and install them.
·Make sure the No. 2 charcoal canister outlet hose is securely inserted to the stopper.
77720H 6.INSTALL FUEL OUTLET VALVE ASSEMBLY
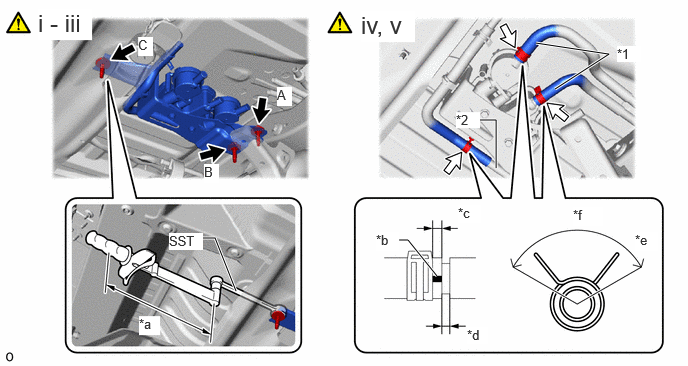
| *1 | Fuel Hose | *2 | No. 1 Charcoal Canister Pipe |
| *a | Torque Wrench Fulcrum Length | *b | Paint Mark |
| *c | 2 to 7 mm (0.0788 to 0.2755 in.) | *d | 3 mm (0.01181 in.) or less |
| *e | 120° | *f | Upper Side |
Temporarily install the fuel outlet valve assembly to the vehicle body with the 3 bolts.
Tighten the bolt (A) and bolt (B).
- Torque:
- 19.5 N*m (199 kgf*cm, 14 ft.*lbf)
Using SST, tighten the bolt (C).
- SST
-
09729-00120
- Torque:
- Specified tightening torque : 19.5 N*m (199 kgf*cm, 14 ft.*lbf)
- HINT:
-
·
Calculate the torque wrench reading when changing the fulcrum length of the torque wrench.
Click hereGeneral>INTRODUCTION>REPAIR INSTRUCTION>PRECAUTION
·When using SST (fulcrum length of 200 mm (7.87 in.)) + torque wrench (fulcrum length of 300 mm (11.8 in.)): 11.7 N*m (119 kgf*cm, 9 ft.*lbf)
Connect the 2 fuel hoses to the fuel outlet valve assembly and slide the 2 hose clips to secure it.
- NOTICE:
-
Align the hose and the hose clip at the locations shown in the illustration and install them.
Connect the fuel outlet valve assembly to the No. 1 charcoal canister pipe and slide the hose clip to secure it.
- NOTICE:
-
Align the hose and the hose clip at the locations shown in the illustration and install them.
77740 7.INSTALL CHARCOAL CANISTER ASSEMBLY
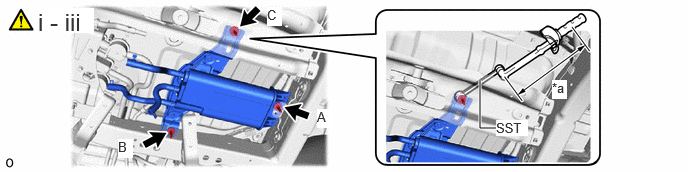
| *a | Torque Wrench Fulcrum Length | - | - |
Temporarily install the charcoal canister assembly to the vehicle body with the 3 bolts.
Tighten the bolt (A) and bolt (B).
- Torque:
- 19.5 N*m (199 kgf*cm, 14 ft.*lbf)
Using SST, tighten the bolt (C).
- SST
-
09729-00120
- Torque:
- Specified tightening torque : 19.5 N*m (199 kgf*cm, 14 ft.*lbf)
- HINT:
-
·
Calculate the torque wrench reading when changing the fulcrum length of the torque wrench.
Click hereGeneral>INTRODUCTION>REPAIR INSTRUCTION>PRECAUTION
·When using SST (fulcrum length of 200 mm (7.87 in.)) + torque wrench (fulcrum length of 300 mm (11.8 in.)): 11.7 N*m (119 kgf*cm, 9 ft.*lbf)
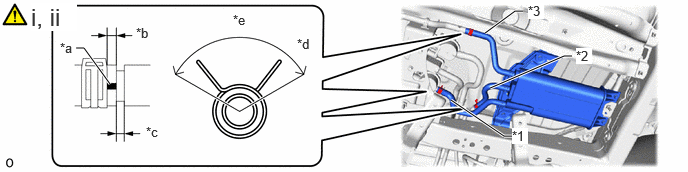
| *1 | Charcoal Canister Outlet Hose | *2 | No. 2 Charcoal Canister Outlet Hose |
| *3 | Fuel Emission HOSE | - | - |
| *a | Paint Mark | *b | 2 to 7 mm (0.0788 to 0.2755 in.) |
| *c | 3 mm (0.01181 in.) or less | *d | 120° |
| *e | Upper Side | - | - |
Connect the charcoal canister outlet hose and No. 2 charcoal canister outlet hose to the fuel outlet valve assembly and slide the hose clip to secure it.
- NOTICE:
-
Align the hose and the hose clip at the locations shown in the illustration and install them.
Connect the fuel emission hose to the No. 2 charcoal canister pipe and slide the hose clip to secure it.
- NOTICE:
-
Align the hose and the hose clip at the locations shown in the illustration and install them.
8.INSTALL SPARE TIRE