Home › Audio / Visual / Telematics › AUDIO / VIDEO › AUDIO AND VISUAL SYSTEM (for Radio and Display Type, for 12.3 Inch Display)
RM38G0E _56 Audio / Visual / Telematics _100606 AUDIO / VIDEO _0467496 AUDIO AND VISUAL SYSTEM(for Radio and Display Type, for 12.3 Inch Display) J

AUDIO / VIDEO  AUDIO AND VISUAL SYSTEM(for Radio and Display Type, for 12.3 Inch Display)  AVC-LAN Circuit  


DESCRIPTION

Each unit of the audio and visual system connected to the AVC-LAN (communication bus) transmits switch signals via AVC-LAN communication.

If a short to +B or short to ground occurs in the AVC-LAN, the audio and visual system will not function normally because communication is not possible.

WIRING DIAGRAM
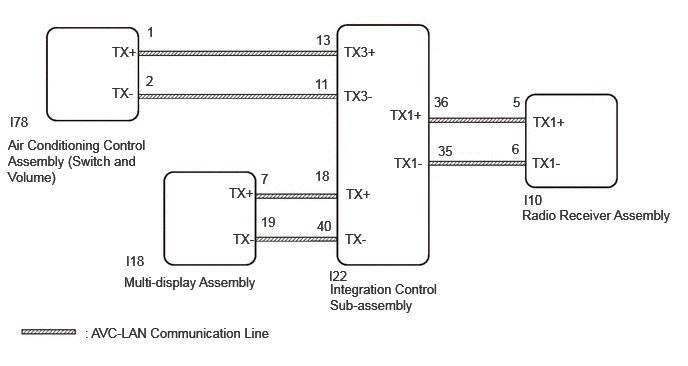
E462714E06
3.438,2.927 4.625,3.51 1.188,0.583 10 false Integration Control Sub-assembly 5.438,2.156 7.156,2.635 1.719,0.479 10 false Radio Receiver Assembly 1.292,2.854 2.792,3.104 1.5,0.25 10 false Multi-display Assembly 0.083,1.427 1.563,2.052 1.479,0.625 10 false Air Conditioning Control Assembly (Switch and Volume) 0.885,3.385 2.896,3.583 2.01,0.198 10 false : AVC-LAN Communication Line 1.313,2.635 1.604,2.875 0.292,0.24 10 false I18 5.458,2 5.75,2.24 0.292,0.24 10 false I10 5.344,0.979 5.635,1.219 0.292,0.24 10 false 5 5.333,1.469 5.625,1.708 0.292,0.24 10 false 6 5.542,1.615 5.906,1.833 0.365,0.219 10 false TX1- 5.552,1.188 5.927,1.396 0.375,0.208 10 false TX1+ 3.604,1.938 4,2.167 0.396,0.229 10 false TX+ 2.385,1.927 2.677,2.167 0.292,0.24 10 false TX+ 2.427,2.406 2.719,2.646 0.292,0.24 10 false TX- 3.292,0.333 3.583,0.594 0.292,0.26 10 false 13 3.281,0.792 3.573,1.031 0.292,0.24 10 false 11 3.281,1.75 3.573,1.99 0.292,0.24 10 false 18 3.302,2.271 3.594,2.51 0.292,0.24 10 false 40 1.167,0.458 1.552,0.635 0.385,0.177 10 false TX+ 0.104,1.188 0.458,1.406 0.354,0.219 10 false I78 2.719,1.781 2.854,1.99 0.135,0.208 10 false 7 3.594,2.406 3.885,2.646 0.292,0.24 10 false TX- 4.063,1.115 4.469,1.354 0.406,0.24 10 false TX1+ 4.104,1.615 4.438,1.844 0.333,0.229 10 false TX1- 1.167,0.885 1.5,1.083 0.333,0.198 10 false TX- 4.521,0.979 4.813,1.219 0.292,0.24 10 false 36 4.563,1.49 4.854,1.729 0.292,0.24 10 false 35 3.427,2.792 3.813,2.979 0.385,0.188 10 false I22 1.531,0.25 1.823,0.49 0.292,0.24 10 false 1 1.521,0.76 1.813,1 0.292,0.24 10 false 2 3.583,0.458 4.01,0.698 0.427,0.24 10 false TX3+ 3.583,0.917 4.01,1.156 0.427,0.24 10 false TX3- 2.719,2.229 2.958,2.458 0.24,0.229 10 false 19

CAUTION / NOTICE / HINT

NOTICE:

Depending on the parts that are replaced during vehicle inspection or maintenance, performing initialization, registration or calibration may be needed. Refer to Precaution for Audio and Visual System.

Click hereAudio / Visual / Telematics>AUDIO / VIDEO>AUDIO AND VISUAL SYSTEM (for Radio and Display Type, for 12.3 Inch Display)>PRECAUTION


HINT:

The radio receiver assembly is the master unit.


PROCEDURE

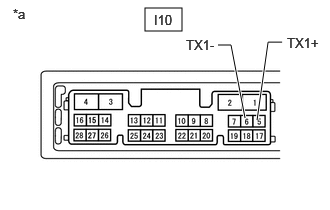
1.INSPECT RADIO RECEIVER ASSEMBLY

b.
E362173C38
1.51,0.083 1.896,0.323 0.385,0.24 2.677,1.25 2.792,0.438 2.792,0.438 2.938,0.438 true 2.552,1.229 2.406,0.469 2.406,0.469 2.271,0.469 true 2.99,0.365 3.406,0.604 0.417,0.24 10 false TX1+ 1.938,0.385 2.375,0.635 0.438,0.25 10 false TX1- 0.135,0.063 0.448,0.26 0.313,0.198 10 false *a 1.604,0.125 2.042,0.375 0.438,0.25 10 false I10
*a Component without harness connected
(Radio Receiver Assembly)


Measure the resistance according to the value(s) in the table below.

Standard Resistance:
Tester Connection Condition Specified Condition

Click Location & Routing(I10)Location & Routing

Click Connector(I10)Instrument Panel>Instrument Panel Wire / Mobile Wireless Charger Cord / No. 1 Navigation Wire / No. 2 Instrument Panel Wire / No. 5 Instrument Panel Wire / Telephone Computer Wire>Radio Receiver Assembly

I10-5 (TX1+) - I10-6 (TX1-) Always 60 to 80 Ω


Result:
Proceed to
OK
NG


OK

2.CHECK HARNESS AND CONNECTOR (AVC-LAN CIRCUIT)

NG

2.CHECK HARNESS AND CONNECTOR (AVC-LAN CIRCUIT)
a.

Disconnect the I10 radio receiver assembly connector.


b.

Disconnect the I22 integration control sub-assembly connector.


c.

Disconnect the I18 multi-display assembly connector.


d.

Disconnect the I78 air conditioning control assembly (switch and volume) connector.


e.

Measure the resistance according to the value(s) in the table below.

Standard Resistance:
Tester Connection Condition Specified Condition

Click Location & Routing(I10,I22,I18,I78)Location & Routing

Click Connector(I10)Instrument Panel>Instrument Panel Wire / Mobile Wireless Charger Cord / No. 1 Navigation Wire / No. 2 Instrument Panel Wire / No. 5 Instrument Panel Wire / Telephone Computer Wire>Radio Receiver Assembly

Click Connector(I22)Instrument Panel>Instrument Panel Wire / Mobile Wireless Charger Cord / No. 1 Navigation Wire / No. 2 Instrument Panel Wire / No. 5 Instrument Panel Wire / Telephone Computer Wire>Integration Control Sub-Assembly

Click Connector(I18)Instrument Panel>Instrument Panel Wire / Mobile Wireless Charger Cord / No. 1 Navigation Wire / No. 2 Instrument Panel Wire / No. 5 Instrument Panel Wire / Telephone Computer Wire>Multi-Display Assembly

Click Connector(I78)Instrument Panel>Instrument Panel Wire / Mobile Wireless Charger Cord / No. 1 Navigation Wire / No. 2 Instrument Panel Wire / No. 5 Instrument Panel Wire / Telephone Computer Wire>Air Conditioning Control Assembly

I10-5 (TX1+) - I22-36 (TX1+) Always Below 1 Ω
I10-6 (TX1-) - I22-35 (TX1-) Always Below 1 Ω
I10-5 (TX1+) or I22-36 (TX1+) - Body ground Always 10 kΩ or higher
I10-6 (TX1-) or I22-35 (TX1-) - Body ground Always 10 kΩ or higher
I22-18 (TX+) - I18-7 (TX+) Always Below 1 Ω
I22-40 (TX-) - I18-19 (TX-) Always Below 1 Ω
I22-18 (TX+) or I18-7 (TX+) - Body ground Always 10 kΩ or higher
I22-40 (TX-) or I18-19 (TX-) - Body ground Always 10 kΩ or higher
I22-13 (TX3+) - I78-1 (TX+) Always Below 1 Ω
I22-11 (TX3-) - I78-2 (TX-) Always Below 1 Ω
I22-13 (TX3+) or I78-2 (TX+) - Body ground Always 10 kΩ or higher
I22-11 (TX3-) or I78-2 (TX-) - Body ground Always 10 kΩ or higher


Result:
Proceed to
OK
NG


OK

3.INSPECT MALFUNCTIONING PARTS

NG

REPAIR OR REPLACE HARNESS OR CONNECTOR

3.INSPECT MALFUNCTIONING PARTS
a.

Disconnect and reconnect each slave unit one by one until the master unit returns to normal.

HINT:
·

Check all slave units.

·

If disconnecting a slave unit causes the master unit to return to normal, the slave unit is defective and should be replaced.


OK:

Master unit return to normal.


Result:
Proceed to
OK
NG


OK

REPLACE MALFUNCTIONING PARTS

NG