F33A-FTV ENGINE MECHANICAL CYLINDER HEAD REASSEMBLY
CAUTION / NOTICE / HINT
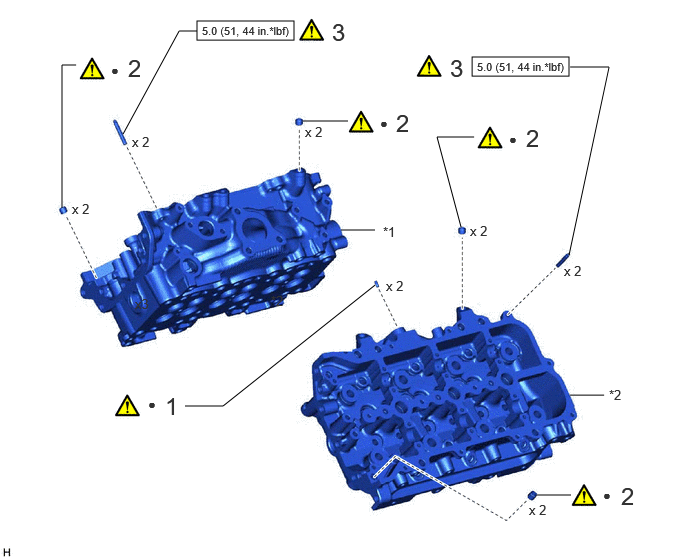
| Procedure | Part Name Code |

|

|

|
|
|---|---|---|---|---|---|
| 1 | STRAIGHT PIN | ( ) |
|||
| 2 | RING PIN | - | () |
- | - |
| 3 | STUD BOLT | - | () |
- | - |
| *1 | CYLINDER HEAD SUB-ASSEMBLY RH | *2 | CYLINDER HEAD SUB-ASSEMBLY LH |

|
N*m (kgf*cm, ft.*lbf): Specified torque | ● | Non-reusable part |
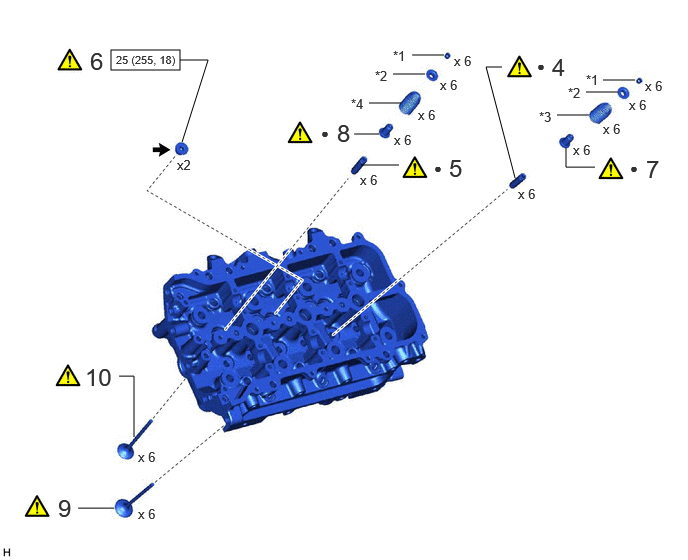
| Procedure | Part Name Code |
|
|
|
|
|---|---|---|---|---|---|
| 4 | NO. 2 EXHAUST VALVE GUIDE BUSH | 11126B | () |
- | - |
| 5 | NO. 2 INTAKE VALVE GUIDE BUSH | 11122B | () |
- | - |
| 6 | NO. 2 STRAIGHT SCREW PLUG LH WITH HEAD | 11117F | () |
- | - |
| 7 | EXHAUST VALVE STEM OIL SEAL | 13715A | () |
- | - |
| 8 | INTAKE VALVE STEM OIL SEAL | 13711E | () |
- | - |
| 9 | EXHAUST VALVE | 13715 | () |
- | - |
| 10 | INTAKE VALVE | 13711 | () |
- | - |
| *1 | VALVE SPRING RETAINER LOCK | *2 | VALVE SPRING RETAINER |
| *3 | INTAKE VALVE COMPRESSION SPRING | *4 | EXHAUST VALVE COMPRESSION SPRING |
|
|
N*m (kgf*cm, ft.*lbf): Specified torque | ● | Non-reusable part |

|
Toyota Genuine Adhesive 1324, Three Bond 1324 or equivalent | - | - |
CAUTION / NOTICE / HINT
- HINT:
-
·
Use the same procedure for the Bank 1 side and Bank 2 side.
·The following procedure is for the Bank 2 side.
PROCEDURE

 1.INSTALL STRAIGHT PIN
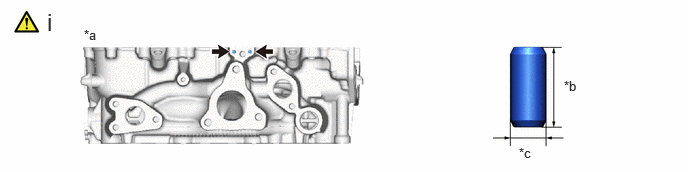
| *a | for Bank 2 | *b | 9 mm (0.354 in.) |
| *c | 4 mm (0.158 in.) | - | - |
Using a plastic-faced hammer, tap in new straight pins to the specified protrusion height.
- Standard protrusion height:
-
3.0 to 5.0 mm (0.118 to 0.197 in.)
2.INSTALL RING PIN
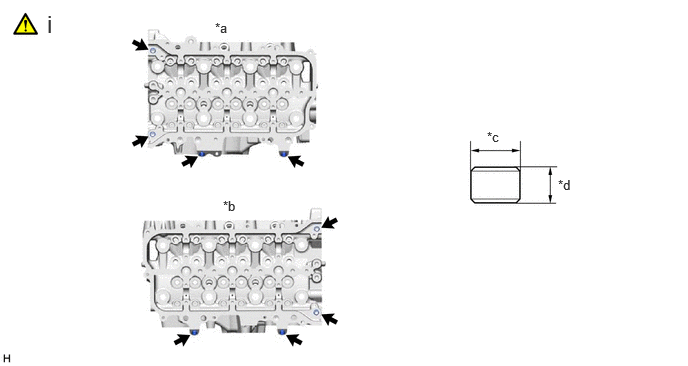
| *a | for Bank 1 | *b | for Bank 2 |
| *c | 11 mm (0.433 in.) | *d | 8 mm (0.315 in.) |
Using a plastic-faced hammer, tap in new ring pins to the specified protrusion height.
- Standard protrusion height:
-
3.0 to 5.0 mm (0.118 to 0.197 in.)
3.INSTALL STUD BOLT
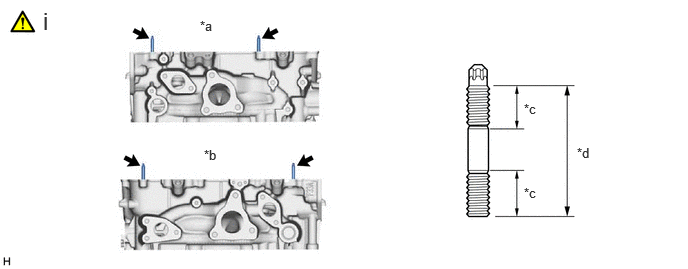
| *a | for Bank 1 | *b | for Bank 2 |
| *c | 12 mm (0.472 in.) | *d | 37 mm (1.46 in.) |
Using E6 "TORX" socket wrench, install the stud bolts.
- Torque:
- 5.0 N*m (51 kgf*cm, 44 in.*lbf)
11126B 4.INSTALL NO. 2 EXHAUST VALVE GUIDE BUSH
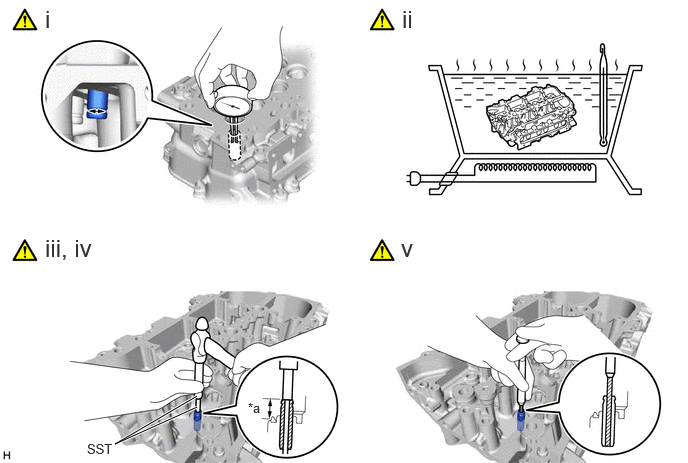
| *a | Protrusion Height | - | - |
Using a caliper gauge, measure the exhaust valve guide bush bore diameter of the cylinder head sub-assembly.
- Standard cylinder bore diameter:
-
10.285 to 10.306 mm (0.405 to 0.406 in.)
| Bush Size | Specified Condition |
|---|---|
| STD | 10.333 to 10.344 mm (0.40681 to 0.40724 in.) |
| O/S | 10.383 to 10.394 mm (0.40878 to 0.40921 in.) |
- HINT:
-
·
If the bush bore diameter of the cylinder head sub-assembly is more than 10.306 mm (0.406 in.), machine the bush bore to the dimension of 10.335 to 10.356 mm (0.407 to 0.408 in.) to install an O/S 0.05 valve guide bush.
·If the bush bore diameter of the cylinder head sub-assembly is more than 10.356 mm (0.408 in.), replace the cylinder head sub-assembly.
Heat the cylinder head to 80 to 100°C (176 to 212°F).
- CAUTION:
-
·
Do not touch the cylinder head sub-assembly without wearing protective gloves, as it may get very hot during operation.
·Be sure to wear protective gloves to avoid burns.
Place the cylinder head sub-assembly on wooden blocks.
- CAUTION:
-
Be sure to wear protective gloves.
Using SST, tap in new exhaust valve guide bushes to the specified protrusion height.
- SST
-
09201-10000 (09201-01050)
09950-70010 (09951-07100)
09201-01055
- Standard protrusion height:
-
18.1 to 18.5 mm (0.713 to 0.728 in.)
Using a sharp 5.5 mm reamer, ream the valve guide bushings to obtain the specified clearance.
- Standard oil clearance:
-
0.030 to 0.065 mm (0.00118 to 0.00256 in.)
11122B 5.INSTALL NO. 2 INTAKE VALVE GUIDE BUSH
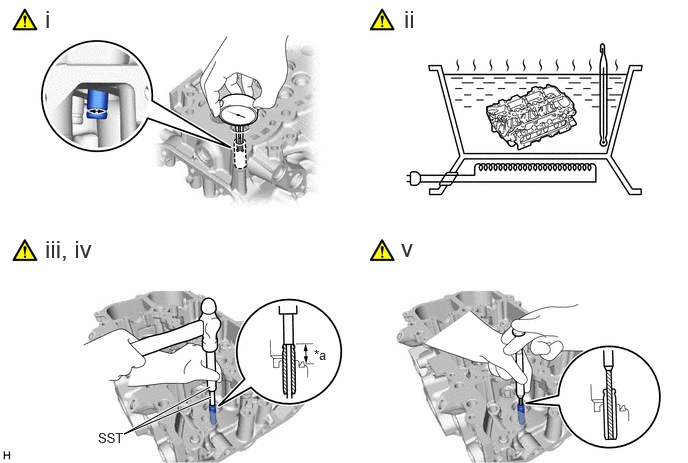
| *a | Protrusion Height | - | - |
Using a caliper gauge, measure the intake valve guide bush bore diameter of the cylinder head sub-assembly.
- Standard cylinder bore diameter:
-
10.285 to 10.306 mm (0.405 to 0.406 in.)
| Bush Size | Specified Condition |
|---|---|
| STD | 10.333 to 10.344 mm (0.40681 to 0.40724 in.) |
| O/S | 10.383 to 10.394 mm (0.40878 to 0.40921 in.) |
- HINT:
-
·
If the bush bore diameter of the cylinder head sub-assembly is more than 10.306 mm (0.406 in.), machine the bush bore to the dimension of 10.335 to 10.356 mm (0.407 to 0.408 in.) to install an O/S 0.05 valve guide bush.
·If the bush bore diameter of the cylinder head sub-assembly is more than 10.356 mm (0.408 in.), replace the cylinder head sub-assembly.
Heat the cylinder head sub-assembly to 80 to 100°C (176 to 212°F).
- CAUTION:
-
·
Do not touch the cylinder head sub-assembly without wearing protective gloves, as it may get very hot during operation.
·Be sure to wear protective gloves to avoid burns.
Place the cylinder head sub-assembly on wooden blocks.
- CAUTION:
-
Be sure to wear protective gloves.
Using SST, tap in new intake valve guide bushes to the specified protrusion height.
- SST
-
09201-10000 (09201-01050)
09950-70010 (09951-07100)
09201-01055
- Standard protrusion height:
-
16.1 to 16.5 mm (0.634 to 0.650 in.)
Using a sharp 5.5 mm reamer, ream the valve guide bushings to obtain the specified clearance.
- Standard oil clearance:
-
0.025 to 0.060 mm (0.000984 to 0.00236 in.)
11117F 6.INSTALL NO. 2 STRAIGHT SCREW PLUG LH WITH HEAD
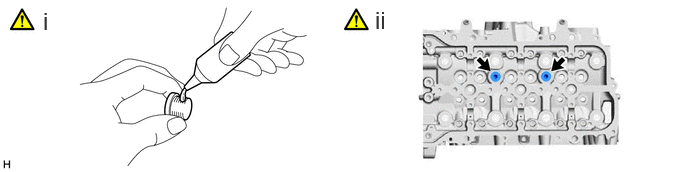
Apply adhesive to the No. 2 straight screw plugs LH with head.
- Adhesive:
-
Toyota Genuine Adhesive 1324, Three Bond 1324 or equivalent
Using a 6 mm hexagon wrench, install the No. 2 straight screw plugs LH with head.
- Torque:
- 25 N*m (255 kgf*cm, 18 ft.*lbf)
- NOTICE:
-
Do not expose the No. 2 straight screw plug LH with head to engine oil for at least 1 hour after installing it.
13715A 7.INSTALL EXHAUST VALVE STEM OIL SEAL
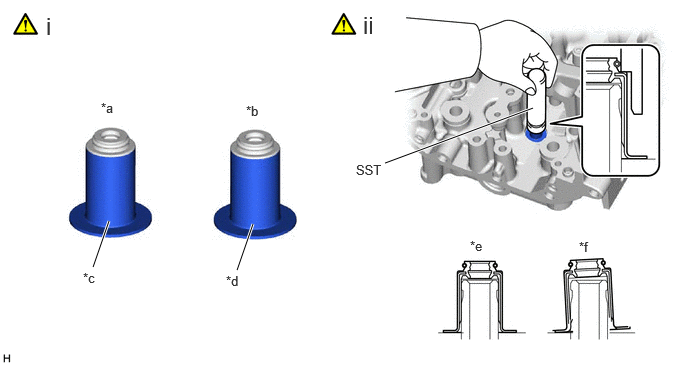
| *a | Intake Side | *b | Exhaust Side |
| *c | Gray | *d | Green |
| *e | CORRECT | *f | INCORRECT |
Apply a light coat of engine oil to new exhaust valve stem oil seals.
- NOTICE:
-
Pay attention when installing the intake and exhaust valve stem oil seals. For example, installing the intake valve stem oil seal to the exhaust side or installing the exhaust valve stem oil seal to the intake side can cause installation problems later.
- HINT:
-
The intake valve oil seals are gray and the exhaust valve oil seals are green.
Using SST, push in the exhaust valve stem oil seals.
- SST
-
09201-41020
- NOTICE:
-
Failure to use SST will cause the seal to be damaged or improperly seated.
13711E 8.INSTALL INTAKE VALVE STEM OIL SEAL
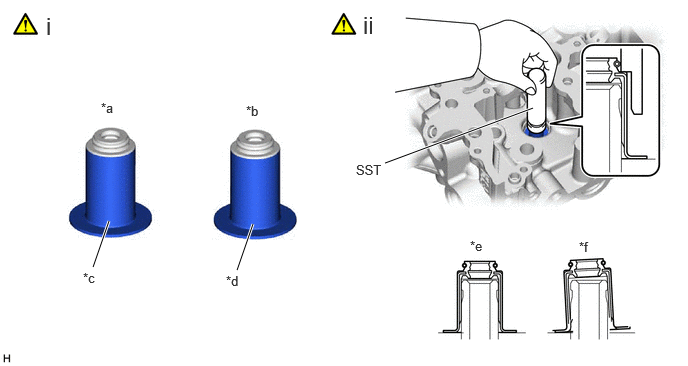
| *a | Intake Side | *b | Exhaust Side |
| *c | Gray | *d | Green |
| *e | CORRECT | *f | INCORRECT |
Apply a light coat of engine oil to new intake valve stem oil seals.
- NOTICE:
-
Pay attention when installing the intake and exhaust valve stem oil seals. For example, installing the intake valve stem oil seal to the exhaust side or installing the exhaust valve stem oil seal to the intake side can cause installation problems later.
- HINT:
-
The intake valve oil seals are gray and the exhaust valve oil seals are green.
Using SST, push in the intake valve stem oil seals.
- SST
-
09201-41020
- NOTICE:
-
Failure to use SST will cause the seal to be damaged or improperly seated.
13715 9.INSTALL EXHAUST VALVE
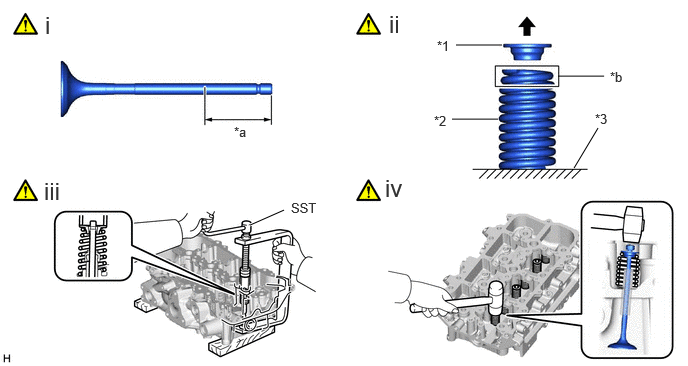
| *1 | Valve Spring Retainer | *2 | Exhaust Valve Compression Spring |
| *3 | Cylinder Head Sub-assembly | - | - |
| *a | 30 mm (1.18 in.) or more | *b | Orange |
|
|
Top | - | - |
Apply a sufficient coat of engine oil to the tip area of the exhaust valve shown in the illustration.
Install the exhaust valve, exhaust valve compression spring and valve spring retainer to the cylinder head sub-assembly.
- NOTICE:
-
·
Install the exhaust valve compression spring so that the painted side (orange) faces upward (valve spring retainer side).
·Install the same parts in the same combination to their original locations.
Using SST, compress each compression spring and install the 6 valve spring retainer locks.
- SST
-
09202-70020 (09202-01010, 09202-01020)
09202-00021
Using a plastic-faced hammer, lightly tap the valve stem tip to ensure a proper fit.
- NOTICE:
-
Be careful not to damage the retainer.
13711 10.INSTALL INTAKE VALVE
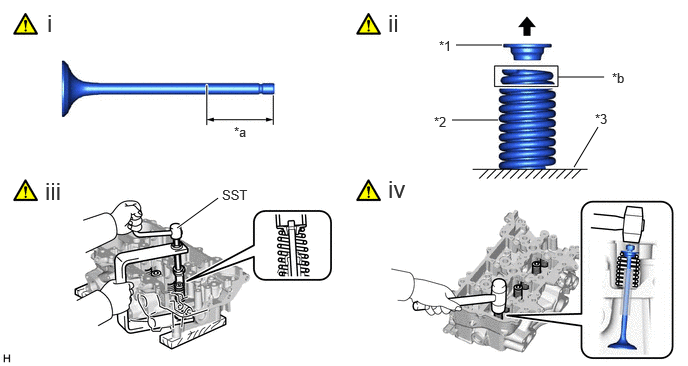
| *1 | Valve Spring Retainer | *2 | Intake Valve Compression Spring |
| *3 | Cylinder Head Sub-assembly | - | - |
| *a | 30 mm (1.18 in.) or more | *b | Green |
|
|
Top | - | - |
Apply a sufficient coat of engine oil to the tip area of the intake valve shown in the illustration.
Install the intake valve, intake valve compression spring and valve spring retainer to the cylinder head sub-assembly.
- NOTICE:
-
·
Install the intake valve compression spring so that the painted side (green) faces upward (valve spring retainer side).
·Install the same parts in the same combination to their original locations.
Using SST, compress each compression spring and install the 6 valve spring retainer locks.
- SST
-
09202-70020 (09202-01010, 09202-01020)
09202-00021
Using a plastic-faced hammer, lightly tap the valve stem tip to ensure a proper fit.
- NOTICE:
-
Be careful not to damage the retainer.