F33A-FTV ENGINE CONTROL MASS AIR FLOW METER ON-VEHICLE INSPECTION
PROCEDURE

 22204 1.INSPECT INTAKE MASS AIR FLOW METER SUB-ASSEMBLY
Read the value of Data List item "Mass Air Flow Sensor" using the GTS.
- NOTICE:
-
Perform the inspection of the mass air flow meter sub-assembly while it is installed to the air cleaner cap sub-assembly (installed to the vehicle).
Check and ensure the following conditions:
Turn off all electrical loads, such as the air conditioning, etc.
Check that the coolant temperature is 75°C (167°F) or more.
Put the shift lever in the N position.
Start the engine.
According to the display on the GTS, read the Data List when the engine is running.
- Powertrain > Engine > Data List
-
Tester Display Mass Air Flow Sensor - 50003 372 215
- Standard:
-
GTS Display Test Condition Specified Condition Mass Air Flow Sensor Idling (shift lever in N, engine warmed up and A/C off) EGR system ON 5.5 to 17.3 gm/sec EGR system OFF 13.5 to 17.3 gm/sec 3000 rpm (shift lever in N, engine warmed up and A/C off) EGR system ON 38.0 to 124.4 gm/sec EGR system OFF 81.7 to 124.4 gm/sec
If the result is not as specified, clean (air blow) the intake mass air flow meter sub-assembly.
After cleaning (air blowing) the intake mass air flow meter sub-assembly, perform an on-vehicle inspection of the intake mass air flow meter sub-assembly again and replace the intake mass air flow meter sub-assembly if the result is not as specified.
If the result is within the specified range, check the intake air temperature sensor (thermistor) resistance.
Click hereEngine / Hybrid System>F33A-FTV (ENGINE CONTROL)>MASS AIR FLOW METER>INSPECTION
22204 2.CLEAN INTAKE MASS AIR FLOW METER SUB-ASSEMBLY
- NOTICE:
-
If the mass air flow meter sub-assembly is removed and installed 10 times or more, the thread of the hole of the mass air flow meter sub-assembly may be damaged. Therefore, do not loosen the screws of the mass air flow meter sub-assembly.
Remove the air cleaner cap sub-assembly.
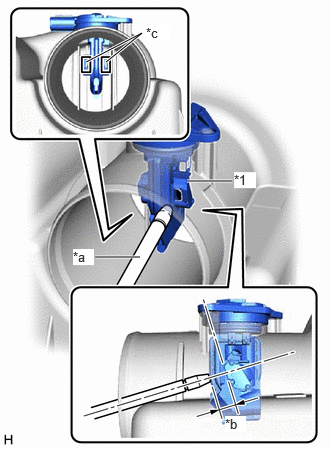
| *1 | Mass Air Flow Meter Sub-assembly |
| *a | Air Duster |
| *b | 10 mm (0.394 in.) |
| *c | Airflow Hole |
Clean the mass air flow meter sub-assembly.
- NOTICE:
-
·
Do not contact the mass air flow meter sub-assembly with the nozzle of the air duster.
·Do not insert the nozzle of the air duster into the airflow hole.
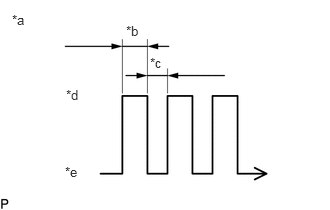
| *a | Air Blow Duration |
| *b | 3 to 6 Seconds |
| *c | 1 Second |
| *d | Air Blowing |
| *e | Air Stopped |
Using an air duster, clean the hole of the mass air flow meter sub-assembly by applying approximately 10 intermittent bursts of air to the airflow hole at a pressure of approximately 392 to 981 kPa (4 to 10 kgf/cm2, 57 to 142 psi).
- HINT:
-
Apply 5 intermittent bursts of air to the airflow hole at 2 locations.