LIGHTING (EXT) HEADLIGHT ASSEMBLY INSTALLATION
CAUTION / NOTICE / HINT
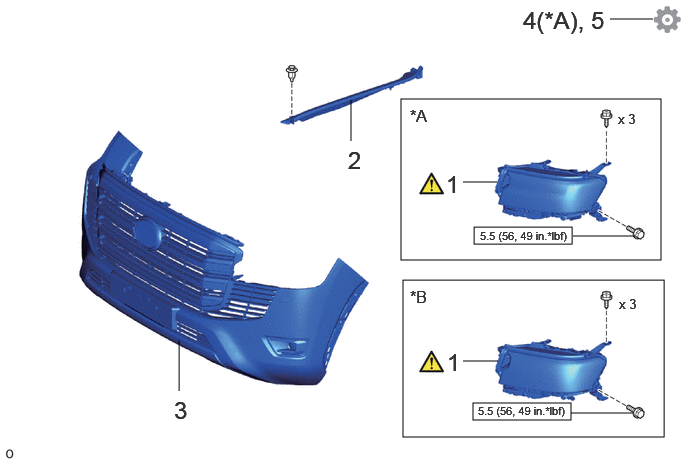
| Procedure | Part Name Code |

|

|

|
|
|---|---|---|---|---|---|
| 1 | HEADLIGHT ASSEMBLY LH | - | ( ) |
- | - |
| 2 | FRONT FENDER REINFORCEMENT SUB-ASSEMBLY TOP LH | 53808D | - | - | - |
| 3 | FRONT BUMPER ASSEMBLY | - | - | - | - |
| 4 | PERFORM SYSTEM INITIALIZATION | - | - | - | () |
| 5 | ADJUST HEADLIGHT AIMING | - | - | - | () |
| *A | w/ Headlight ECU | *B | w/o Headlight ECU |

|
N*m (kgf*cm, ft.*lbf): Specified torque | - | - |
CAUTION / NOTICE / HINT
- HINT:
-
·
Use the same procedure for the RH and LH sides.
·The procedure described below is for the LH side.
PROCEDURE

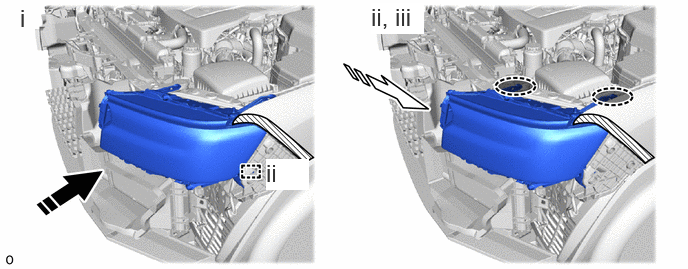
 1.INSTALL HEADLIGHT ASSEMBLY LH

|
Place Hand Here |

|
Install in this Direction (1) |

|
Install in this Direction (2) | - | - |
Set the headlight assembly LH in the installation direction (1) as shown in the illustration.
Slide the headlight assembly LH in the installation direction (2) and attach the guide.
Place your hands at the positions shown in the illustration and set the bracket to the guide.
- NOTICE:
-
Do not break the bracket.
| *A | w/ Headlight ECU | *B | w/o Headlight ECU |
|
|
Install in this Direction |

|
Bolt |

|
Screw |

|
Connector |
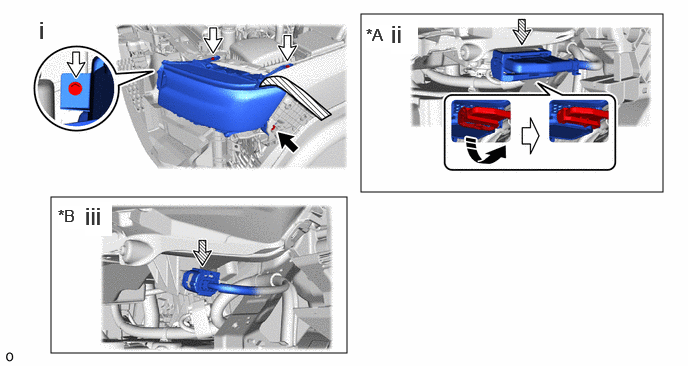
Install the headlight assembly LH with the bolt and 3 screws.
- Torque:
- 5.5 N*m (56 kgf*cm, 49 in.*lbf)
w/ Headlight ECU:
Connect the connector and lock the connector lock lever and remove the protective tape.
w/o Headlight ECU:
Connect the connector and remove the protective tape.
53808D 2.INSTALL FRONT FENDER REINFORCEMENT SUB-ASSEMBLY TOP LH
3.INSTALL FRONT BUMPER ASSEMBLY
for Standard:
Click hereVehicle Exterior>EXTERIOR PANELS / TRIM>FRONT BUMPER (for Standard)>INSTALLATION
for Aero Type:
Click hereVehicle Exterior>EXTERIOR PANELS / TRIM>FRONT BUMPER (for Aero Type)>INSTALLATION
4.PERFORM SYSTEM INITIALIZATION (w/ Headlight ECU)
5.ADJUST HEADLIGHT AIMING