1HZ ENGINE MECHANICAL CYLINDER BLOCK DISASSEMBLY
PROCEDURE

 1.INSPECT CONNECTING ROD THRUST CLEARANCE
- HINT:
-
·
Thoroughly clean all parts to be assembled.
·Before installing the parts, apply new engine oil to all sliding and rotating surfaces.
·Replace all gaskets, O-rings and oil seals with new ones.
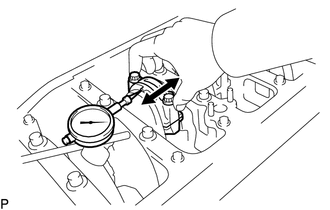
Using a dial indicator, measure the thrust clearance while moving the connecting rod back and forth.
- Standard thrust clearance:
-
0.10 to 0.20 mm (0.00394 to 0.00787 in.)
- Maximum thrust clearance:
-
0.30 mm (0.0118 in.)
If the thrust clearance is more than the maximum, replace the connecting rod assembly. If necessary, replace the crankshaft.
2.INSPECT CONNECTING ROD OIL CLEARANCE
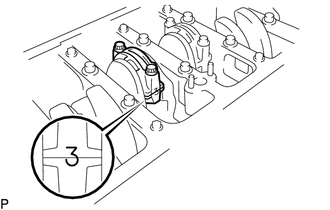
Check the matchmarks on the connecting rod and cap to ensure correct reassembly.
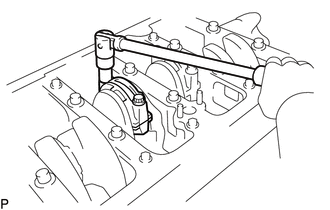
Remove the 2 connecting rod cap bolts.
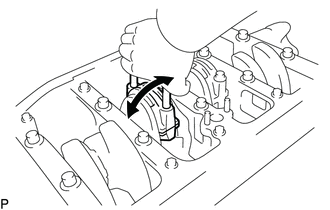
Using the 2 removed connecting rod cap bolts, remove the connecting rod cap and lower connecting rod bearing by wiggling the connecting rod cap right and left.
- HINT:
-
Keep the lower connecting rod bearing and connecting rod cap together.
Clean the crank pin and connecting rod bearing.
Check the crank pin and connecting rod bearing for pitting and scratches. If the crank pin or connecting rod bearing is damaged, replace the connecting rod bearings. If necessary, replace the crankshaft.
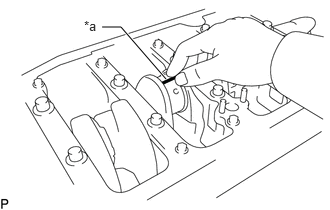
| *a | Plastigage |
Lay a strip of Plastigage across the crank pin.
Install the connecting rod cap.
Click hereEngine / Hybrid System>1HZ (ENGINE MECHANICAL)>CYLINDER BLOCK>REASSEMBLY
- NOTICE:
-
Do not turn the crankshaft.
Remove the 2 bolts, connecting rod cap and lower connecting rod bearing.
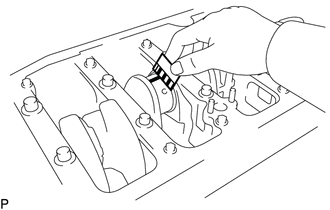
Measure the Plastigage at its widest point.
- Standard oil clearance:
-
0.036 to 0.054 mm (0.00142 to 0.00213 in.)
- Maximum oil clearance:
-
0.10 mm (0.00394 in.)
If the oil clearance is more than the maximum, replace the connecting rod bearings. If necessary, grind or replace the crankshaft.
- HINT:
-
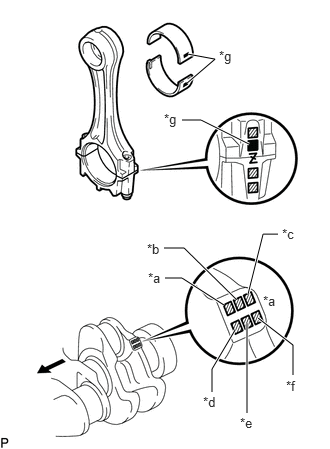 1.948,0.865 2.24,0.615 2.24,0.615 1.958,0.563 true 1.896,1.25 2.094,1.25 2.094,1.25 2.594,1.5 true 1.719,2.896 1.896,2.896 1.896,2.896 2.333,3.177 true 1.708,2.583 1.917,2.583 1.917,2.583 2.458,3.115 true 2.896,2.438 2.74,2.438 2.74,2.438 2.583,3.063 true 2.208,4.083 2.208,3.844 2.208,3.844 2.448,3.438 true 2.573,4.302 2.573,3.365 true 3.052,3.906 3.052,3.594 3.052,3.594 2.688,3.313 true 2.74,3.052 2.948,3.25 0.208,0.198 10 false *a 1.542,2.813 1.854,2.969 0.313,0.156 10 false *a 1.531,2.51 1.844,2.667 0.313,0.156 10 false *b 2.938,2.354 3.25,2.51 0.313,0.156 10 false *c 2.115,4.104 2.427,4.26 0.313,0.156 10 false *d 2.5,4.323 2.813,4.479 0.313,0.156 10 false *e 2.979,3.938 3.292,4.094 0.313,0.156 10 false *f 2.281,0.5 2.594,0.771 0.313,0.271 10 false *g 1.708,1.156 2.021,1.427 0.313,0.271 10 false *g
*a No. 1 *b No. 2 *c No. 3 *d No. 4 *e No. 5 *f No. 6 *g Number Mark
-
If replacing a connecting rod bearing, replace it with one that has the same number as the number marked on the connecting rod. There are 5 sizes of standard connecting rod bearings, marked "2", "3", "4", "5" and "6" accordingly.
- Connecting Rod Diameter:
-
Item Specified Condition Mark 1 62.014 to 62.020 mm (2.4415 to 2.4417 in.) Mark 2 62.020 to 62.026 mm (2.4417 to 2.4420 in.) Mark 3 62.026 to 62.032 mm (2.4420 to 2.4422 in.)
- Standard Connecting Rod Bearing Center Wall Thickness:
-
Item Specified Condition Mark 2 1.486 to 1.489 mm (0.0585 to 0.0586 in.) Mark 3 1.489 to 1.492 mm (0.0586 to 0.0587 in.) Mark 4 1.492 to 1.495 mm (0.0587 to 0.0589 in.) Mark 5 1.495 to 1.498 mm (0.0589 to 0.0590 in.) Mark 6 1.498 to 1.501 mm (0.0590 to 0.0591 in.)
- Standard Crankshaft Pin Diameter:
-
Item Specified Condition Mark 1 58.994 to 59.000 mm (2.3226 to 2.3228 in.) Mark 2 58.988 to 58.994 mm (2.3224 to 2.3226 in.) Mark 3 58.982 to 58.988 mm (2.3221 to 2.3224 in.)
Completely remove the Plastigage.
3.REMOVE PISTON AND CONNECTING ROD
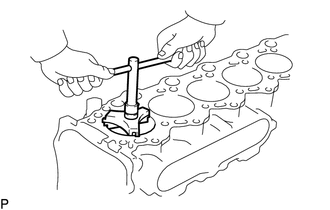
Using a ridge reamer, remove all the carbon from the top of the cylinder.
Push out the piston with connecting rod and upper connecting rod bearing through the top of the cylinder block sub-assembly.
- HINT:
-
·
Keep the connecting rod bearings, connecting rod and cap together.
·Arrange the piston and connecting rod assemblies in the correct order.
13041 4.REMOVE CONNECTING ROD BEARING
Remove the connecting rod bearings from the connecting rods and connecting rod caps.
- HINT:
-
Arrange the removed parts in the correct order.
13011 5.REMOVE PISTON RING SET
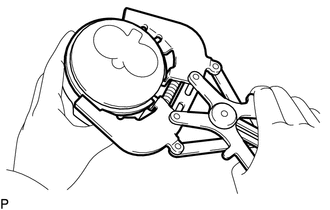
Using a piston ring expander, remove the No. 1 compression ring, No. 2 compression ring and oil ring.
Remove the coil by hand.
- HINT:
-
Arrange the rings in correct order only.
6.REMOVE PISTON
Check the fitting condition between the piston and piston pin.
Try to move the piston back and forth on the piston pin.
If any movement is felt, replace the piston and pin with a new piston and a set.
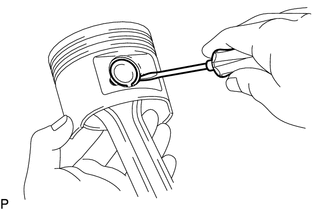
Disconnect the connecting rod from the piston.
Using a screwdriver, remove the 2 snap rings from the piston.
Gradually heat the piston to approximately 80°C (176°F).
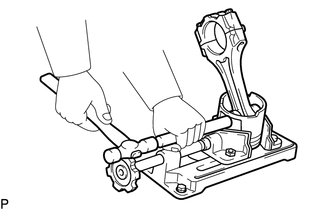
Using a plastic-faced hammer and brass bar, lightly tap out the piston pin and remove the connecting rod.
- HINT:
-
·
The piston and pin are a matched set.
·Arrange the pistons, pins, rings, connecting rods and bearings in the correct order.
7.INSPECT CRANKSHAFT THRUST CLEARANCE
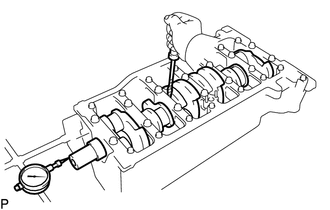
Using a dial indicator, measure the thrust clearance while prying the crankshaft back and forth with a screwdriver.
- Standard thrust clearance:
-
0.04 to 0.24 mm (0.00157 to 0.00945 in.)
- Maximum thrust clearance:
-
0.30 mm (0.0118 in.)
If the thrust clearance is more than the maximum, replace the crankshaft thrust washers as a set.
- Standard crankshaft thrust washer thickness:
-
2.93 to 2.98 mm (0.1154 to 0.1173 in.)
If necessary, replace the crankshaft.
8.INSPECT CRANKSHAFT OIL CLEARANCE
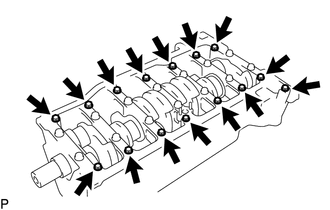
Remove the 15 bolts.
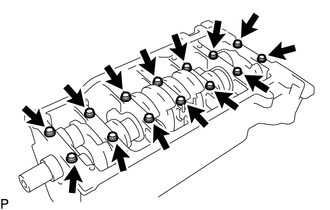
Uniformly loosen and remove the 14 main bearing cap bolts in several passes, in the sequence shown.
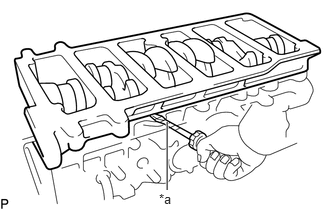
| *a | Protective Tape |
Using a screwdriver, pry out the main bearing cap.
- NOTICE:
-
Do not scratch the surface which will be coated with FIPG.
- HINT:
-
·
Keep the lower main bearings and main bearing cap together.
·Tape the screwdriver tip before use.
Lift out the crankshaft.
- HINT:
-
Keep the upper main bearings and crankshaft thrust washers together with the cylinder block sub-assembly.
Clean each crankshaft journal and main bearing.
Check each crankshaft journal and main bearing for pitting and scratches.
If the journal or main bearing is damaged, replace the main bearings. If necessary, replace the crankshaft.
Place the crankshaft on the cylinder block sub-assembly.
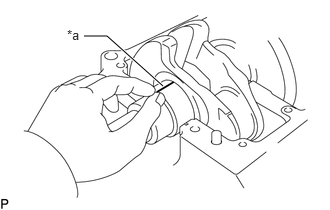
| *a | Plastigage |
Lay a strip of Plastigage across each journal.
Install the main bearing cap with the lower main bearings.
Click hereEngine / Hybrid System>1HZ (ENGINE MECHANICAL)>CYLINDER BLOCK>REASSEMBLY
- NOTICE:
-
Do not turn the crankshaft.
Remove the main bearing cap with lower main bearings.
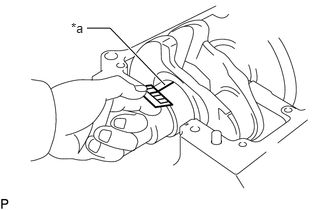
| *a | Plastigage |
Measure the Plastigage at its widest point.
- Standard oil clearance:
-
0.036 to 0.054 mm (0.00142 to 0.00213 in.)
- Maximum oil clearance:
-
0.10 mm (0.00394 in.)
If the oil clearance is more than the maximum, replace the main bearings. If necessary, replace the crankshaft.
- HINT:
-
If replacing a main bearing, replace it with one that has the same number. If the number of the main bearing cannot be determined, select the correct main bearing by adding together the numbers imprinted on the cylinder block sub-assembly and crankshaft, and then refer to the table below for the appropriate main bearing number. There are 6 sizes of standard main bearings, marked "2", "3", "4", "5", "6" and "7" accordingly.
-
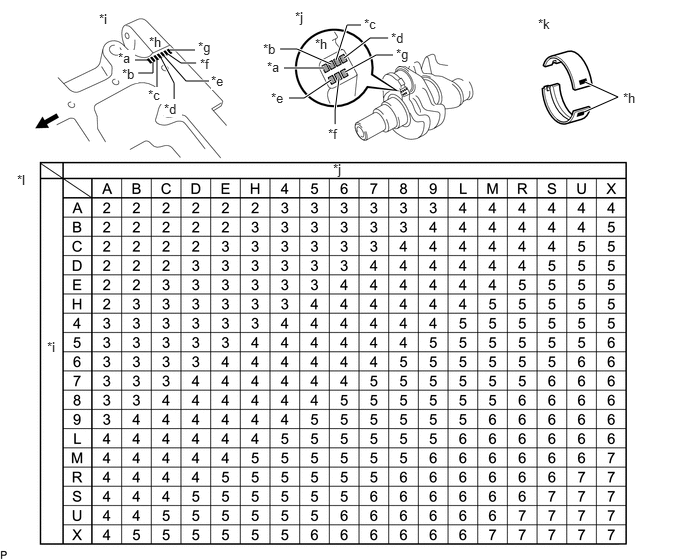 6.094,0.854 6.438,1.01 6.438,1.01 6.083,1.167 true 1.396,0.625 1.542,0.625 false 1.438,0.76 1.594,0.76 1.594,0.76 1.594,0.646 false 1.771,0.521 2.031,0.521 true 1.635,0.906 1.635,0.625 true 2.042,0.656 1.885,0.656 1.885,0.656 1.75,0.563 true 1.813,1.031 1.813,0.865 1.813,0.865 1.677,0.604 true 2.177,0.844 1.938,0.844 1.938,0.844 1.708,0.583 true 2.958,0.708 3.375,0.708 true 3.5,0.625 3.615,0.26 3.615,0.26 3.76,0.26 true 2.917,0.51 3.094,0.51 3.094,0.51 3.448,0.667 true 3.583,0.604 3.854,0.396 3.854,0.396 4.042,0.396 true 3.01,1.021 3.167,1.021 3.167,1.021 3.448,0.833 true 3.49,1.292 3.49,1.146 3.49,1.146 3.531,0.813 true 3.594,0.75 3.917,0.573 3.917,0.573 4.094,0.573 true 1.229,0.521 1.406,0.719 0.177,0.198 10 true *a 1.271,0.688 1.438,0.865 0.167,0.177 10 true *b 1.542,0.906 1.729,1.083 0.188,0.177 10 true *c 1.708,1.052 1.896,1.219 0.188,0.167 10 true *d 2.198,0.76 2.396,0.938 0.198,0.177 10 true *e 2.083,0.583 2.229,0.771 0.146,0.188 10 true *f 2.063,0.406 2.25,0.615 0.188,0.208 10 true *g 1.552,0.354 1.792,0.521 0.24,0.167 10 false *h 6.49,0.938 6.708,1.146 0.219,0.208 10 false *h 3.281,0.375 3.458,0.531 0.177,0.156 10 true *h 2.781,0.615 2.979,0.823 0.198,0.208 10 false *a 2.74,0.427 2.938,0.604 0.198,0.177 10 false *b 3.792,0.167 3.979,0.344 0.188,0.177 10 true *c 4.073,0.313 4.26,0.479 0.188,0.167 10 true *d 2.823,0.938 3.021,1.115 0.198,0.177 10 false *e 3.417,1.313 3.563,1.5 0.146,0.188 10 true *f 4.125,0.479 4.313,0.688 0.188,0.208 10 true *g 1.031,0.115 1.344,0.313 0.313,0.198 10 false *i 3.073,0.094 3.385,0.292 0.313,0.198 10 false *j 5.604,0.167 5.917,0.365 0.313,0.198 10 false *k 0.49,3.531 0.802,3.729 0.313,0.198 10 false *i 3.469,1.677 3.781,1.875 0.313,0.198 10 false *j 0.177,1.792 0.375,2.031 0.198,0.24 10 false *l
*a No. 1 *b No. 2 *c No. 3 *d No. 4 *e No. 5 *f No. 6 *g No. 7 *h Mark *i Cylinder Block Journal Code *j Crankshaft Journal Code *k Main Bearing Code *l Main Bearing Chart 
front - -
- Cylinder Block Main Journal Bore Diameter:
-
Item Specified Condition Mark A 71.000 to 71.001 mm (2.79527 to 2.79531 in.) Mark B 71.001 to 71.002 mm (2.79531 to 2.79535 in.) Mark C 71.002 to 71.003 mm (2.79535 to 2.79539 in.) Mark D 71.003 to 71.004 mm (2.79539 to 2.79543 in.) Mark E 71.004 to 71.005 mm (2.79543 to 2.79547 in.) Mark H 71.005 to 71.006 mm (2.79547 to 2.79551 in.) Mark 4 71.006 to 71.007 mm (2.79551 to 2.79555 in.) Mark 5 71.007 to 71.008 mm (2.79555 to 2.79558 in.) Mark 6 71.008 to 71.009 mm (2.79558 to 2.79562 in.) Mark 7 71.009 to 71.010 mm (2.79562 to 2.79566 in.) Mark 8 71.010 to 71.011 mm (2.79566 to 2.79570 in.) Mark 9 71.011 to 71.012 mm (2.79570 to 2.79574 in.) Mark L 71.012 to 71.013 mm (2.79574 to 2.79578 in.) Mark M 71.013 to 71.014 mm (2.79578 to 2.79582 in.) Mark R 71.014 to 71.015 mm (2.79582 to 2.79586 in.) Mark S 71.015 to 71.016 mm (2.79586 to 2.79590 in.) Mark U 71.016 to 71.017 mm (2.79590 to 2.79594 in.) Mark X 71.017 to 71.018 mm (2.79594 to 2.79598 in.)
- Crankshaft Main Journal Diameter:
-
Item Specified Condition Mark A 66.999 to 67.000 mm (2.63775 to 2.63779 in.) Mark B 66.998 to 66.999 mm (2.63771 to 2.63775 in.) Mark C 66.997 to 66.998 mm (2.63767 to 2.63771 in.) Mark D 66.996 to 66.997 mm (2.63763 to 2.63767 in.) Mark E 66.995 to 66.996 mm (2.63759 to 2.63763 in.) Mark H 66.994 to 66.995 mm (2.63755 to 2.63759 in.) Mark 4 66.993 to 66.994 mm (2.63751 to 2.63755 in.) Mark 5 66.992 to 66.993 mm (2.63748 to 2.63751 in.) Mark 6 66.991 to 66.992 mm (2.63744 to 2.63748 in.) Mark 7 66.990 to 66.991 mm (2.63740 to 2.63744 in.) Mark 8 66.989 to 66.990 mm (2.63736 to 2.63740 in.) Mark 9 66.988 to 66.989 mm (2.63732 to 2.63736 in.) Mark L 66.987 to 66.988 mm (2.63728 to 2.63732 in.) Mark M 66.986 to 66.987 mm (2.63724 to 2.63728 in.) Mark R 66.985 to 66.986 mm (2.63720 to 2.63724 in.) Mark S 66.984 to 66.985 mm (2.63716 to 2.63720 in.) Mark U 66.983 to 66.984 mm (2.63712 to 2.63716 in.) Mark X 66.982 to 66.983 mm (2.63708 to 2.63712 in.)
- Standard Main Bearing Center Wall Thickness:
-
Item Specified Condition Mark 2 1.982 to 1.985 mm (0.0780 to 0.0781 in.) Mark 3 1.985 to 1.988 mm (0.0781 to 0.0783 in.) Mark 4 1.988 to 1.991 mm (0.0783 to 0.0784 in.) Mark 5 1.991 to 1.994 mm (0.0784 to 0.0785 in.) Mark 6 1.994 to 1.997 mm (0.0785 to 0.0786 in.) Mark 7 1.997 to 2.000 mm (0.0786 to 0.0787 in.)
Completely remove the Plastigage.
13411 9.REMOVE CRANKSHAFT
Lift out the crankshaft.
Remove the upper main bearings and crankshaft thrust washers from the cylinder block sub-assembly.
- HINT:
-
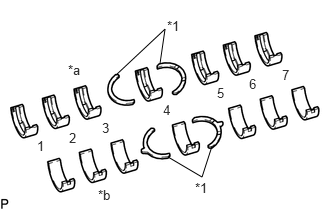 1.208,0.781 1.719,0.302 1.719,0.302 1.667,0.656 false 1.75,1.635 2.104,1.844 2.104,1.844 2.208,1.521 false 0.708,0.646 0.958,0.823 0.25,0.177 10 false *a 1.021,1.948 1.208,2.125 0.188,0.177 10 false *b 0.385,1.438 0.51,1.635 0.125,0.198 10 false 1 0.719,1.354 0.844,1.552 0.125,0.198 10 false 2 1.063,1.25 1.188,1.448 0.125,0.198 10 false 3 1.698,1.063 1.823,1.26 0.125,0.198 10 false 4 2.26,0.885 2.385,1.083 0.125,0.198 10 false 5 2.594,0.792 2.719,0.99 0.125,0.198 10 false 6 2.938,0.698 3.063,0.896 0.125,0.198 10 false 7 1.74,0.188 2.021,0.406 0.281,0.219 10 false *1 2.031,1.875 2.313,2.094 0.281,0.219 10 false *1
*1 Crankshaft Thrust Washer *a Upper *b Lower
-
Arrange the main bearings and crankshaft thrust washers in correct order.
15708 10.REMOVE NO. 1 OIL NOZZLE SUB-ASSEMBLY
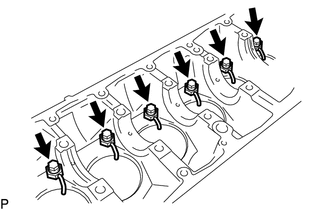
Remove the 6 bolts and 6 No. 1 oil nozzle sub-assemblies.
11497 11.REMOVE CYLINDER BLOCK OIL HOLE GASKET
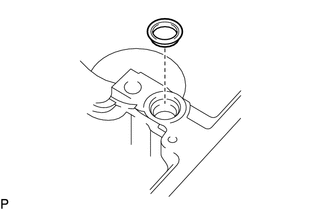
Remove the cylinder block oil hole gasket.
11448 12.REMOVE CYLINDER BLOCK OIL ORIFICE
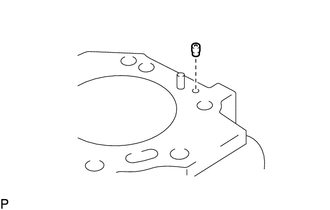
Remove the cylinder block oil orifice.