1HZ ENGINE MECHANICAL CYLINDER BLOCK REASSEMBLY
CAUTION / NOTICE / HINT
- HINT:
-
·
Thoroughly clean all parts to be assembled.
·Before installing the parts, apply new engine oil to all sliding and rating surfaces.
·Replace all gaskets, O-rings and oil seals with new parts.
PROCEDURE

 11448 1.INSTALL CYLINDER BLOCK OIL ORIFICE
Install the cylinder block oil orifice.
11497 2.INSTALL CYLINDER BLOCK OIL HOLE GASKET
Install a new cylinder block oil hole gasket.
15708 3.INSTALL NO. 1 OIL NOZZLE SUB-ASSEMBLY
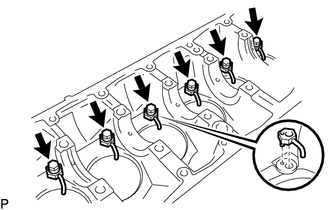
Align the pin of the No. 1 oil nozzle sub-assembly with the pin hole of the cylinder block sub-assembly.
Install the No. 1 oil nozzle sub-assembly with the check valve. Install the 6 No. 1 oil nozzle sub-assemblies and 6 check valves.
- Torque:
- 27 N*m (275 kgf*cm, 20 ft.*lbf)
4.INSTALL PISTON
Assemble the piston and connecting rod.
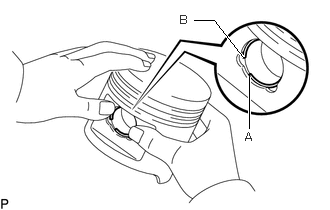
Using snap ring pliers, install a new snap ring on one side of the piston pin hole.
- NOTICE:
-
Position the snap ring so that end (B) of the snap ring is aligned with the hollow, then push the snap ring into the piston groove starting from end (A).
Gradually heat the piston to about 80°C (176°F).
Coat the piston pin with engine oil.
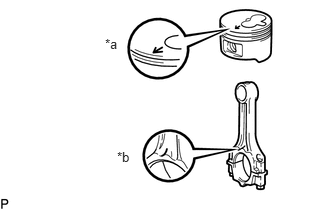
| *a | Front Mark (Arrow) |
| *b | Front Mark (Protrusion) |
Align the front marks of the piston and connecting rod, connect the connecting rod to the piston, and then push in the piston pin with your thumb.
Check the fitting condition between the piston and piston pin. Try to move the piston back and forth on the piston pin.
Using snap ring pliers, install a new snap ring on the other side of the piston pin hole.
13011 5.INSTALL PISTON RING SET
Install the coil by hand.
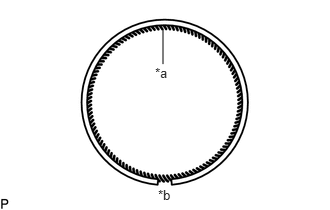
| *a | Coil Joint |
| *b | Oil Ring Ends |
Using a piston ring expander, install the oil ring.
- HINT:
-
Make sure the end gap of the oil ring faces the opposite direction of the coil joint.
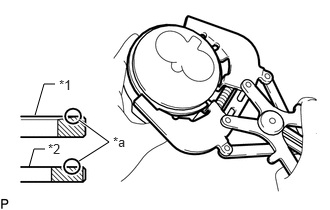
| *1 | No. 1 Compression Ring |
| *2 | No. 2 Compression Ring |
| *a | Code Mark |
Using a piston ring expander, install the No. 1 compression ring and No. 2 compression ring with the code mark facing upward.
- Code Mark:
-
Item Code Mark No. 1 compression ring T1 No. 2 compression ring 2T
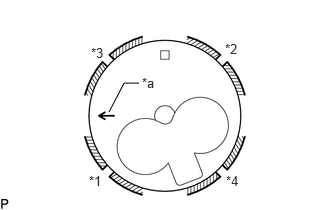
| *1 | No. 1 Compression Ring |
| *2 | No. 2 Compression Ring |
| *3 | Oil Ring |
| *4 | Coil |
| *a | Front Mark |
Position the piston rings so that the ring ends are as shown in the illustration.
- NOTICE:
-
Do not align the ring ends.
13041 6.INSTALL CONNECTING ROD BEARING
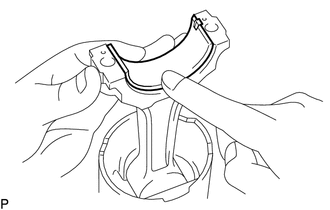
Align the connecting rod bearing claw with the groove of the connecting rod or connecting rod cap.
Install the connecting rod bearings to the connecting rod and connecting rod cap.
7.INSTALL MAIN BEARING
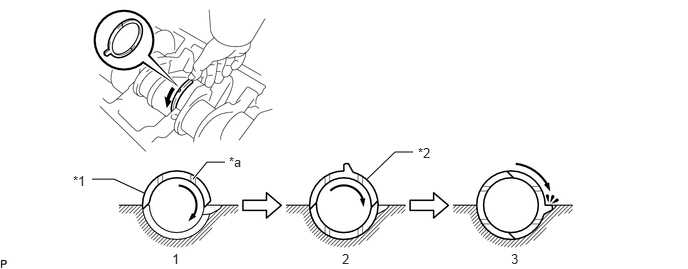
Align the main bearing claw with the claw groove of the main bearing cap or cylinder block sub-assembly.
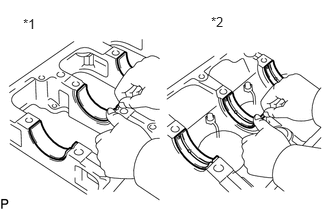
| *1 | Main Bearing Cap |
| *2 | Cylinder Block Sub-assembly |
Install the main bearings in the cylinder block sub-assembly and main bearing cap.
- NOTICE:
-
Install the main bearing with the oil hole in the cylinder block sub-assembly.
13411 8.PLACE CRANKSHAFT ON CYLINDER BLOCK
11011 9.INSTALL CRANKSHAFT THRUST WASHER SET
Push the crankshaft toward the front (rear) side.
| *1 | No. 2 Crankshaft Thrust Washer | *2 | No. 1 Crankshaft Thrust Washer |
| *a | Oil Groove | - | - |
Install the crankshaft thrust washers to the No. 4 main journal position of the cylinder block sub-assembly with the oil groove facing outward.
10.INSTALL MAIN BEARING CAP
Remove any old packing (FIPG) material and be careful not to drop any oil the contact surfaces of the main bearing cap and cylinder block sub-assembly.
Thoroughly clean all components to remove all the loosen material.
Using a non-residue solvent, clean both sealing surfaces.
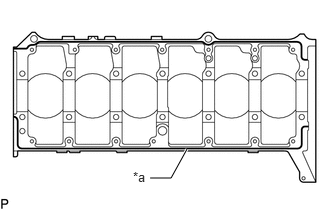
| *a | Seal Packing |
Apply seal packing to the cylinder block sub-assembly as shown in the illustration.
- Seal packing:
-
Toyota Genuine Seal Packing Black, Three Bond 1207B or equivalent
- NOTICE:
-
·
Remove any oil from the contact surfaces.
·Install the main bearing cap within 5 minutes after applying seal packing.
- HINT:
-
Install a nozzle that has been cut to a 5.0 mm (0.197 in.) opening.
Apply a light coat of engine oil on the threads and under the heads of the main bearing cap bolts.
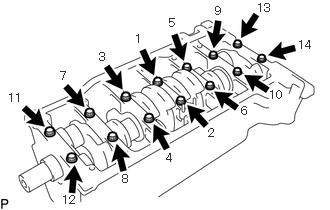
Tighten the main bearing cap bolts.
- NOTICE:
-
If any of the main bearing bolts break or deform, replace them.
- HINT:
-
The main bearing cap bolts are tightened in 2 progressive steps.
Step 1:
Uniformly tighten the 14 bolts in several steps in the order shown in the illustration.
- Torque:
- 103 N*m (1050 kgf*cm, 76 ft.*lbf)
If any one of the main bearing cap bolts does not meet the torque specification, replace the main bearing cap bolt.
Mark the front side of the crankshaft bearing cap bolts with paint.
Step 2:
Tighten the bearing cap bolts 90° in the order shown in step 1.
Check that the paint marks are now at a 90° angle to the front.
Check that the crankshaft turns smoothly.
Check the crankshaft thrust clearance.
Click hereEngine / Hybrid System>1HZ (ENGINE MECHANICAL)>CYLINDER BLOCK>DISASSEMBLY
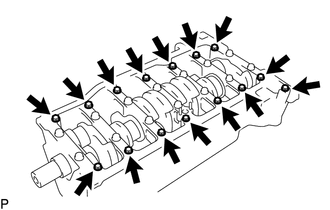
Install the 15 bolts.
- Torque:
- 18.1 N*m (185 kgf*cm, 13 ft.*lbf)
11.INSTALL PISTON AND CONNECTING ROD
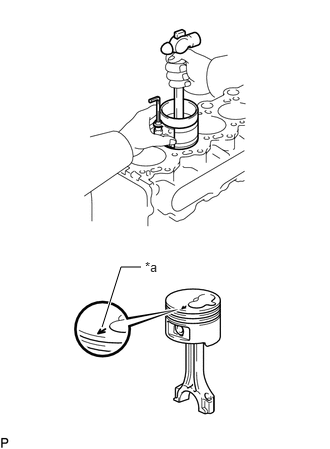
| *a | Front Mark |
Using a piston ring compressor, push the correctly numbered piston and connecting rod assembly into the cylinder with the front mark of the piston facing forward.
Place the connecting rod cap on the connecting rod.
Match each numbered connecting rod cap with the correct connecting rod.
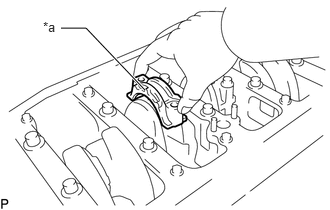
| *a | Front Mark (Protrusion) |
Install the connection rod cap with the front mark facing forward.
Install the connecting rod cap bolts.
- NOTICE:
-
If any connecting rod bolt is broken or deformed, replace it.
- HINT:
-
The connecting rod cap bolts are tightened in 2 progressive steps.
Apply a light of engine oil to the threads and under the heads of the connecting rod cap bolts.
Step 1:
Install and alternately tighten the nuts of the connecting rod cap in several passes.
- Torque:
- 36.8 N*m (375 kgf*cm, 27 ft.*lbf)
- HINT:
-
If any one of the connecting rod cap bolts does not meet the torque specification, replace them.
Mark the front side of the connecting rod cap bolts with paint.
Step 2:
Tighten the connecting rod cap nuts 90° in the shown step 1.
Check that the painted marks are now at a 90° angle to the front.
Check that the crankshaft turns smoothly.
Check the connecting rod thrust clearance.
Click hereEngine / Hybrid System>1HZ (ENGINE MECHANICAL)>CYLINDER BLOCK>DISASSEMBLY