1GR-FE COOLING RADIATOR INSTALLATION
PROCEDURE

 16584 1.INSTALL RADIATOR MOUNTING INSULATOR
Install the 2 No. 1 radiator support collars and 2 radiator mounting insulators.
16400 2.INSTALL RADIATOR ASSEMBLY
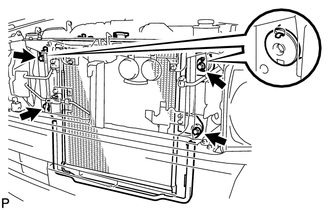
Set the radiator bracket hooks into the radiator support holes.
Install the radiator assembly with the 4 bolts.
- Torque:
- 18 N*m (184 kgf*cm, 13 ft.*lbf)
16711 3.INSTALL FAN SHROUD
Install the fan pulley to the engine water pump assembly.
Place the shroud together with the fan with fluid coupling between the radiator assembly and engine.
- NOTICE:
-
Be careful not to damage the radiator core.
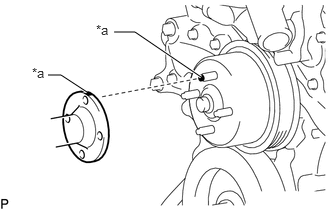
| *a | Paint Mark |
Align the paint marks on the head of the engine water pump stud bolt with the paint marks of the same color on the outer edge of the fluid coupling flange and set the fluid coupling to the engine water pump assembly.
Temporarily install the fan with fluid coupling to the engine water pump assembly with the 4 nuts. Tighten the nuts as much as possible by hand.
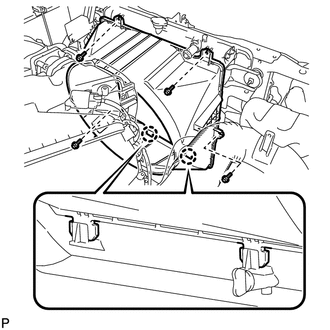
Attach the 2 claws of the fan shroud to the radiator assembly as shown in the illustration.
Install the fan shroud with the 4 bolts.
- Torque:
- 7.8 N*m (80 kgf*cm, 69 in.*lbf)
Install the radiator reservoir with the 3 bolts.
- Torque:
- 7.8 N*m (80 kgf*cm, 69 in.*lbf)
Connect the reservoir hose to the radiator and attach the clamp.
Install the fan and generator V-belt.
Click hereEngine / Hybrid System>1GR-FE (ENGINE MECHANICAL)>DRIVE BELT>INSTALLATION
Tighten the 4 nuts of the fan with fluid coupling.
- Torque:
- 21 N*m (214 kgf*cm, 15 ft.*lbf)
16572D 4.INSTALL NO. 2 RADIATOR HOSE
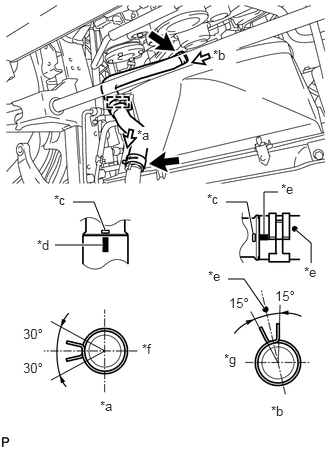
| *a | View A |
| *b | View B |
| *c | Protrusion |
| *d | Blue Paint Mark |
| *e | Yellow Paint Mark |
| *f | RH Side |
| *g | FR Side |
Install the No. 2 radiator hose to the radiator assembly and water inlet housing, and slide the 2 hose clamps to secure the hoses.
- HINT:
-
Make sure the hose and hose clamps are positioned shown in the illustration.
Attach the clamp.
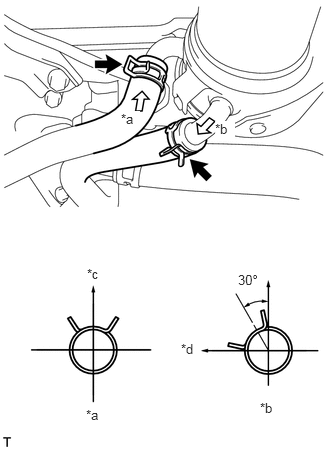
| *a | View A |
| *b | View B |
| *c | Upper |
| *d | FR Side |
Connect the oil cooler hose and No. 2 oil cooler hose to the oil cooler assembly, and slide the 2 hose clamps to secure the hose.
- HINT:
-
Make sure the hoses and hose clamps are positioned shown in the illustration.
16571C 5.INSTALL NO. 1 RADIATOR HOSE
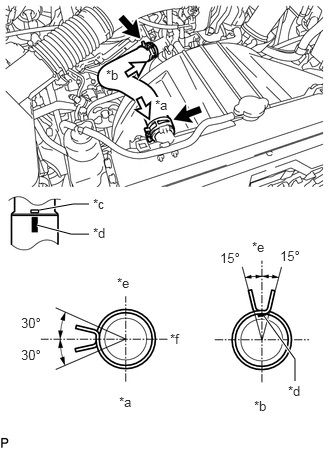
| *a | View A |
| *b | View B |
| *c | Protrusion |
| *d | Paint Mark |
| *e | Upper |
| *f | RH Side |
Install the No. 1 radiator hose to the radiator assembly and water inlet housing, and slide the 2 hose clamps to secure the hose.
- HINT:
-
Make sure the hose and hose clamps are positioned shown in the illustration.
53111 6.INSTALL RADIATOR GRILLE
7.ADD ENGINE COOLANT
8.INSPECT FOR COOLANT LEAK
51442 9.INSTALL NO. 2 ENGINE UNDER COVER
Install the No. 2 engine under cover with the 4 bolts.
- Torque:
- 18 N*m (184 kgf*cm, 13 ft.*lbf)