DOOR / HATCH BACK DOOR(for RH Side) REASSEMBLY
CAUTION / NOTICE / HINT
- HINT:
-
·
A bolt without a torque specification is shown in the standard bolt chart.
Click hereGeneral>SPECIFICATIONS>STANDARD BOLT>SPECIFIED TORQUE FOR STANDARD BOLTS
PROCEDURE

 68285 1.INSTALL BACK DOOR FRAME MOULDING RH (for Canvas Top)
Install the back door frame moulding RH.
68607F 2.INSTALL BACK DOOR WINDOW FRAME SUB-ASSEMBLY RH (for Canvas Top)
Install the back door window frame sub-assembly RH with the 6 bolts.
Install the hole plug.
67891A 3.INSTALL BACK DOOR SEAL (for Canvas Top)
Install the back door seal with the screw.
67883C 4.INSTALL BACK DOOR LOWER WEATHERSTRIP RH (for Canvas Top)
Attach the 16 clips to install the back door lower weatherstrip RH.
67881B 5.INSTALL BACK DOOR UPPER WEATHERSTRIP RH (for Canvas Top)
Attach the 2 clips and install the 2 screws, to the back door weatherstrip RH.
67881A 6.INSTALL BACK DOOR WEATHERSTRIP (except Canvas Top)
Attach the 17 clips to install the rear door weatherstrip.
68650C 7.INSTALL BACK DOOR CHECK ASSEMBLY RH
Apply MP grease to the sliding areas of the back door check assembly RH.
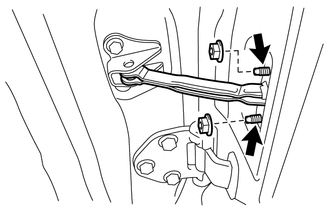
Install the door check to the door panel with the 2 nuts.
- Torque:
- 5.0 N*m (51 kgf*cm, 44 in.*lbf)
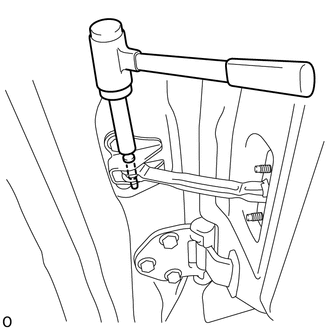
Using a brass bar and hammer, tap the door check pin into the body.
69690 8.INSTALL BACK DOOR REMOTE CONTROL ASSEMBLY
Install the back door remote control assembly with the 2 screws.
69212B 9.INSTALL BACK DOOR INSIDE HANDLE
Install the plate.
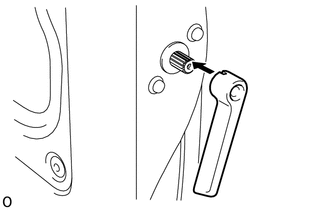
Install the back door inside handle with screw as shown in the illustration.
69380C 10.INSTALL BACK DOOR LOWER LOCK ASSEMBLY
69350Q 11.INSTALL BACK DOOR UPPER LOCK ASSEMBLY
67207C 12.INSTALL BACK DOOR STOPPER SUB-ASSEMBLY
Install the back door stopper sub-assembly with the 2 bolts.
13.INSTALL CUSHION
Install the cushion to the back door stopper sub-assembly.
67206A 14.INSTALL BACK DOOR STOPPER BRACKET SUB-ASSEMBLY
Install the back door stopper bracket sub-assembly with the 2 bolts.
85035R 15.INSTALL REAR WASHER NOZZLE SUB-ASSEMBLY (w/ Rear Wiper)
85110R 16.INSTALL REAR WIPER MOTOR ASSEMBLY (w/ Rear Wiper)
86161D 17.INSTALL NO. 1 SPEAKER MOUNTING BRACKET (w/ Back Door Speaker)
69717 18.INSTALL BACK DOOR LOCK CONTROL LINK COVER
Using a T20 "TORX" socket wrench, install the 6 screws with the back door lock control link cover.
67847 19.INSTALL BACK DOOR SERVICE HOLE COVER RH
Apply new butyl tape to the back door panel RH.
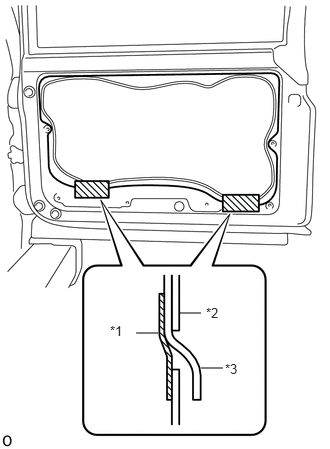
| *1 | Tape |
| *2 | Door Panel |
| *3 | Service Hole Cover |
Install the back door service hole cover RH.
- NOTICE:
-
·
When installing the service hole cover, pull out the links through the service hole cover.
·There should be no wrinkles or folds after attaching the service hole cover.
·After attaching the service hole cover, check the sealing quality.
Install the tape, as shown in the illustration.
64780C 20.INSTALL BACK DOOR TRIM PANEL ASSEMBLY RH
Install the back door trim panel assembly RH with the 10 clips.
86151 21.INSTALL SPEAKER BOX (w/ Back Door Speaker)
86160B 22.INSTALL REAR SPEAKER ASSEMBLY (w/ Back Door Speaker)
86262B 23.INSTALL REAR SPEAKER COVER (w/ Back Door Speaker)
86264B 24.INSTALL REAR SPEAKER GRILLE (w/ Back Door Speaker)
85169R 25.INSTALL NO. 1 REAR WIPER LINK PIVOT WASHER (w/ Rear Wiper)
85168R 26.INSTALL NO. 1 REAR WIPER LINK PIVOT NUT (w/ Rear Wiper)
27.INSTALL REAR WIPER ARM AND BLADE ASSEMBLY (w/ Rear Wiper)
85192R 28.INSTALL REAR WIPER ARM COVER (w/ Rear Wiper)
51908 29.INSTALL SPARE WHEEL CARRIER BRACKET SUB-ASSEMBLY (w/ Back Door Tire Carrier)
Install the spare wheel carrier bracket sub-assembly with the 4 bolts.
30.INSTALL HOLE PLUG
Install the hole plug.
68852B 31.INSTALL BACK DOOR LOWER HINGE COVER
Install the back door lower hinge cover.
68851D 32.INSTALL BACK DOOR UPPER HINGE COVER
Install the back door upper hinge cover.