HF1A TRANSFER / 4WD / AWD TRANSFER CASE FRONT OIL SEAL REPLACEMENT
PROCEDURE

 1.DRAIN TRANSFER OIL
84222 2.REMOVE NO. 1 TRANSFER INDICATOR SWITCH
36275 3.REMOVE SHIFT DETENT BALL SPRING PLUG
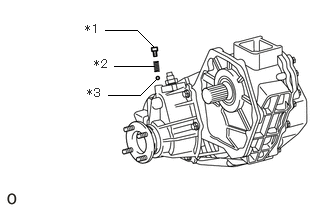
| *1 | Shift Detent Ball Spring Plug |
| *2 | Shift Detent Ball Compression Spring |
| *3 | Shift Detent Ball |
Using a T40 "TORX" socket wrench, remove the shift detent ball spring plug.
Using a magnet hand, remove the shift detent ball compression spring and shift detent ball.
36105 4.REMOVE FRONT TRANSFER EXTENSION HOUSING SUB-ASSEMBLY
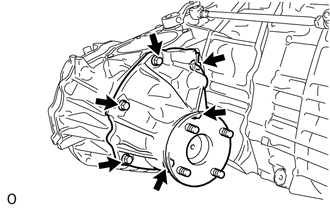
Remove the 6 bolts and front transfer extension housing sub-assembly.
If necessary, tap the front transfer extension housing sub-assembly with a plastic-faced hammer.
- NOTICE:
-
Do not drop the front drive clutch sleeve.
33124E 5.REMOVE TRANSFER OIL RECEIVER PIPE
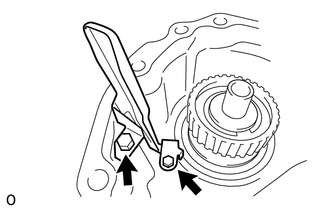
Remove the 2 bolts and transfer oil receiver pipe.
36239 6.REMOVE TRANSFER DRIVE CLUTCH HUB
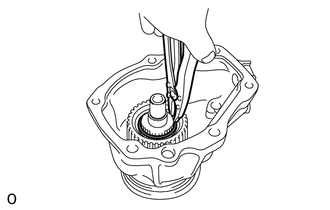
Using a snap ring expander, remove the transfer drive clutch hub shaft snap ring.
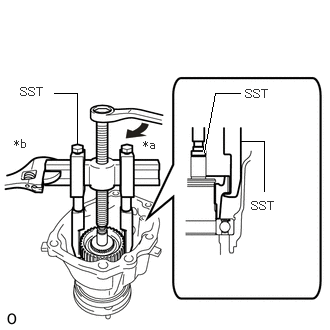
| *a | Turn |
| *b | Hold |
Using SST, remove the transfer drive clutch hub.
- SST
-
09950-40011 (09951-04010, 09952-04010, 09953-04020, 09954-04010, 09955-04061, 09957-04010)
- NOTICE:
-
Do not to damage the transfer drive clutch hub.
36209A 7.REMOVE FRONT TRANSFER OUTPUT SHAFT
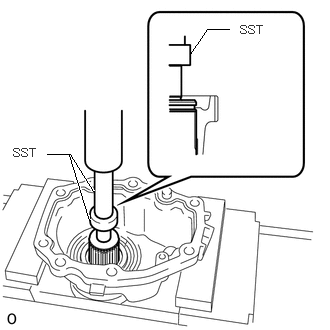
Using SST and a press, remove the front transfer output shaft.
- SST
-
09527-20011
09950-60010 (09951-00300)
09950-70010 (09951-07100)
36231H 8.REMOVE FRONT TRANSFER OUTPUT SHAFT RADIAL BALL BEARING
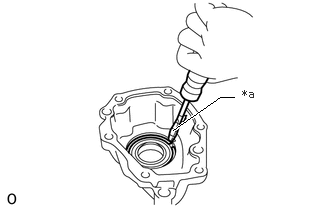
| *a | Protective Tape |
Using a screwdriver, remove the front transfer output shaft bearing snap ring.
- HINT:
-
Tape the screwdriver tip before use.
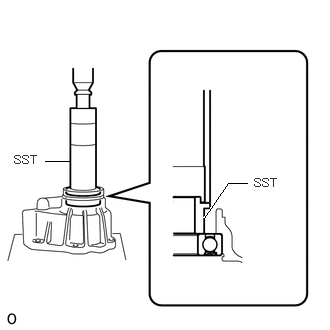
Using SST and a press, remove the front transfer output shaft radial ball bearing.
- SST
-
09316-60011 (09316-00011, 09316-00071)
36105A 9.REMOVE OIL SEAL (FRONT TRANSFER EXTENSION HOUSING SUB-ASSEMBLY)
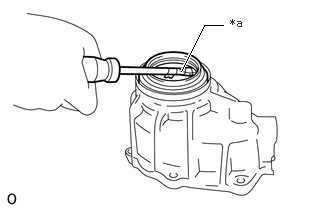
| *a | Protective Tape |
Using a screwdriver, remove the oil seal (front transfer extension housing sub-assembly).
- HINT:
-
Tape the screwdriver tip before use.
36105A 10.INSTALL OIL SEAL (FRONT TRANSFER EXTENSION HOUSING SUB-ASSEMBLY)
Apply MP grease to the lip of a new oil seal (front transfer extension housing sub-assembly).
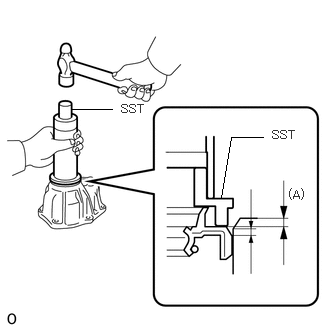
Using SST and a hammer, install the oil seal (front transfer extension housing sub-assembly) as shown in the illustration.
- SST
-
09316-60011 (09316-00011, 09316-00061)
- Drive in depth (A):
-
0 to 0.5 mm (0 to 0.0196 in.)
- NOTICE:
-
·
Install the oil seal (front transfer extension housing sub-assembly) so that its outer edge is positioned past the chamfered part of the front transfer extension housing sub-assembly.
·Do not to damage the oil seal (front transfer extension housing sub-assembly).
36231H 11.INSTALL FRONT TRANSFER OUTPUT SHAFT RADIAL BALL BEARING
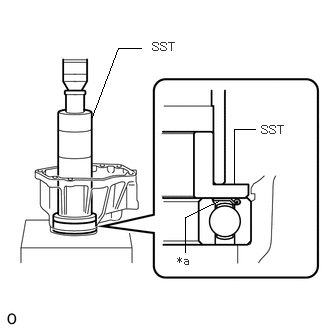
| *a | Seal Plate |
Using SST and a press, install a new front transfer output shaft radial ball bearing.
- SST
-
09316-60011 (09316-00011, 09316-00031)
- NOTICE:
-
Install the front transfer output shaft radial ball bearing so that its seal plate faces the transfer drive clutch hub side.
Select a new front transfer output shaft bearing snap ring that will allow minimum axial play and install it.
- Standard Thickness:
-
Mark Thickness A 1.7 mm (0.0669 in.) B 1.8 mm (0.0709 in.)
- NOTICE:
-
Select a front transfer output shaft bearing snap ring so that the thrust clearance of the front transfer output shaft radial ball bearing is 0.1 mm or less.
| *a | Protective Tape |
Using a screwdriver, install the front transfer output shaft bearing snap ring.
- NOTICE:
-
Do not to damage the front transfer extension housing sub-assembly.
- HINT:
-
Tape the screwdriver tip before use.
33124E 12.INSTALL TRANSFER OIL RECEIVER PIPE
Install the transfer oil receiver pipe with the 2 bolts.
- Torque:
- 4.9 N*m (50 kgf*cm, 43 in.*lbf)
36239 13.INSTALL TRANSFER DRIVE CLUTCH HUB
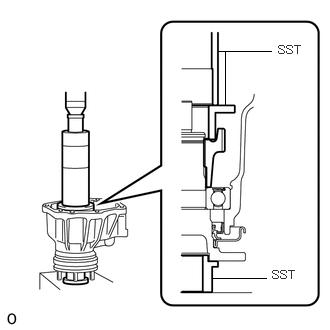
Using SST and a press, install the front transfer output shaft and transfer drive clutch hub.
- SST
-
09316-20011
09316-60011 (09316-00011, 09316-00041, 09316-00071)
- NOTICE:
-
·
Do not to damage the front transfer output shaft and front transfer output shaft radial ball bearing.
·The front transfer output shaft should be installed completely.
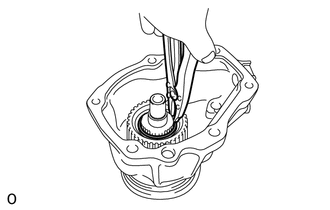
Select a new transfer drive clutch hub shaft snap ring that will allow minimum axial play and install it.
- Standard Thickness:
-
Mark Thickness A 1.8 mm (0.0709 in.) B 1.9 mm (0.0748 in.) C 2.0 mm (0.0787 in.) D 2.1 mm (0.0827 in.) E 2.2 mm (0.0866 in.)
- NOTICE:
-
Select a transfer drive clutch hub shaft snap ring so that the clearance between the transfer drive clutch hub and transfer drive clutch hub shaft snap ring is 0.1 mm or less.
Using a snap ring expander, install the transfer drive clutch hub shaft snap ring.
36105 14.INSTALL FRONT TRANSFER EXTENSION HOUSING SUB-ASSEMBLY
Clean the threads of the front transfer extension housing sub-assembly with non-residue solvent.
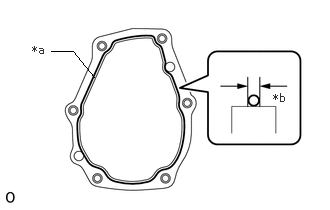
| *a | Seal Packing |
| *b | Seal Width 1.2 mm (0.0472 in.) |
Apply seal packing to the front transfer extension housing sub-assembly as shown in the illustration.
- Seal packing:
-
Toyota Genuine Seal Packing 1281, Three Bond 1281 or equivalent
- HINT:
-
Install the front transfer extension housing sub-assembly as soon as the seal packing is applied.
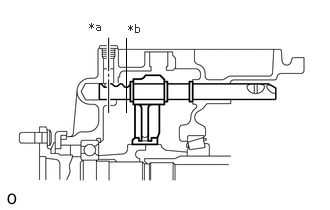
| *a | 4WD |
| *b | 2WD |
Set the front drive clutch sleeve in 4WD, and install the front transfer extension housing sub-assembly.
Install the front transfer extension housing sub-assembly with the 6 bolts.
- Torque:
- 37.24 N*m (380 kgf*cm, 27 ft.*lbf)
36275 15.INSTALL SHIFT DETENT BALL SPRING PLUG
Clean the threads of the shift detent ball spring plug and front transfer extension housing sub-assembly with non-residue solvent.
| *1 | Shift Detent Ball |
| *2 | Shift Detent Ball Compression Spring |
| *3 | Shift Detent Ball Spring Plug |
Install the shift detent ball and shift detent ball compression spring.
Apply adhesive to 2 or 3 threads of the shift detent ball spring plug.
- Adhesive:
-
Toyota Genuine Adhesive 1344, Three Bond 1344 or equivalent
Using a T40 "TORX" socket wrench, install the shift detent ball spring plug.
- Torque:
- 18.62 N*m (190 kgf*cm, 14 ft.*lbf)
84222 16.INSTALL NO. 1 TRANSFER INDICATOR SWITCH
17.ADD TRANSFER OIL
18. CHECK FOR TRANSFER OIL LEAK