WIPER / WASHER FRONT WIPER MOTOR INSTALLATION
CAUTION / NOTICE / HINT
- HINT:
-
·
Use the same procedure for RHD and LHD vehicles.
-
·
The procedure listed below is for LHD vehicles.
PROCEDURE

 85160 1.INSTALL WINDSHIELD WIPER LINK ASSEMBLY
Install the windshield wiper link assembly through the service hole, and then install the 6 bolts.
- Torque:
- 5.4 N*m (55 kgf*cm, 48 in.*lbf)
85110 2.INSTALL WINDSHIELD WIPER MOTOR ASSEMBLY
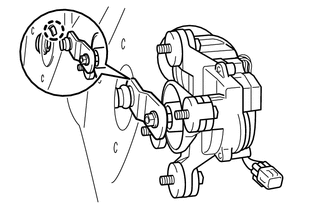
Attach the claw of the windshield wiper link assembly to the vehicle body.
Connect the windshield wiper motor assembly to the windshield wiper link assembly.
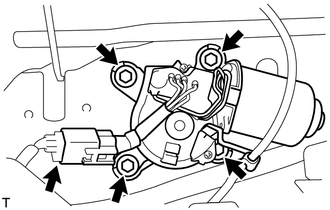
Install the windshield wiper motor assembly with the 4 bolts.
- Torque:
- 5.5 N*m (56 kgf*cm, 49 in.*lbf)
Connect the connector.
55791E 3.INSTALL HEATER DUCT HOLE COVER
Attach the 4 claws to install the heater duct hole cover.
55792E 4.INSTALL NO. 2 HEATER AIR DUCT HOLE COVER
55781F 5.INSTALL COWL TOP VENTILATOR LOUVER
Attach the 5 claws to install the cowl top ventilator louver.
Install the 6 screws.
6.INSTALL WINDSHIELD WIPER ARM AND BLADE ASSEMBLY LH
When reinstalling:
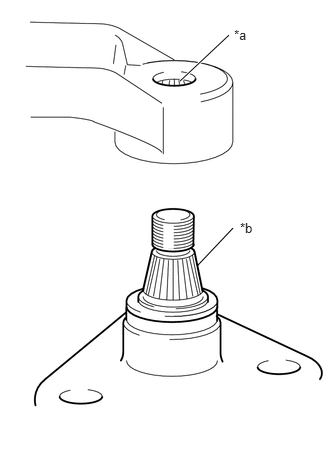
| *a | Wiper Arm Serrations |
| *b | Wiper Pivot Serrations |
Clean the wiper arm serrations.
- NOTICE:
-
Do not grind the serrations excessively.
Clean the wiper pivot serrations.
- NOTICE:
-
Do not grind the serrations excessively.
Operate the wiper switch and stop the windshield wiper motor assembly at the automatic stop (park) position.
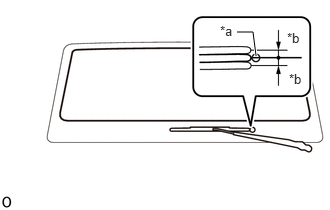
| *a | Ceramic Dot |
| *b | 10 mm (0.3937 in.) |
except Canvas Top:
Install the windshield wiper arm and blade assembly LH with the nut to the position shown in the illustration.
- Torque:
- 25 N*m (255 kgf*cm, 18 ft.*lbf)
- HINT:
-
Hold the arm hinge by hand when tightening the nut.
for Canvas Top:
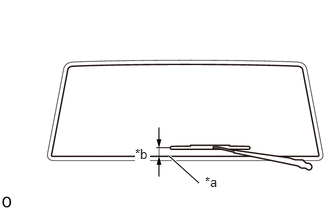
| *a | Windshield Weatherstrip |
| *b | 20 to 40 mm (0.7874 to 1.5748 in.) |
Install the windshield wiper arm and blade assembly LH with the nut to the position shown in the illustration.
- Torque:
- 25 N*m (255 kgf*cm, 18 ft.*lbf)
- HINT:
-
Hold the arm hinge by hand when tightening the nut.
7.INSTALL WINDSHIELD WIPER ARM AND BLADE ASSEMBLY RH
When reinstalling:
| *a | Wiper Arm Serrations |
| *b | Wiper Pivot Serrations |
Clean the wiper arm serrations.
- NOTICE:
-
Do not grind the serrations excessively.
Clean the wiper pivot serrations.
- NOTICE:
-
Do not grind the serrations excessively.
Operate the wiper switch and stop the windshield wiper motor assembly at the automatic stop (park) position.
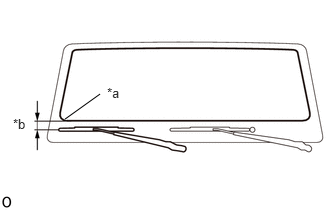
| *a | Ceramic Line |
| *b | 0 to 20 mm (0 to 0.7874 in.) |
except Canvas Top:
Install the windshield wiper arm and blade assembly RH with the nut to the position shown in the illustration.
- Torque:
- 25 N*m (255 kgf*cm, 18 ft.*lbf)
- HINT:
-
Hold the arm hinge by hand when tightening the nut.
for Canvas Top:
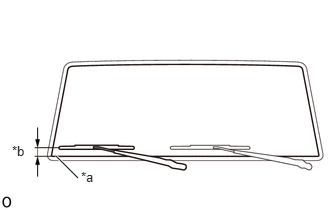
| *a | Windshield Weatherstrip |
| *b | 20 to 40 mm (0.7874 to 1.5748 in.) |
Install the windshield wiper arm and blade assembly RH with the nut to the position shown in the illustration.
- Torque:
- 25 N*m (255 kgf*cm, 18 ft.*lbf)
- HINT:
-
Hold the arm hinge by hand when tightening the nut.
Raise the wiper arm 2 times and check that the tip of the front wiper blade is at the position shown in the illustration.
- HINT:
-
Use the same procedure for the LH side.
85192 8.INSTALL WINDSHIELD WIPER ARM COVER
Attach the 3 claws to install the windshield wiper arm cover.
- HINT:
-
Use the same procedure for both windshield wiper arm covers.