HEATING / AIR CONDITIONING AIR CONDITIONING UNIT INSTALLATION
CAUTION / NOTICE / HINT
- HINT:
-
·
Use the same procedure for RHD and LHD vehicles.
·The procedure listed below is for LHD vehicles.
·A bolt without a torque specification is shown in the standard bolt chart.
Click hereGeneral>SPECIFICATIONS>STANDARD BOLT>SPECIFIED TORQUE FOR STANDARD BOLTS
PROCEDURE

 88510 1.INSTALL COOLER UNIT ASSEMBLY
for LHD:
Install the No. 1 cooler unit drain hose.
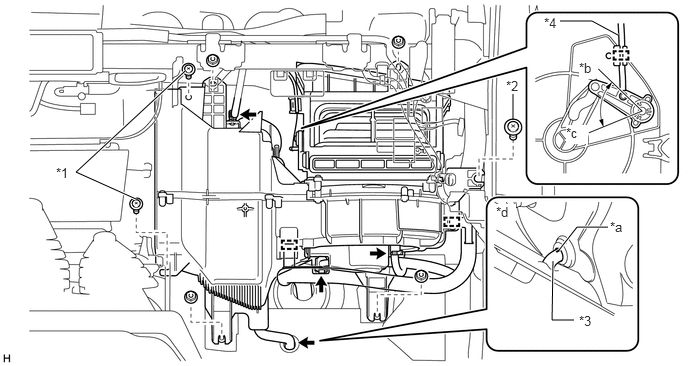
| *1 | Screw | *2 | Bolt |
| *3 | No. 1 Cooler Unit Drain Hose | *4 | Air inlet Damper Control Cable Sub-assembly |
| *a | No. 1 Cooler Unit Drain Hose Paint Mark for 1HZ: Pink for 1GR-FE: Yellow |
*b | RECIRC Side |
| *c | FRESH Side | *d | Engine Room Side |
for RHD:
Install the No. 1 cooler unit drain hose.
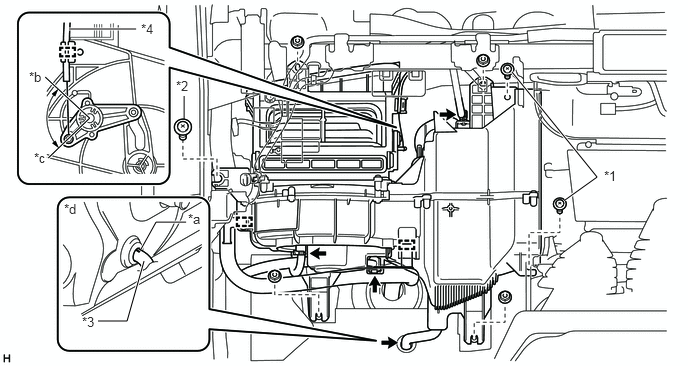
| *1 | Screw | *2 | Bolt |
| *3 | No. 1 Cooler Unit Drain Hose | *4 | Air inlet Damper Control Cable Sub-assembly |
| *a | No. 1 cooler unit drain hose Paint Mark for 1HZ, 1VD-FTV: Blue for 1GR-FE: Green |
*b | RECIRC Side |
| *c | FRESH Side | *d | Engine Room Side |
Install the cooler unit assembly.
Align the link of the cooler unit assembly to the RECIRC side, and then insert the end of the air inlet damper control cable sub-assembly into the link and secure it with the clamp.
Connect the clamps, connectors.
Install the 4 nuts, 2 screws and bolt.
- Torque:
- for nut, screw and bolt : 5.0 N*m (51 kgf*cm, 44 in.*lbf)
55331 2.INSTALL INSTRUMENT PANEL REINFORCEMENT
Install the instrument panel reinforcement with the 5 bolts and nut.
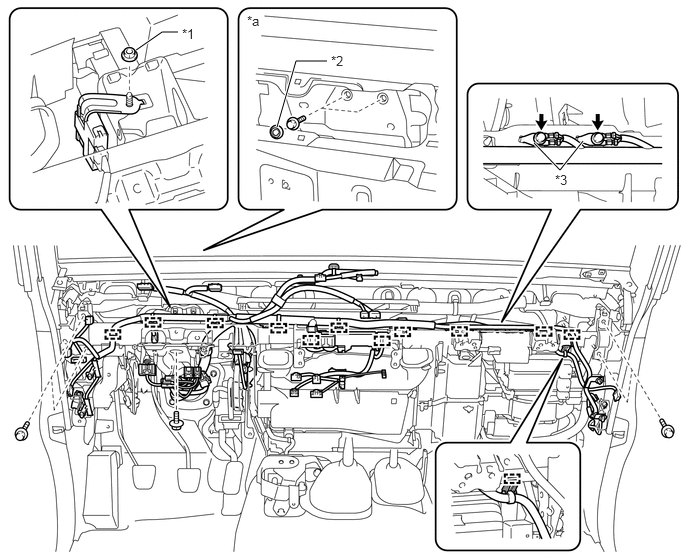
| *1 | Nut | *2 | Grommet |
| *3 | Ground Wire | - | - |
Attach the clamps and instrument panel wire.
Connect the ground wire with the 2 bolts.
- Torque:
- 8.4 N*m (86 kgf*cm, 74 in.*lbf)
Install the 2 bolts and 2 grommets.
28520 3.INSTALL PREHEATING TIMER ASSEMBLY (for 1HZ, w/o EGR)
89551 4.INSTALL EMISSION CONTROL ECU (for 1HZ, w/ EGR)
5.INSTALL DOOR CONTROL RECEIVER (w/ Wireless Door Lock System)
Connect the connector.
Install the door control receiver with the bolt.
88650 6.INSTALL COOLER STABILIZER AMPLIFIER ASSEMBLY
Install the cooler stabilizer amplifier assembly with the nut.
Connect the connector.
55307C 7.INSTALL NO. 2 INSTRUMENT PANEL BRACE SUB-ASSEMBLY
Install the No. 2 instrument panel brace sub-assembly with the 2 nuts and 2 bolts.
Attach the 2 claws to install the instrument panel wire.
for 1GR-FE, for 1VD-FTV:
Attach the 2 claws to install the DLC3 connector.
55306A 8.INSTALL NO. 1 INSTRUMENT PANEL BRACE SUB-ASSEMBLY
Install the No. 1 instrument panel brace sub-assembly with the 2 nuts and 2 bolts.
55833D 9.INSTALL NO. 1 INSTRUMENT PANEL REGISTER CONNECTOR
Install the No. 1 instrument panel register connector with the 2 clips.
55837C 10.INSTALL CENTER HEATER TO REGISTER SUB DUCT
Install the center heater to register sub duct with the screw.
55834B 11.INSTALL NO. 2 INSTRUMENT PANEL REGISTER CONNECTOR
Install the No. 2 instrument panel register connector together with the No. 5 heater to register duct with the 2 clips.
12.INSTALL STEERING COLUMN ASSEMBLY
55301 13.INSTALL INSTRUMENT PANEL SUB-ASSEMBLY
55792E 14.INSTALL NO. 2 HEATER AIR DUCT HOLE COVER
except Canvas Top:
Attach the 9 claws to install the No. 2 heater air duct hole cover.
for Canvas Top:
Attach the 7 claws to install the No. 2 heater air duct hole cover.
55781F 15.INSTALL COWL TOP VENTILATOR LOUVER
16.INSTALL WINDSHIELD WIPER ARM AND BLADE ASSEMBLY LH
17.INSTALL WINDSHIELD WIPER ARM AND BLADE ASSEMBLY RH
85192 18.INSTALL WINDSHIELD WIPER ARM COVER
85190 19.ADJUST WINDSHIELD WIPER ARM ASSEMBLY
88716C 20.CONNECT COOLER REFRIGERANT LIQUID PIPE C (except Sub-cool Accelerator)
Remove the attached vinyl tape from the cooler refrigerant liquid pipe C.
Sufficiently apply compressor oil to new O-ring and the fitting surface of the cooler refrigerant liquid pipe C.
- Compressor oil:
-
ND-OIL 8 or equivalent
Install the O-ring on the cooler refrigerant liquid pipe C.
- NOTICE:
-
Keep the O-rings and O-ring fitting surfaces free of foreign matter.
Connect the cooler refrigerant liquid pipe C.
88712 21.CONNECT NO. 1 COOLER REFRIGERANT SUCTION HOSE (except Sub-cool Accelerator)
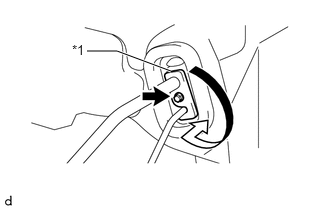
| *1 | Plate |
Remove the attached vinyl tape from the No. 1 cooler refrigerant suction hose.
Sufficiently apply compressor oil to new O-ring and the fitting surface of the No. 1 cooler refrigerant suction hose.
- Compressor oil:
-
ND-OIL 8 or equivalent
Install the O-ring on the No. 1 cooler refrigerant suction hose.
- NOTICE:
-
Keep the O-rings and O-ring fitting surfaces free of foreign matter.
Connect the No. 1 cooler refrigerant suction hose.
Rotate the hook connector in the direction indicated by the arrow in the illustration and install the bolt.
- Torque:
- 5.0 N*m (51 kgf*cm, 44 in.*lbf)
88710E 22.CONNECT AIR CONDITIONER TUBE AND ACCESSORY ASSEMBLY (for Sub-cool Accelerator)
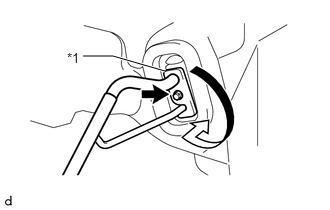
| *1 | Plate |
Remove the vinyl tape from the air conditioner tube and accessory assembly.
Sufficiently apply compressor oil to 2 new O-rings and the fitting surface of the air conditioner tube and accessory assembly.
- Compressor oil:
-
ND-OIL 8 or equivalent
Install the O-ring to the air conditioner tube and accessory assembly.
- NOTICE:
-
Keep the O-rings and O-ring fitting surfaces free of foreign matter.
Connect the air conditioner tube and accessory assembly.
Rotate the hook connector in the direction indicated by the arrow in the illustration and install the bolt.
- Torque:
- 5.0 N*m (51 kgf*cm, 44 in.*lbf)
23.CHARGE AIR CONDITIONING SYSTEM WITH REFRIGERANT
24.WARM UP ENGINE
25.CHECK FOR REFRIGERANT GAS LEAK