STEERING GEAR / LINKAGE STEERING GEAR(w/ Driver Side Knee Airbag) REASSEMBLY
CAUTION / NOTICE / HINT
- NOTICE:
-
·
When using a vise, place aluminum plates between the part and vise.
·When using a vise, do not overtighten it.
PROCEDURE

 45357 1.INSTALL SECTOR SHAFT ADJUSTING SCREW
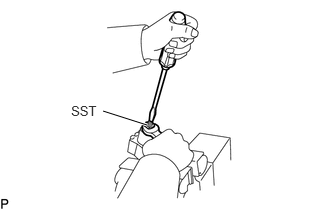
Using SST, install a sector shaft adjusting screw to the cross shaft.
- SST
-
09630-00014 (09631-00051)
- HINT:
-
Adjust the sector adjusting screw for correct thrust clearance.
-
Click hereSteering>STEERING GEAR / LINKAGE>STEERING GEAR (w/ Driver Side Knee Airbag)>INSPECTION
Stake the lock nut.
44105C 2.INSTALL VALVE BODY HOUSING UNION SEAT
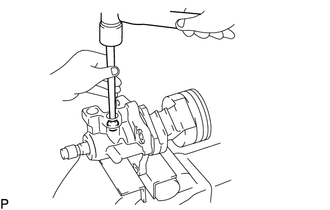
Using a plastic-faced hammer and extension bar, tap in 2 new valve body housing union seats.
- NOTICE:
-
Do not allow any shards into the port.
44114A 3.INSTALL POWER PISTON NUT RING ("TEFLON" RING)
Apply power steering fluid to a new O-ring.
Install the O-ring to the power piston nut.
Expand a new power piston nut ring ("Teflon" Ring) with your fingers.
- NOTICE:
-
Be careful not to over-expand the power piston nut ring ("Teflon" Ring).
Install the power piston nut ring ("Teflon" Ring) to the power piston nut.
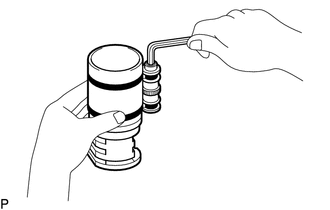
Coat the power piston nut ring ("Teflon" Ring) with power steering fluid and tighten it with the piston ring compressor for 5 to 7 minutes.
44107A 4.INSTALL POWER STEERING GEAR HOUSING NEEDLE ROLLER BEARING
Apply MP grease to a new power steering gear housing needle roller bearing (lower).
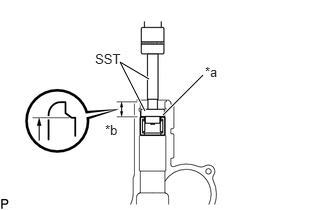
| *a | Bearing Supplier Mark Side |
| *b | 23.1 mm (0.909 in.) |
Using SST, press in the power steering gear housing needle roller bearing (lower).
- SST
-
09950-60010 (09951-00350, 09951-00420, 09952-06010)
09950-70010 (09951-07100)
- HINT:
-
Install the power steering gear housing needle roller bearing (lower) so that it is positioned 23.1 mm (0.909 in.) away from the housing inner end surface.
Apply MP grease to the power steering gear housing needle roller bearing (upper).
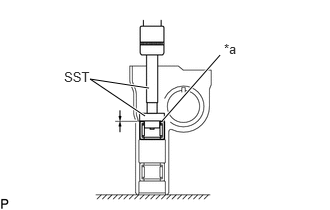
| *a | Bearing Supplier Mark Side |
Using SST, press in the power steering gear housing needle roller bearing (upper).
- SST
-
09950-60010 (09951-00350, 09951-00420, 09952-06010)
09950-70010 (09951-07100)
- HINT:
-
The power steering gear housing needle roller bearings (upper) top end should be installed so that it aligns with the housing end surface.
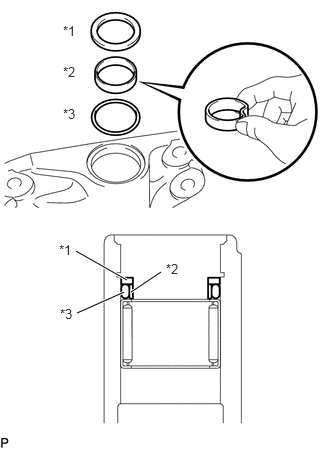
| *1 | Power Steering Gear Housing Ring |
| *2 | Power Steering Gear Housing Ring ("Teflon" Ring) |
| *3 | O-ring |
Apply power steering fluid to a new O-ring.
Install the O-ring to the power steering gear housing.
Apply power steering fluid to a new power steering gear housing ring ("Teflon" Ring).
Bend and install the power steering gear housing ring ("Teflon" ring) as shown in the illustration.
Install the power steering gear housing ring ("Teflon" Ring) the power steering gear housing.
Install the power steering gear housing ring to the power steering gear housing.
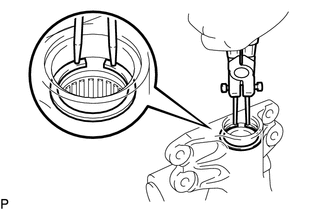
Using snap ring pliers, install the power steering gear housing hole snap ring.
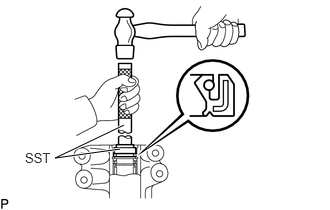
Using SST, tap in a new power steering housing oil seal into the power steering gear housing.
- SST
-
09950-70010 (09951-07100)
09630-00014 (09631-00091)
- HINT:
-
Coat the lip of a new oil seal with MP grease.
44120 5.INSTALL VALVE ASSEMBLY (WITH BALL NUT)
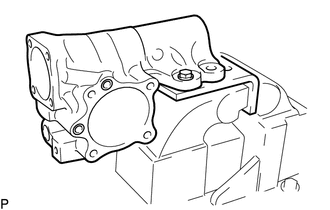
Mount the power steering gear housing on SST and clamp SST in a vise.
- SST
-
09630-00014 (09631-00142)
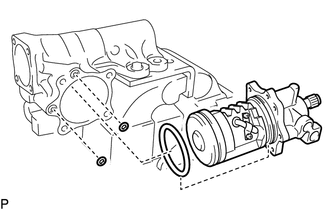
Apply power steering fluid to 3 new O-rings.
Install 2 new O-rings to the power steering gear housing.
Install the new O-rings to the valve housing of the valve assembly (with ball nut).
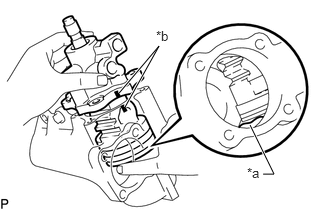
| *a | Do not damage |
| *b | Matchmark |
Align the matchmark on the valve assembly (with ball nut) to the matchmark on the power steering gear housing, and then slightly insert the valve assembly (with ball) so that the teeth of the power piston nut are facing towards the cross shaft side.
- NOTICE:
-
Do not damage the power piston nut ring ("Teflon" Ring).
Insert the valve assembly (with ball nut) until the power steering gear housing ring ("Teflon" ring) reaches the position shown in the illustration.
Press down on the power steering gear housing ring ("Teflon" ring) using your finger while being careful not to damage it and insert the valve assembly (with ball nut).
- NOTICE:
-
Do not damage the O-ring.
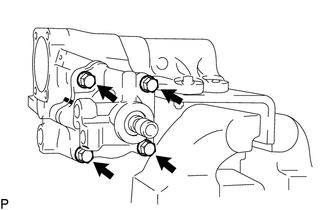
Install the 4 bolts.
- Torque:
- 61 N*m (622 kgf*cm, 45 ft.*lbf)
Using SST, check the valve assembly (with ball nut) preload.
Click hereSteering>STEERING GEAR / LINKAGE>STEERING GEAR (w/ Driver Side Knee Airbag)>INSPECTION
44111 6.INSTALL CROSS SHAFT
Apply power steering fluid to a new O-ring.
Install the O-ring to the side cover sub-assembly.
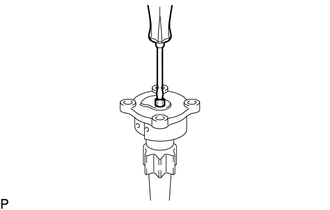
Using a screwdriver, install the cross shaft to the side cover sub-assembly.
- HINT:
-
Fully loosen the sector shaft adjusting screw.
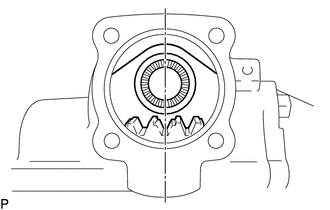
Set the worm gear at the center of the power steering gear housing.
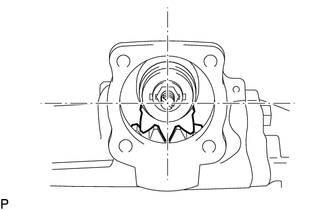
Insert and push the cross shaft into the power steering gear housing so that the center teeth mesh together.
- NOTICE:
-
Do not damage the oil seal.
44108 7.INSTALL SIDE COVER SUB-ASSEMBLY
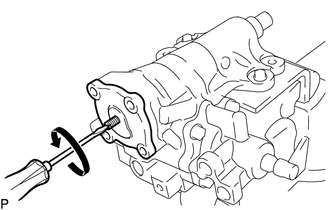
Turn the sector shaft adjusting screw counterclockwise so that the side cover sub-assembly fully contacts the power steering gear housing sub-assembly.
Install the 4 bolts.
- Torque:
- 61 N*m (622 kgf*cm, 45 ft.*lbf)
44154 8.INSTALL POWER PISTON PLUNGER GUIDE NUT
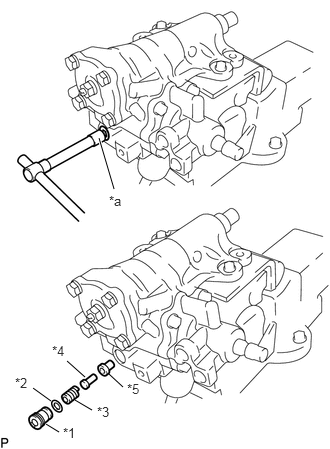
| *1 | Power Piston Plunger Guide Nut |
| *2 | O-ring |
| *3 | Power Piston Plunger Spring |
| *4 | Power Piston Plunger |
| *5 | Power Piston Plunger Guide |
| *a | Hexagon Socket Wrench |
Apply power steering fluid to a new O-ring.
Install the O-ring to the power plunger guide nut.
Install the power piston plunger, power piston plunger guide and power piston plunger spring.
Using a hexagon socket wrench, install the power piston plunger guide nut.
- Torque:
- 20 N*m (204 kgf*cm, 15 ft.*lbf)
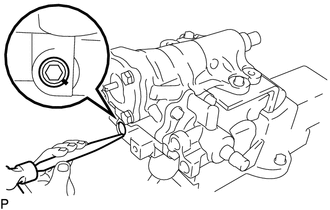
Stake the plunger guide nut.
44251 9.INSTALL PITMAN ARM
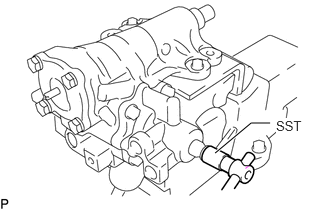
Using SST, center the power steering gear assembly.
- SST
-
09616-00011
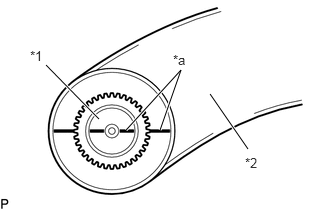
| *1 | Cross Shaft |
| *2 | Pitman Arm |
| *a | Matchmark |
Align the matchmarks of the pitman arm and cross shaft.
Using a 32 mm socket wrench, install the nut.
- Torque:
- 195 N*m (1988 kgf*cm, 144 ft.*lbf)
10.ADJUST TOTAL PRELOAD
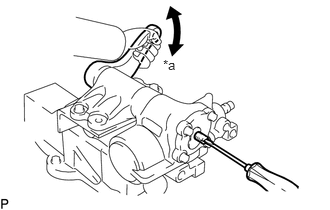
| *a | No Backlash |
Tighten the sector shaft adjusting screw to reduce the backlash to 0.
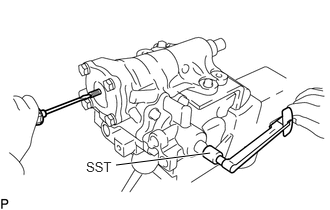
Install SST with a torque wrench on the worm shaft.
- SST
-
09616-00011
Turn the adjusting screw while measuring the preload until it is correct.
- Total Preload:
-
0.735 to 1.08 N*m (8 to 11 kgf*cm, 7 to 9 in.*lbf)
Install a new cross shaft adjusting screw seal washer.
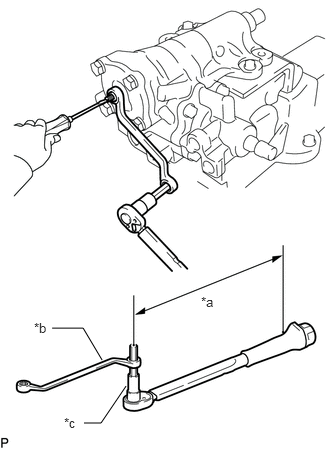
| *a | Torque Wrench Fulcrum Length |
| *b | Long Offset Wrench |
| *c | Hexagon Wrench |
Secure the adjusting screw and install the nut using a 14 mm hexagon wrench and 14 mm x 17 mm long offset wrench.
- Torque:
- Specified tightening torque : 46 N*m (469 kgf*cm, 34 ft.*lbf)
- HINT:
-
·
Calculate the torque wrench reading when changing the fulcrum length of the torque wrench.
Click hereGeneral>INTRODUCTION>REPAIR INSTRUCTION>PRECAUTION
·When using a long offset wrench (fulcrum length of 229.75 mm (9.045 in.)) + torque wrench (fulcrum length of 255 mm (10.039 in.)): 24.2 N*m (247 kgf*cm, 18 ft.*lbf)
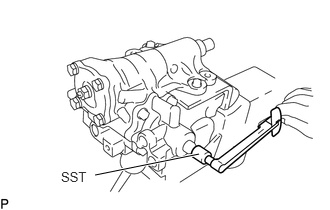
Using SST, check the total preload.
- SST
-
09616-00011
- Total preload:
-
0.735 to 1.08 N*m (8 to 11 kgf*cm, 7 to 9 in.*lbf)