1VD-FTV FUEL FUEL SYSTEM(w/ DPF) ON-VEHICLE INSPECTION
PROCEDURE

 1.INSPECT FUEL PRESSURE
Read Data List
Warm up the engine.
Turn the ignition switch off.
Connect the GTS to the DLC3.
Turn the ignition switch to ON.
Start the engine.
Turn the GTS on.
Enter the following menus: Powertrain / Engine and ECT / Data List.
- Powertrain > Engine and ECT > Data List
-
Tester Display Target Common Rail Pressure Common Rail Pressure - 50003 234 850,851
Read the Data List.
| Tester Display | Measurement Item/Range (Display) | Normal Conditions |
|---|---|---|
| Common Rail Pressure | Common rail pressure / Min.: 0 kPa, Max.: 250000 kPa | 27000 to 45000 kPa: Idling |
| Target Common Rail Pressure | Target common rail pressure/ Min.: 0 kPa, Max.: 250000 kPa | 25000 to 200000 kPa |
2.INSPECT FOR FUEL LEAK
Perform Active Test
Connect the GTS to the DLC3.
Turn the ignition switch to ON.
Start the engine.
Turn the GTS on.
Enter the following menus: Powertrain / Engine and ECT / Active Test.
- Powertrain > Engine and ECT > Active Test
-
Tester Display Test the Fuel Leak - 50004 234 90
Perform the Active Test.
| Tester Display | Test Details | Control Range | Diagnostic Notes |
|---|---|---|---|
| Test the Fuel Leak | Pressurizes fuel inside common rail and checks for fuel leaks | Stop/Start |
·
Fuel inside common rail pressurized to specified value and engine speed increased to 2000 rpm when Start is selected
·
Above conditions preserved while test is Start |
3.CHECK PRESSURE DISCHARGE VALVE
Activate the Pressure Discharge Valve Check
- HINT:
-
·
This is the procedure for troubleshooting common rail pressure control malfunctions and combustion problems.
·Malfunctions can be determined by checking the common rail pressure when performing a fuel cut and operating the pressure discharge valve with the GTS.
·During "Pressure Discharge Valve Check", the GTS measures the common rail pressure while the engine is running, after the engine is stopped, and after the pressure discharge valve operates.
Connect the GTS to the DLC3.
Turn the ignition switch to ON.
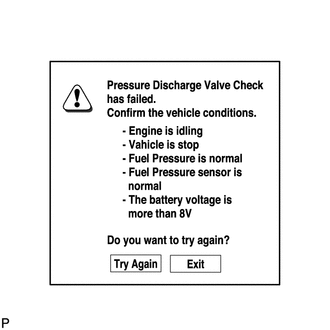
Turn the GTS on.
- NOTICE:
-
Confirm the following conditions:
-
·
Engine is idling.
·Vehicle is stopped.
·common rail pressure is not extremely high (below 100000 kPa).
·common rail pressure is not extremely low (higher than 26000 kPa).
·common rail pressure sensor is normal.
·Battery voltage is higher than 8 V.
- HINT:
-
When the common rail pressure is unstable, the common rail pressure may decrease to a level where the test cannot be performed. In this situation, wait until the common rail pressure meets the test condition, and then perform the test.
Enter the following menus: Powertrain / Engine and ECT / Utility / Pressure Discharge Valve Check.
- Powertrain > Engine and ECT > Utility
-
Tester Display Pressure Discharge Valve Check - 50005 234 2109
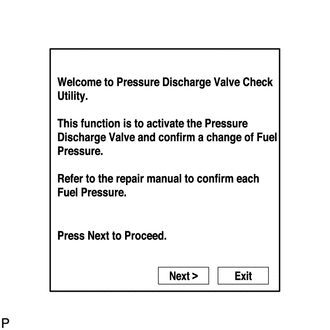
Press "Next".
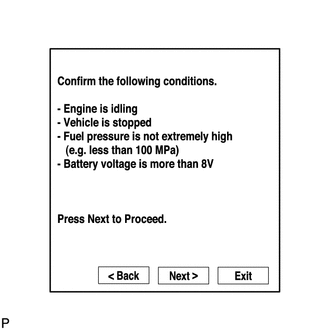
Press "Next" again to proceed.
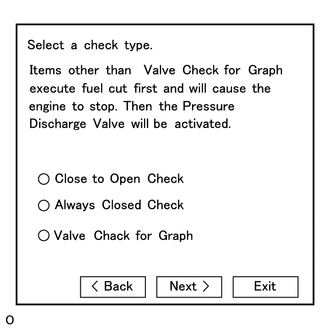
Select the check type "Valve Check for Graph".
Press "Next" again to proceed.
Press "Start" again to proceed.
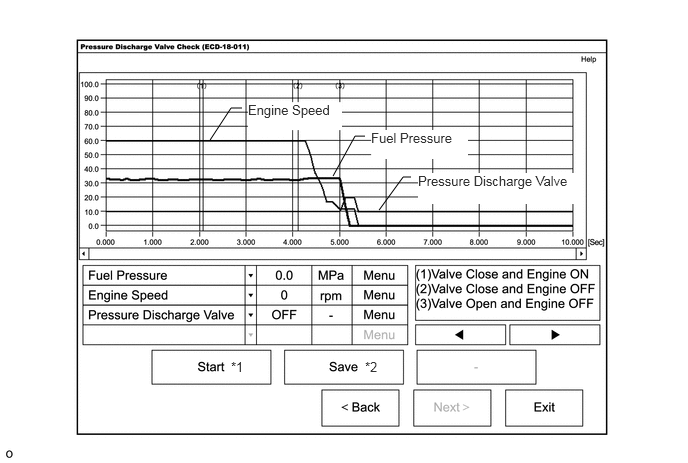
- HINT:
-
*1: When "Start" is pressed, the pressure discharge valve check begins.
-
*2: If "Save" is pressed after the pressure discharge valve check, the data recorded during the valve check can be saved.
Select the check type "Close to Open Check" or "Always Closed Check".
- HINT:
-
·
"Close to Open Check" opens the pressure discharge valve after the engine stops.
·"Always Closed Check" holds the pressure discharge valve closed during the check.
Press "Next".
Perform troubleshooting based on the measurement results.
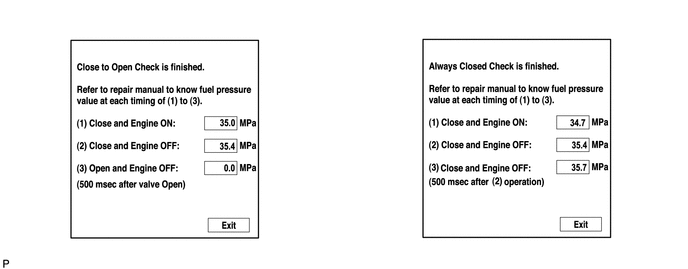
- HINT:
-
·
During "Close to Open Check", if there is no large change in common rail pressure when the pressure discharge valve is closed while the engine is running and after the engine is stopped, and if the value is 0 kPa when the pressure discharge valve is open, the system is normal.
·Perform "Always Closed Check" if the value is not 0 kPa when the pressure discharge valve is open during "Close to Open Check". If the results are the same as during "Close to Open Check", there is a pressure discharge valve operation malfunction.
·If the fuel temperature is high, perform "Pressure Discharge Valve Check" after the fuel has cooled to the outside air temperature.
·If a large amount of fuel is leaking, the common rail pressure decreases when the engine is stopped. However, the condition of the pressure discharge valve can still be determined by comparing the measurement results of "Close to Open Check" and "Always Closed Check".
-
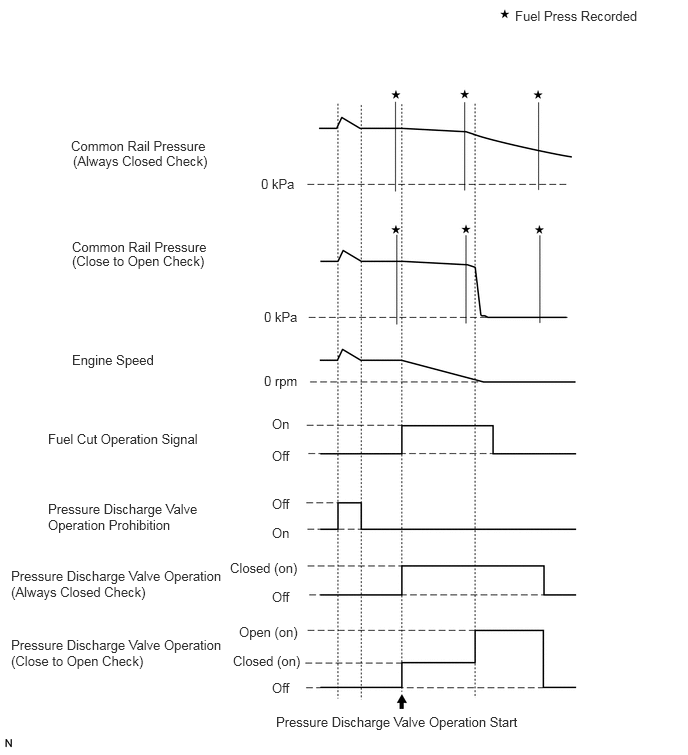 5.365,0.083 6.771,0.281 1.406,0.198 10 false Fuel Press Recorded 0.74,1.438 2.406,1.646 1.667,0.208 10 false Common Rail Pressure 0.75,2.635 2.281,2.833 1.531,0.198 10 false (Close to Open Check) 2.719,1.833 3.167,2.031 0.448,0.198 10 false 0 kPa 0.75,2.49 2.417,2.677 1.667,0.188 10 false Common Rail Pressure 0.76,1.594 2.292,1.792 1.531,0.198 10 false (Always Closed Check) 2.75,3.219 3.198,3.417 0.448,0.198 10 false 0 kPa 0.75,3.667 2.417,4.083 1.667,0.417 10 false Engine Speed 2.75,3.885 3.198,4.083 0.448,0.198 10 false 0 rpm 2.833,4.333 3.281,4.531 0.448,0.198 10 false On 2.833,4.667 3.135,4.865 0.302,0.198 10 false Off 0.5,4.49 2.26,4.74 1.76,0.25 10 false Fuel Cut Operation Signal 0.5,5.219 2.156,5.583 1.656,0.365 10 false Pressure Discharge Valve Operation Prohibition 2.833,5.167 3.135,5.365 0.302,0.198 10 false Off 2.833,5.469 3.281,5.667 0.448,0.198 10 false On 2.396,5.833 3.25,6.073 0.854,0.24 10 false Closed (on) 2.833,6.135 3.135,6.333 0.302,0.198 10 false Off 2.49,6.5 3.344,6.74 0.854,0.24 10 false Open (on) 2.427,6.802 3.281,7.042 0.854,0.24 10 false Closed (on) 2.833,7.083 3.135,7.281 0.302,0.198 10 false Off 2.875,7.438 5.542,7.688 2.667,0.25 10 false Pressure Discharge Valve Operation Start 0.115,5.917 2.385,6.406 2.271,0.49 10 false Pressure Discharge Valve Operation (Always Closed Check) 0.115,6.635 2.365,7.125 2.25,0.49 10 false Pressure Discharge Valve Operation (Close to Open Check)
4. BLEED AIR FROM FUEL SYSTEM
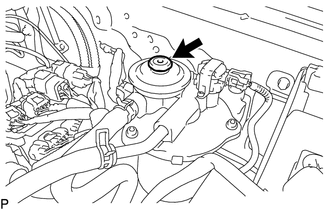
Using the hand pump indicated by the arrow in the illustration, bleed air from the fuel system. Continue pumping until pumping becomes difficult.
5.CHECK FUEL FILTER WARNING LIGHT AND DRAIN WATER
Check the fuel system warning light in the combination meter assembly and either replace the fuel filter element assembly (Click hereEngine / Hybrid System>1VD-FTV (FUEL)>FUEL FILTER>REPLACEMENT) or drain the water in the fuel filter assembly based on the instructions shown in the illustration.
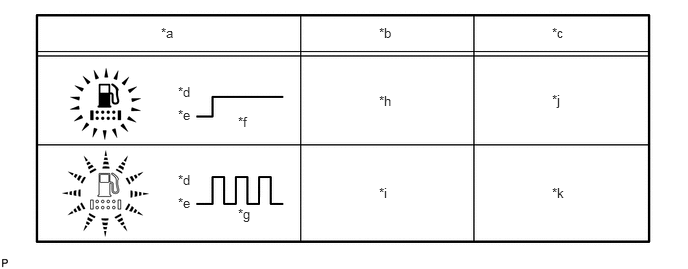
| *a | Fuel System Warning Light | *b | Fuel Filter Condition |
| *c | Necessary Procedure | *d | On |
| *e | Off | *f | Illuminate |
| *g | Blinking | *h | Clogged |
| *i | Water Level Warning | *j | Replace the Fuel Filter Element Assembly |
| *k | Drain the Water | - | - |
Drain water.
Detach the fuel hose clamp and disconnect the connectors.
Remove the 2 nuts and lift up the fuel filter assembly.
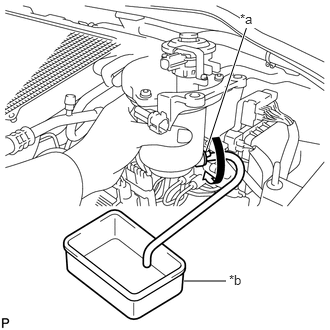
| *a | Drain Cock |
| *b | Container |
Connect a hose to the drain cock. Place the other end of the hose into a container under the drain cock.
Loosen the drain cock to drain water.
Tighten the drain cock by hand.
- NOTICE:
-
Do not use any tools in this step.
Install the fuel filter assembly with the 2 nuts.
- Torque:
- 20 N*m (204 kgf*cm, 15 ft.*lbf)
Connect the connectors and attach the fuel hose clamp.