EXTERIOR PANELS / TRIM REAR BUMPER(except Pickup) INSTALLATION
CAUTION / NOTICE / HINT
- HINT:
-
A bolt without a torque specification is shown in the standard bolt chart.
-
Click hereGeneral>SPECIFICATIONS>STANDARD BOLT>SPECIFIED TORQUE FOR STANDARD BOLTS
PROCEDURE

 52109A 1.INSTALL REAR SIDE BUMPER SUB-ASSEMBLY LH
Install the rear side bumper sub-assembly LH with the 2 nuts.
52108B 2.INSTALL REAR BUMPER SIDE EXTENSION SUB-ASSEMBLY RH
- HINT:
-
Use the same procedure described for the rear side bumper sub-assembly LH.
52186B 3.INSTALL REAR BUMPER SIDE MOUNTING BRACKET LH
Install the rear bumper side mounting bracket LH with 2 bolts.
- Torque:
- 37 N*m (377 kgf*cm, 27 ft.*lbf)
52185B 4.INSTALL REAR BUMPER SIDE MOUNTING BRACKET RH
- HINT:
-
Use the same procedure described for the LH side.
52174E 5.INSTALL REAR BUMPER BAR BRACKET LH
Install the rear bumper bar bracket LH with the 3 bolts.
- Torque:
- 35 N*m (357 kgf*cm, 26 ft.*lbf)
52173E 6.INSTALL REAR BUMPER BAR BRACKET RH
- HINT:
-
Use the same procedure described for the LH side.
52176A 7.INSTALL REAR BUMPER ARM MOUNTING BRACKET LH (for Model Code #J76 Series)
Install a new grommet.
Install the rear bumper arm mounting bracket LH with screw.
52175 8.INSTALL REAR BUMPER ARM MOUNTING BRACKET (for Model Code #J76 Series)
- HINT:
-
Use the same procedure described for the LH side.
52553 9.INSTALL REAR BUMPER FILLER LH
- HINT:
-
When installing the rear bumper filler LH, heat the vehicle body using a heat light.
- Standard:
-
Item Temperature Vehicle Body 40 to 60°C (104 to 140°F)
- NOTICE:
-
Do not heat the vehicle body excessively.
Clean the vehicle body surface.
Using a heat light, heat the vehicle body surface.
Remove the double-sided tape from the vehicle body surface.
Wipe off any tape adhesive residue with cleaner.
Install a new rear bumper filler LH.
Remove the peeling paper from the rear bumper filler LH.
- HINT:
-
After removing the peeling paper, keep the exposed adhesive free from foreign matter.
for Model Code #J76 Series:
Install the rear bumper filler LH with 4 new grommets.
- HINT:
-
Press the rear bumper filler LH firmly to install it.
Install the 4 screws.
except Model Code #J76 Series:
Install the rear bumper filler LH with 3 new grommets.
- HINT:
-
Press the rear bumper filler LH firmly to install it.
Install the 2 screws.
Install the rear bumper arm mounting bracket LH with the 2 screws.
Install a new grommet.
52552 10.INSTALL REAR BUMPER FILLER RH
- HINT:
-
Use the same procedure described for the LH side.
52359 11.INSTALL REAR BUMPER STEP COVER LH (w/ Cover, w/ Rear Combination Light)
- HINT:
-
When installing the rear bumper step cover LH, heat the rear bumper step cover LH using a heat light.
- Standard:
-
Item Temperature Rear Bumper Step Cover LH 20 to 30°C (68 to 86°F)
- NOTICE:
-
Do not heat the rear bumper step cover LH excessively.
Clean the rear bumper step cover LH surface.
Using a heat light, heat the rear bumper step cover LH surface.
Remove the double-sided tape from the rear bumper step cover LH.
Wipe off any tape adhesive residue with cleaner.
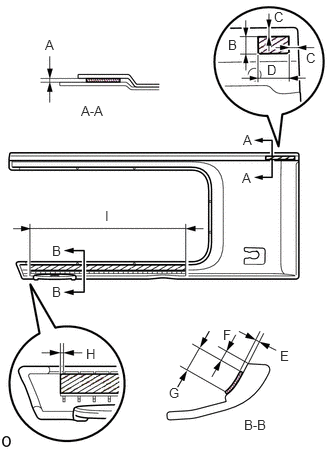
for Model Code #J76 Series:
Install the rear bumper step cover LH.
Using a heat light, heat the rear bumper step cover LH.
Install the double-sided tape in the position shown in the illustration.
- HINT:
-
Cut the double-sided tape to the dimensions shown in the illustration
- Standard Value:
-
Area Dimensions Area Dimensions A 0.4 mm B 29.0 mm C 5.0 mm D 50.0 mm E 1.2 mm F 4.0 mm G 10.0 mm H 1.0 mm I 195.0 mm - -
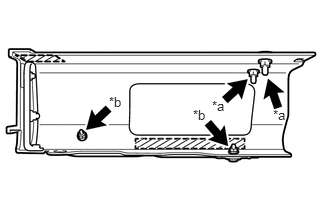
| *a | Nut A |
| *b | Nut B |

|
Double-sided Tape |
Install the rear bumper step cover LH with the 4 nuts.
- HINT:
-
Press the rear bumper step cover LH firmly to install it.
- Torque:
- Nut A : 15 N*m (153 kgf*cm, 11 ft.*lbf)
- Nut B : 5.5 N*m (56 kgf*cm, 49 in.*lbf)
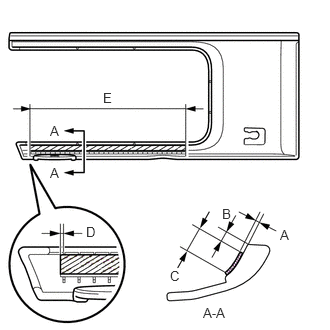
except Model Code #J76 Series:
Install the rear bumper step cover LH.
Using a heat light, heat the rear bumper step cover LH.
Install the double-sided tape in the position shown in the illustration.
- HINT:
-
Cut the double-sided tape to the dimensions shown in the illustration
- Standard Value:
-
Area Dimensions Area Dimensions A 1.2 mm B 4.0 mm C 10.0 mm D 1.0 mm E 195.0 mm - -
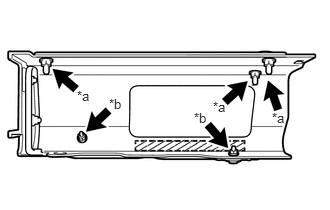
| *a | Nut A |
| *b | Nut B |
|
|
Double-sided Tape |
Install the rear bumper step cover LH with the 5 nuts.
- HINT:
-
Press the rear bumper step cover LH firmly to install it.
- Torque:
- Nut A : 15 N*m (153 kgf*cm, 11 ft.*lbf)
- Nut B : 5.5 N*m (56 kgf*cm, 49 in.*lbf)
52358B 12.INSTALL REAR BUMPER STEP COVER RH (w/ Cover, w/ Rear Combination Light)
- HINT:
-
Use the same procedure described for the LH side.
81920 13.INSTALL REFLEX REFLECTOR ASSEMBLY LH
Attach the clip and claw to install the reflex reflector assembly LH.
81910 14.INSTALL REFLEX REFLECTOR ASSEMBLY RH
- HINT:
-
Use the same procedure described for the LH side.
52069 15.INSTALL REAR BUMPER BAR SUB-ASSEMBLY LH
Install the rear bumper bar sub-assembly LH with the 3 nuts.
- Torque:
- 41 N*m (418 kgf*cm, 30 ft.*lbf)
Install the 2 bolts.
- Torque:
- 37 N*m (377 kgf*cm, 27 ft.*lbf)
52019A 16.INSTALL REAR BUMPER BAR SUB-ASSEMBLY RH
- HINT:
-
Use the same procedure described for the LH side.
52153B 17.INSTALL REAR BUMPER EXTENSION LH
for Model Code #J76 Series:
Install the rear bumper extension LH with 3 nuts and bolt.
- Torque:
- for nut : 12 N*m (122 kgf*cm, 9 ft.*lbf)
Install 2 new grommets.
Install the 2 screws.
except Model Code #J76 Series:
Attach the guide to install the rear bumper extension LH.
Install the 3 nuts and bolt.
- Torque:
- for nut : 12 N*m (122 kgf*cm, 9 ft.*lbf)
Install the screw.
52152B 18.INSTALL REAR BUMPER EXTENSION RH
- HINT:
-
Use the same procedure described for the LH side.
52303A 19.INSTALL REAR BUMPER STEP SUB-ASSEMBLY LH (w/ Pintle Hook)
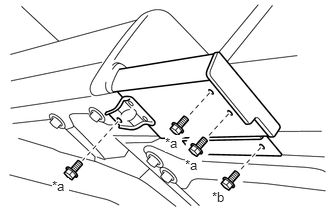
| *a | Bolt A |
| *b | Bolt B |
Install the rear bumper step sub-assembly LH with the 3 bolts.
- Torque:
- Bolt A : 18 N*m (184 kgf*cm, 13 ft.*lbf)
Install the bolt.
- Torque:
- Bolt B : 12 N*m (122 kgf*cm, 9 ft.*lbf)
52302A 20.INSTALL REAR BUMPER STEP SUB-ASSEMBLY (w/ Pintle Hook)
- HINT:
-
Use the same procedure described for the LH side.
52350 21.INSTALL REAR BUMPER STEP ASSEMBLY
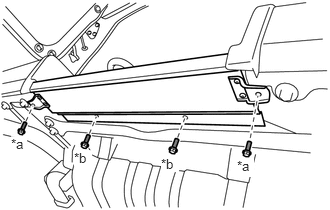
| *a | Bolt A |
| *b | Bolt B |
Install the rear bumper step assembly with the 2 bolts.
- Torque:
- Bolt A : 18 N*m (184 kgf*cm, 13 ft.*lbf)
Install the 2 bolts.
- Torque:
- Bolt B : 12 N*m (122 kgf*cm, 9 ft.*lbf)
52566 22.INSTALL REAR BUMPER EXTENSION FILLER LH (for Model Code #J76 Series)
Install the rear bumper extension filler LH with the 2 bolts.
Install the 2 hole plugs.
52565 23.INSTALL REAR BUMPER EXTENSION FILLER RH (for Model Code #J76 Series)
Install the rear bumper extension filler RH with the 3 bolts.
Install the 3 hole plugs.
81560 24.INSTALL REAR COMBINATION LIGHT ASSEMBLY LH (w/ Rear Combination Light)
81550 25.INSTALL REAR COMBINATION LIGHT ASSEMBLY RH (w/ Rear Combination Light)
- HINT:
-
Use the same procedure described for the LH side.
61608B 26.INSTALL REAR WHEEL OPENING EXTENSION SUB-ASSEMBLY LH (for Model Code #J71 Series)
61607B 27.INSTALL REAR WHEEL OPENING EXTENSION SUB-ASSEMBLY RH (for Model Code #J71 Series)
- HINT:
-
Use the same procedure described for the LH side.
76608 28.INSTALL REAR QUARTER PANEL MUDGUARD SUB-ASSEMBLY LH (w/ Mudguard)
76607 29.INSTALL REAR QUARTER PANEL MUDGUARD SUB-ASSEMBLY RH (w/ Mudguard)
- HINT:
-
Use the same procedure described for the LH side.