EXTERIOR PANELS / TRIM REAR DOOR BELT MOULDING REMOVAL
CAUTION / NOTICE / HINT
- HINT:
-
·
Use the same procedure for the RH and LH sides.
·The procedure listed below is for the LH side.
PROCEDURE

 1. PRECAUTION
- NOTICE:
-
After turning the ignition switch off, waiting time may be required before disconnecting the cable from the negative (-) battery terminal.
-
Click hereGeneral>INTRODUCTION>REPAIR INSTRUCTION>PRECAUTION
2.DISCONNECT CABLE FROM NEGATIVE BATTERY TERMINAL (w/ Power Window)
69206C 3.REMOVE REAR DOOR INSIDE HANDLE SUB-ASSEMBLY LH
69260E 4.REMOVE REAR DOOR WINDOW REGULATOR HANDLE ASSEMBLY (w/o Power Window)
5.REMOVE REAR POWER WINDOW REGULATOR SWITCH ASSEMBLY WITH REAR DOOR ARMREST BASE PANEL (w/ Power Window)
67604 6.REMOVE REAR DOOR TRIM BOARD SUB-ASSEMBLY LH (w/ Power Window)
74240 7.REMOVE REAR ARMREST ASSEMBLY LH (w/ Power Window)
74240 8.REMOVE REAR ARMREST ASSEMBLY LH (w/o Power Window)
67604 9.REMOVE REAR DOOR TRIM BOARD SUB-ASSEMBLY LH (w/o Power Window)
69759J 10.REMOVE DOOR LOCK LINK SILENCER
67842E 11.REMOVE REAR DOOR SERVICE HOLE COVER LH
69780A 12.REMOVE REAR DOOR INSIDE LOCKING LINK ASSEMBLY LH
69718B 13.REMOVE REAR DOOR LOCK REMOTE CONTROL LINK LH
68142 14.REMOVE REAR DOOR GLASS RUN
67408E 15.REMOVE REAR DOOR WINDOW DIVISION BAR SUB-ASSEMBLY LH
68104 16.REMOVE REAR DOOR GLASS SUB-ASSEMBLY LH
68240A 17.REMOVE REAR DOOR INNER GLASS WEATHERSTRIP ASSEMBLY LH
62714 18.REMOVE REAR QUARTER WINDOW GLASS LH
68230C 19.REMOVE REAR DOOR OUTER GLASS WEATHERSTRIP ASSEMBLY LH
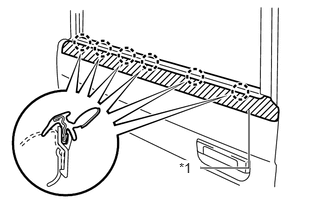
| *1 | Protective Tape |
Put protective tape around the rear door outer glass weatherstrip assembly LH.
Detach the 6 claws and remove the rear door outer glass weatherstrip assembly LH.