WINDOW / GLASS POWER WINDOW REGULATOR MOTOR(for Front Side) REMOVAL
CAUTION / NOTICE / HINT
- HINT:
-
·
Use the same procedure for RHD and LHD vehicles.
·The procedure listed below is for LHD vehicles.
·Use the same procedure for the RH and LH sides.
·The procedure listed below is for the LH side.
PROCEDURE

 1. PRECAUTION
- NOTICE:
-
After turning the ignition switch off, waiting time may be required before disconnecting the cable from the negative (-) battery terminal.
-
Click hereGeneral>INTRODUCTION>REPAIR INSTRUCTION>PRECAUTION
2.DISCONNECT CABLE FROM NEGATIVE BATTERY TERMINAL
69206B 3.REMOVE FRONT DOOR INSIDE HANDLE SUB-ASSEMBLY
68278B 4.REMOVE DOOR INSIDE HANDLE BEZEL (w/ Double Inside Handles)
5.REMOVE POWER WINDOW REGULATOR MASTER SWITCH ASSEMBLY WITH FRONT DOOR ARMREST BASE PANEL (for Driver Side)
6.REMOVE POWER WINDOW REGULATOR SWITCH ASSEMBLY WITH FRONT DOOR ARMREST BASE PANEL (for Front Passenger Side)
67602 7.REMOVE FRONT DOOR TRIM BOARD SUB-ASSEMBLY LH
69759V 8.REMOVE FRONT DOOR LOCK LINK SILENCER
69205 9.REMOVE FRONT DOOR INSIDE HANDLE SUB-ASSEMBLY RH (w/ Double Inside Handles)
67832 10.REMOVE FRONT DOOR SERVICE HOLE COVER LH
68220A 11.REMOVE FRONT DOOR INNER GLASS WEATHERSTRIP ASSEMBLY LH
68141 12.REMOVE FRONT DOOR GLASS RUN
68102 13.REMOVE FRONT DOOR GLASS SUB-ASSEMBLY LH
69802 14.REMOVE FRONT DOOR WINDOW REGULATOR SUB-ASSEMBLY LH
85720A 15.REMOVE FRONT POWER WINDOW REGULATOR MOTOR ASSEMBLY LH
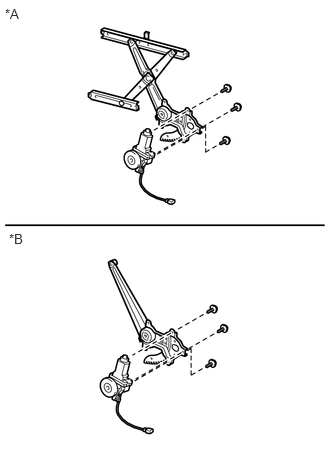
| *A | w/o Vent Window |
| *B | w/ Vent Window |
Using a T25 "TORX" socket wrench, remove the 3 "TORX" screws and front power window regulator motor assembly LH.
- NOTICE:
-
Be careful when removing the screws as the motor may fall and become damaged.