WINDOW / GLASS POWER WINDOW REGULATOR MOTOR(for Rear Side) INSTALLATION
CAUTION / NOTICE / HINT
- HINT:
-
·
Use the same procedure for the RH and LH sides.
·The procedure listed below is for the LH side.
PROCEDURE

 85720B 1.INSTALL REAR POWER WINDOW REGULATOR MOTOR ASSEMBLY LH
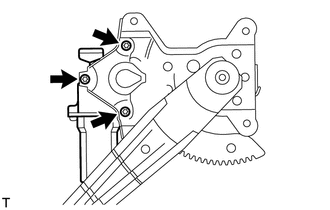
Using a T25 "TORX" driver, install the rear power window regulator motor assembly LH with the 3 screws.
- Torque:
- 5.4 N*m (55 kgf*cm, 48 in.*lbf)
- HINT:
-
For a new rear power window regulator motor assembly LH, the installation position of the regulator will be set when the self-tapping screws are installed.
69804 2.INSTALL REAR DOOR WINDOW REGULATOR SUB-ASSEMBLY LH
68104 3.INSTALL REAR DOOR GLASS SUB-ASSEMBLY LH
67408E 4.INSTALL REAR DOOR WINDOW DIVISION BAR SUB-ASSEMBLY LH
68240A 5.INSTALL REAR DOOR INNER GLASS WEATHERSTRIP ASSEMBLY LH
68142 6.INSTALL REAR DOOR GLASS RUN
69718B 7.INSTALL REAR DOOR LOCK REMOTE CONTROL LINK LH
69780A 8.INSTALL REAR DOOR INSIDE LOCKING LINK ASSEMBLY LH
67842E 9.INSTALL REAR DOOR SERVICE HOLE COVER LH
69759J 10.INSTALL DOOR LOCK LINK SILENCER
74240 11.INSTALL REAR ARMREST ASSEMBLY LH
67604 12.INSTALL REAR DOOR TRIM BOARD SUB-ASSEMBLY LH
13.INSTALL REAR POWER WINDOW REGULATOR SWITCH ASSEMBLY WITH REAR DOOR ARMREST BASE PANEL
69206C 14.INSTALL REAR DOOR INSIDE HANDLE SUB-ASSEMBLY LH
15.CONNECT CABLE TO NEGATIVE BATTERY TERMINAL
16. INITIALIZATION AFTER RECONNECTING BATTERY TERMINAL
- HINT:
-
When disconnecting and reconnecting the battery, there is an automatic learning function that completes learning when the respective system is used.
-
Click hereGeneral>SETUP>WHEN DISCONNECTING OR RECONNECTING BATTERY TERMINAL>AUTOMATIC LEARNING CHART