DOOR / HATCH REAR DOOR REASSEMBLY
CAUTION / NOTICE / HINT
- HINT:
-
·
Use the same procedure for the RH side and LH side.
·The procedures listed below are for the LH side.
·A bolt without a torque specification is shown in the standard bolt chart.
Click hereGeneral>SPECIFICATIONS>STANDARD BOLT>SPECIFIED TORQUE FOR STANDARD BOLTS
PROCEDURE

 1.INSTALL CUSHION
Install the cushion.
67872 2.INSTALL REAR DOOR WEATHERSTRIP LH
Attach the 18 clips to install the rear door weatherstrip LH.
68630 3.INSTALL REAR DOOR CHECK ASSEMBLY
Apply MP grease to the sliding areas of the rear door check assembly.
Install the door check to the door panel with the 2 bolts.
- Torque:
- 5.0 N*m (51 kgf*cm, 44 in.*lbf)
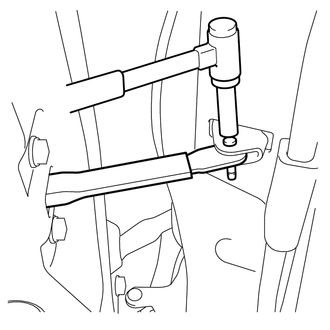
Using a brass bar and hammer, tap the door check pin into the body.
69240 4.INSTALL REAR DOOR OUTSIDE HANDLE ASSEMBLY LH
Install the rear door outside handle assembly LH with the 2 bolts.
- Torque:
- 8.0 N*m (82 kgf*cm, 71 in.*lbf)
69140 5.INSTALL REAR DOOR LOCK ACTUATOR ASSEMBLY LH (w/ Power Door Lock)
69340 6.INSTALL REAR DOOR LOCK ASSEMBLY LH
67836 7.INSTALL REAR DOOR LOCK CHILD PROTECTION COVER
Install the rear door lock child protection cover.
68230C 8.INSTALL REAR DOOR OUTER GLASS WEATHESTRIP ASSEMBLY LH
69804 9.INSTALL REAR DOOR WINDOW REGULATOR SUB-ASSEMBLY LH (w/ Power Window)
Apply MP grease to the sliding and rotating areas of the rear door window regulator sub-assembly LH.
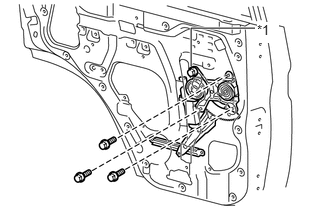
| *1 | Temporary Bolt |
Temporarily install the temporary bolt to the rear door window regulator sub-assembly LH.
Install the rear door window regulator sub-assembly LH with the 3 bolts, and then tighten the temporary bolt.
- Torque:
- 8.0 N*m (82 kgf*cm, 71 in.*lbf)
- HINT:
-
Tighten the bolts in the order shown in the illustration.
- NOTICE:
-
Be careful not to drop the rear door window regulator as it may become damaged.
Connect the connector.
85720B 10.INSTALL REAR POWER WINDOW REGULATOR MOTOR ASSEMBLY LH (w/ Power Window)
69804 11.INSTALL REAR DOOR WINDOW REGULATOR SUB-ASSEMBLY LH (w/o Power Window)
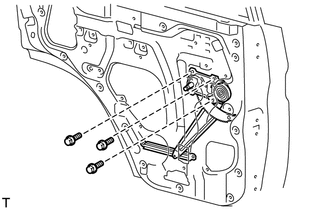
Apply MP grease to the sliding and rotating areas of the rear door window regulator sub-assembly LH.
Install the rear door window regulator sub-assembly LH with the 3 bolts.
- Torque:
- 8.0 N*m (82 kgf*cm, 71 in.*lbf)
68189 12.INSTALL REAR DOOR QUARTER WINDOW WEATHERSTRIP LH
Install the rear door quarter window weatherstrip LH to the rear quarter window glass LH.
62714 13.INSTALL REAR QUARTER WINDOW GLASS LH
Install the rear quarter window glass LH with rear door quarter window weatherstrip LH.
68240A 14.INSTALL REAR DOOR INNER GLASS WEATHERSTRIP ASSEMBLY LH
Attach the 4 claws into the door panel slit and push the rear door inner glass weatherstrip assembly LH onto the panel.
68104 15.INSTALL REAR DOOR GLASS SUB-ASSEMBLY LH
Install the rear door glass sub-assembly LH to the regulator with the 2 nuts.
- Torque:
- 5.0 N*m (51 kgf*cm, 44 in.*lbf)
67408E 16.INSTALL REAR DOOR WINDOW DIVISION BAR SUB-ASSEMBLY LH
Lift up the weatherstrip, and then install the screw.
Install the rear door window division bar sub-assembly LH with the 2 bolts.
- Torque:
- Bolt : 5.0 N*m (51 kgf*cm, 44 in.*lbf)
68142 17.INSTALL REAR DOOR GLASS RUN
Install the rear door glass run to the door frame.
69718B 18.INSTALL REAR DOOR LOCK REMOTE CONTROL LINK LH
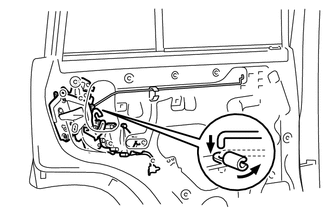
Attach the rear door lock remote control link LH with the snap as shown in the illustration.
69780A 19.INSTALL REAR DOOR INSIDE LOCKING LINK ASSEMBLY LH
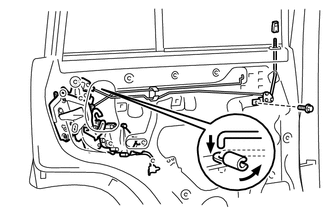
Attach the rear door inside locking link assembly LH with the snap as shown in the illustration.
Install the bolt, knob holder and knob.
67842E 20.INSTALL REAR DOOR SERVICE HOLE COVER LH
Apply new butyl tape to the rear door panel.
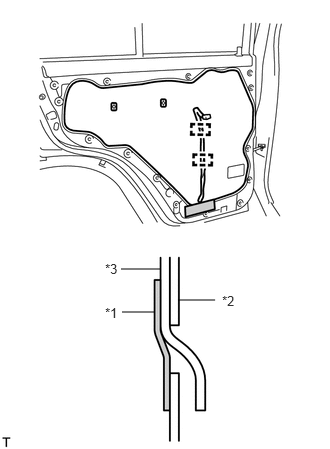
| *1 | Tape |
| *2 | Door Panel |
| *3 | Service Hole Cover |
Install the rear door service hole cover.
- NOTICE:
-
·
When installing the service hole cover, pull out the links through the service hole cover.
·There should be no wrinkles or folds after attaching the service hole cover.
·After attaching the service hole cover, check the sealing quality.
Attach the 2 clamps and 2 new grommets.
Install the tape, as shown in the illustration.
69759J 21.INSTALL DOOR LOCK LINK SILENCER
Install the door lock link silencer.
67604 22.INSTALL REAR DOOR TRIM BOARD SUB-ASSEMBLY LH (w/o Power Window)
Attach the 16 clips to install the rear door trim door trim board sub-assembly LH.
74240 23.INSTALL REAR ARMREST ASSEMBLY LH (w/o Power Window)
Install the rear armrest assembly LH with the 2 screws.
74240 24.INSTALL REAR ARMREST ASSEMBLY LH (w/ Power Window)
Install the armrest to the door trim board with the 4 screws.
67604 25.INSTALL REAR DOOR TRIM BOARD SUB-ASSEMBLY LH (w/ Power Window)
Attach the 16 clips to install the rear door trim board sub-assembly LH.
Install the 2 screws to attach the 2 caps.
26.INSTALL REAR POWER WINDOW REGULATOR SWITCH ASSEMBLY WITH REAR DOOR ARMREST BASE PANEL (w/ Power Window)
Connect the connector.
Attach the clip and 3 claws to install the rear power window regulator switch assembly with rear door armrest base panel.
69260E 27.INSTALL REAR DOOR WINDOW REGULATOR HANDLE ASSEMBLY (w/o Power Window)
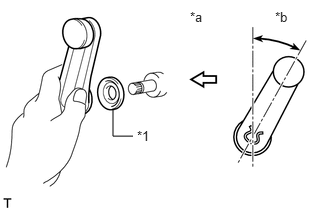
| *1 | Plate |
| *a | Front |
| *b | 30° |
With the door window fully closed, install the plate and the regulator handle with the snap ring as shown in the illustration.
69206C 28.INSTALL REAR DOOR INSIDE HANDLE SUB-ASSEMBLY LH
Connect the rear door inside handle sub-assembly LH to the control link and install the rear door inside handle sub-assembly LH.
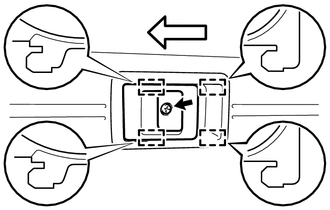

|
Screw |

|
Rearward |
Attach the 4 guides in the direction indicated by the arrow in the illustration.
Install the screw and rear door inside handle sub-assembly.
29.CONNECT CABLE TO NEGATIVE BATTERY TERMINAL (w/ Power Window)
- Torque:
- 5.4 N*m (55 kgf*cm, 48 in.*lbf)
30. INITIALIZATION AFTER RECONNECTING BATTERY TERMINAL
- HINT:
-
When disconnecting and reconnecting the battery, there is an automatic learning function that completes learning when the respective system is used.
-
Click hereGeneral>SETUP>WHEN DISCONNECTING OR RECONNECTING BATTERY TERMINAL>AUTOMATIC LEARNING CHART
31.CHECK POWER WINDOW CONTROL SYSTEM (w/ Power Window)
32.CHECK POWER DOOR LOCK CONTROL SYSTEM (w/ Power Door Lock)