Q710 HYBRID TRANSMISSION / TRANSAXLE SHIFT CONTROL POWER SUPPLY(for RHD) INSTALLATION
CAUTION / NOTICE / HINT
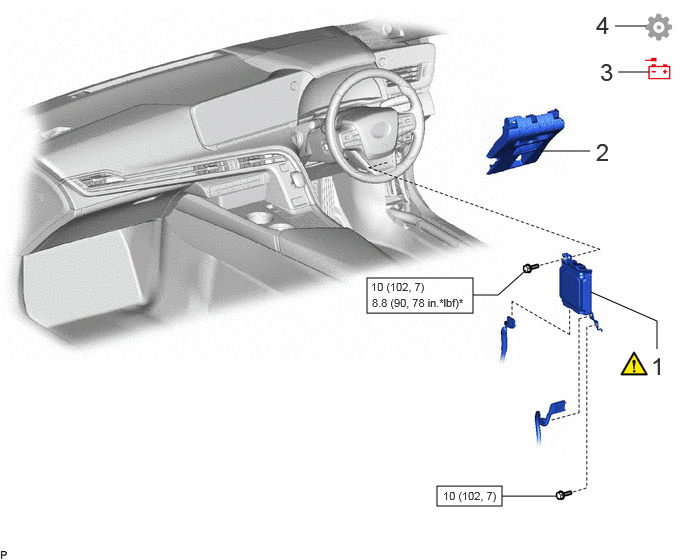
| Procedure | Part Name Code | 
|

|

|
|
|---|---|---|---|---|---|
| 1 | SHIFT CONTROL SUPPLY | 894D1 | ( ) |
- | - |
| 2 | LOWER INSTRUMENT PANEL FINISH PANEL SUB-ASSEMBLY | 55045 | - | - | - |
| 3 | CONNECT CABLE TO NEGATIVE AUXILIARY BATTERY TERMINAL | - | - | - | - |
| 4 | INITIALIZATION AFTER RECONNECTING BATTERY TERMINAL | - | - | - | ()
|

|
N*m (kgf*cm, ft.*lbf): Specified torque | - | - |
| * | For use with union nut wrench | - | - |
PROCEDURE

 894D1
1.INSTALL SHIFT CONTROL SUPPLY
|
|
|
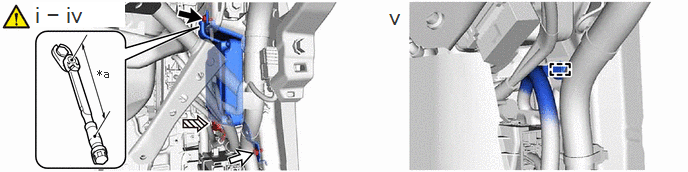
| *a | Torque Wrench Fulcrum Length | - | - |

|
Bolt A | 
|
Bolt B |

|
Shift Control Supply Connector | - | - |
Temporarily install the shift control supply with the 2 bolts.
Using a 10 mm union nut wrench, tighten the bolt A.
- Torque:
- Specified tightening torque : 10 N*m (102 kgf*cm, 7 ft.*lbf)
- HINT:
- ·
Calculate the torque wrench reading when changing the fulcrum length of the torque wrench.
Click hereGeneral>INTRODUCTION>REPAIR INSTRUCTION>PRECAUTION
·When using a union nut wrench (fulcrum length of 22 mm (0.866 in.)) + torque wrench (fulcrum length of 162 mm (6.38 in.)): 8.8 N*m (90 kgf*cm, 78 in.*lbf)
Tighten the bolt B.
- Torque:
- 10 N*m (102 kgf*cm, 7 ft.*lbf)
Connect the shift control supply connector.
Attach the wire harness clamp to the shift control supply.

Connect the ECU with the 2 nuts.
55045
2.INSTALL LOWER INSTRUMENT PANEL FINISH PANEL SUB-ASSEMBLY
3.CONNECT CABLE TO NEGATIVE AUXILIARY BATTERY TERMINAL
4. INITIALIZATION AFTER RECONNECTING BATTERY TERMINAL
Click hereGeneral>SETUP>WHEN DISCONNECTING OR RECONNECTING BATTERY TERMINAL>WORK PROCEDURE
- HINT:
-
When disconnecting and reconnecting the battery, there is an automatic learning function that completes learning when the respective system is used.
-
Click hereGeneral>SETUP>WHEN DISCONNECTING OR RECONNECTING BATTERY TERMINAL>AUTOMATIC LEARNING CHART