INTERIOR PANELS / TRIM FRONT CONSOLE BOX REMOVAL
CAUTION / NOTICE / HINT
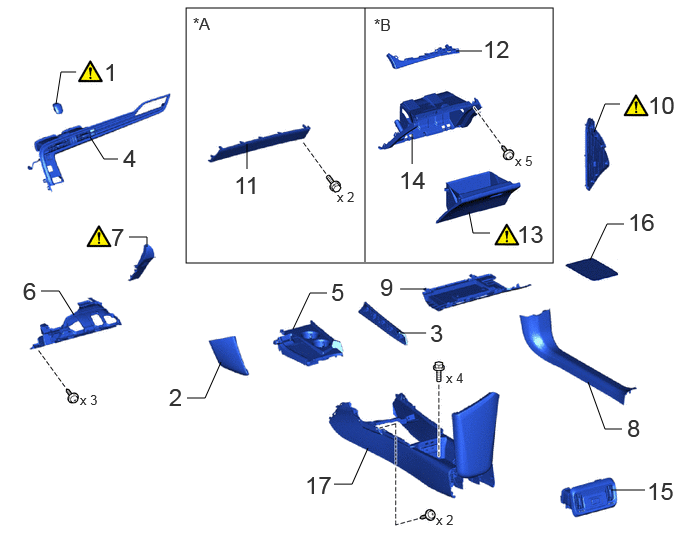
| Procedure | Part Name Code | 
|

|

|
|
|---|---|---|---|---|---|
| 1 | SHIFT LEVER KNOB SUB-ASSEMBLY | 33504F | ( ) |
- | - |
| 2 | UPPER NO. 1 CONSOLE PANEL GARNISH | 58833B | - | - | - |
| 3 | UPPER NO. 2 CONSOLE PANEL GARNISH | 58834B | - | - | - |
| 4 | INSTRUMENT CLUSTER FINISH PANEL GARNISH ASSEMBLY | 55470 | - | - | - |
| 5 | REAR UPPER CONSOLE PANEL SUB-ASSEMBLY | - | - | - | - |
| 6 | NO. 1 INSTRUMENT PANEL UNDER COVER SUB-ASSEMBLY | 55606 | - | - | - |
| 7 | LOWER INSTRUMENT PANEL FINISH PANEL SUB-ASSEMBLY LH | 55046A | ()
|
- | - |
| 8 | FRONT DOOR SCUFF PLATE RH | 67913 | - | - | - |
| 9 | NO. 2 INSTRUMENT PANEL UNDER COVER SUB-ASSEMBLY | 55607 | - | - | - |
| 10 | NO. 2 INSTRUMENT SIDE PANEL | 55318F | ()
|
- | - |
| 11 | INSTRUMENT PANEL FINISH PANEL END RH | 55435A | - | - | - |
| 12 | LOWER INSTRUMENT CLUSTER FINISH PANEL GARNISH | 55479D | - | - | - |
| 13 | GLOVE COMPARTMENT DOOR SUB-ASSEMBLY | 55501A | ()
|
- | - |
| 14 | LOWER NO. 2 INSTRUMENT PANEL FINISH PANEL | 55433B | - | - | - |
| 15 | CONSOLE REAR END PANEL SUB-ASSEMBLY | 58903A | - | - | - |
| 16 | CONSOLE BOX CARPET | 58815C | - | - | - |
| 17 | CONSOLE BOX ASSEMBLY | 58810J | - | - | - |
| *A | for LHD | *B | for RHD |
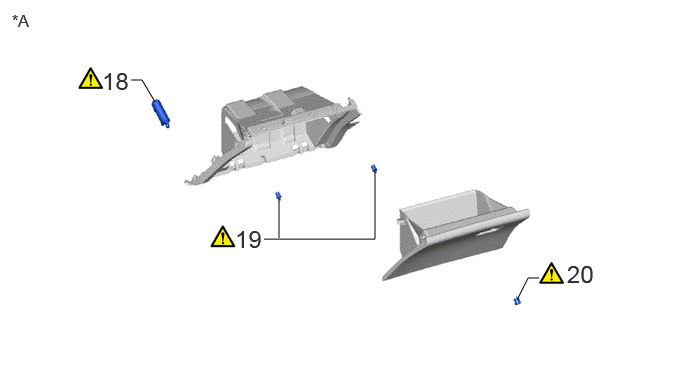
| Procedure | Part Name Code |
|
|
|
|
|---|---|---|---|---|---|
| 18 | GLOVE COMPARTMENT DOOR STOPPER SUB-ASSEMBLY | 55054 | ()
|
- | - |
| 19 | GLOVE COMPARTMENT DOOR CHECK CUSHION | 55557A | ()
|
- | - |
| 20 | GLOVE COMPARTMENT DOOR LOCK CYLINDER ASSEMBLY | 69550A | ()
|
- | - |
| *A | for RHD | - | - |
CAUTION / NOTICE / HINT
- HINT:
- ·
Use the same procedure for RHD and LHD vehicles.
·The procedure listed below is for LHD vehicles.
PROCEDURE

 33504F
1.REMOVE SHIFT LEVER KNOB SUB-ASSEMBLY
|
|
Click here()
|
58833B
2.REMOVE UPPER NO. 1 CONSOLE PANEL GARNISH
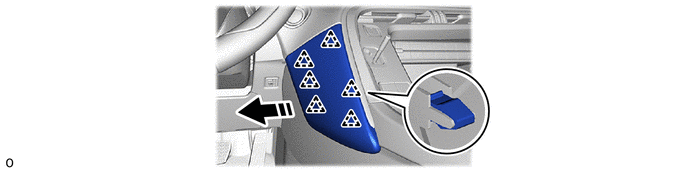

|
Remove in this Direction | - | - |
58834B
3.REMOVE UPPER NO. 2 CONSOLE PANEL GARNISH
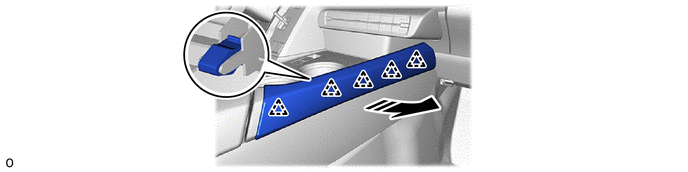
|
|
Remove in this Direction | - | - |
55470
4.REMOVE INSTRUMENT CLUSTER FINISH PANEL GARNISH ASSEMBLY
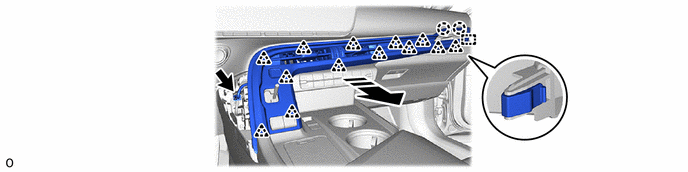
|
|
Remove in this Direction | - | - |
5.REMOVE REAR UPPER CONSOLE PANEL SUB-ASSEMBLY
- HINT:
-
The illustrations are representative examples, and details may differ.
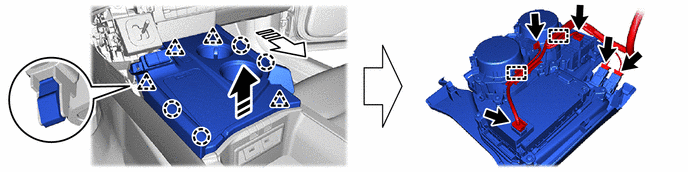
|
|
Remove in this Direction (1) | 
|
Remove in this Direction (2) |
55606
6.REMOVE NO. 1 INSTRUMENT PANEL UNDER COVER SUB-ASSEMBLY
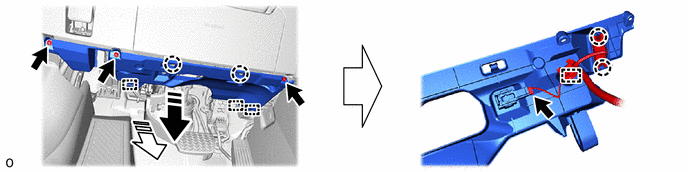
|
|
Remove in this Direction (1) |
|
Remove in this Direction (2) |
55046A
7.REMOVE LOWER INSTRUMENT PANEL FINISH PANEL SUB-ASSEMBLY LH
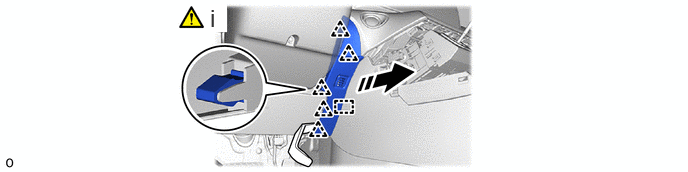
|
|
Remove in this Direction | - | - |
Using moulding remover A, detach the clip as shown in the illustration and remove the lower instrument panel finish panel sub-assembly LH.
67913
8.REMOVE FRONT DOOR SCUFF PLATE RH
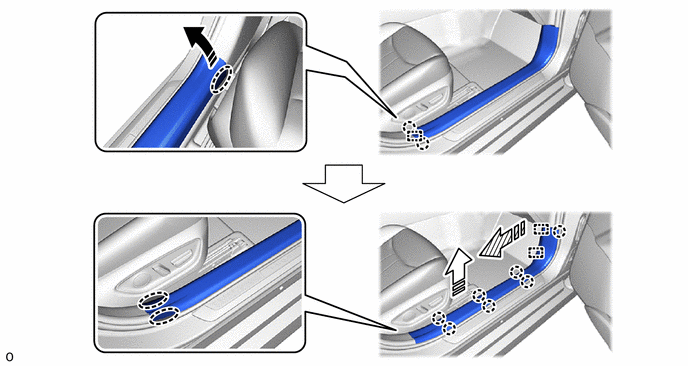

|
Place Hand Here |
|
Remove in this Direction (1) |
|
|
Remove in this Direction (2) | 
|
Remove in this Direction (3) |
55607
9.REMOVE NO. 2 INSTRUMENT PANEL UNDER COVER SUB-ASSEMBLY
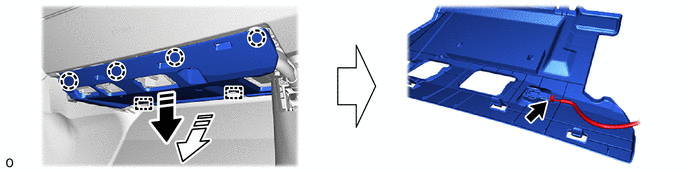
|
|
Remove in this Direction (1) |
|
Remove in this Direction (2) |
55318F
10.REMOVE NO. 2 INSTRUMENT SIDE PANEL
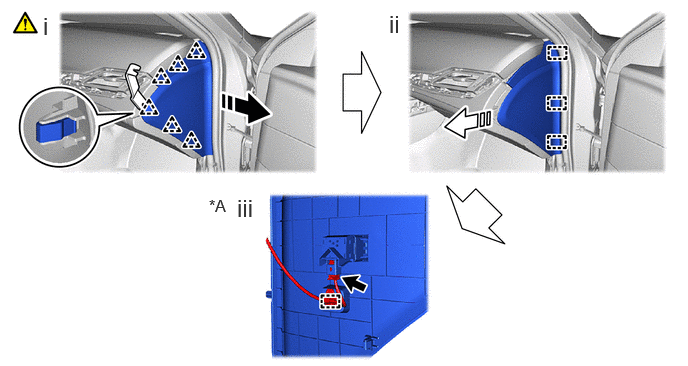
| *A | w/ Airbag Cut Off Switch | - | - |
|
|
Remove in this Direction (1) |
|
Remove in this Direction (2) |
Using moulding remover B, detach the clip in the removal direction (1) as shown in the illustration.
Detach the guide in the removal direction (2) as shown in the illustration and remove the No. 2 instrument side panel.
w/ Airbag Cut Off Switch:
1. Detach the clamp and disconnect the connector.
55435A
11.REMOVE INSTRUMENT PANEL FINISH PANEL END RH (for LHD)
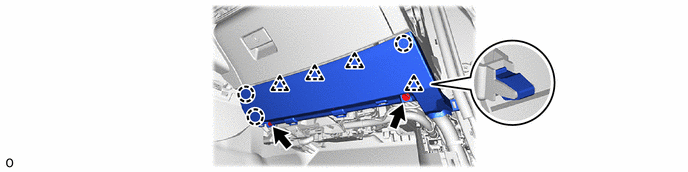
55479D
12.REMOVE LOWER INSTRUMENT CLUSTER FINISH PANEL GARNISH (for RHD)
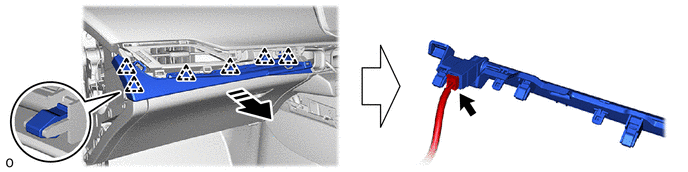
|
|
Remove in this Direction | - | - |
55501A
13.REMOVE GLOVE COMPARTMENT DOOR SUB-ASSEMBLY (for RHD)
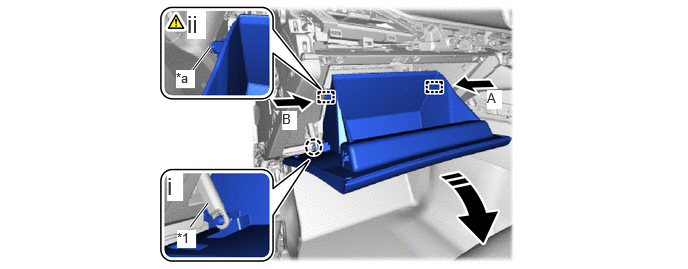
| *1 | Glove Compartment Door Stopper Sub-assembly | - | - |
| *a | Stopper | - | - |
|
|
Remove in this Direction | - | - |
Detach the claw and disconnect the glove compartment door stopper sub-assembly.
Slightly bend the stoppers (A) and (B) in the directions indicated by the arrows in the illustration and open the glove compartment door assembly until the stoppers are released.
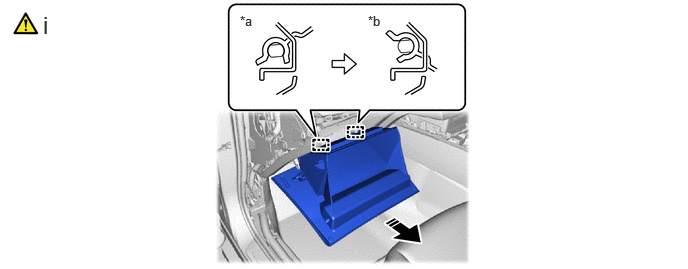
| *a | Closed Position | *b | Horizontal Position |
|
|
Remove in this Direction | - | - |
Pull the glove compartment door assembly horizontally in the direction indicated by the arrow to detach the hinges and remove it.
- NOTICE:
-
Pulling the glove compartment door assembly upward to remove it causes the hinges to deform. Be sure to pull out the glove compartment door assembly horizontally.
55433B
14.REMOVE LOWER NO. 2 INSTRUMENT PANEL FINISH PANEL (for RHD)
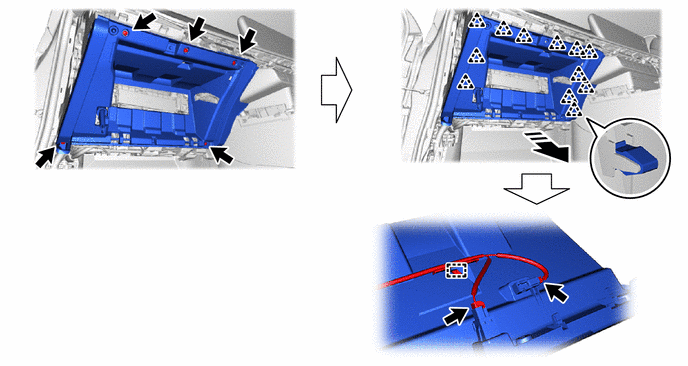
|
|
Remove in this Direction | - | - |
58903A
15.REMOVE CONSOLE REAR END PANEL SUB-ASSEMBLY
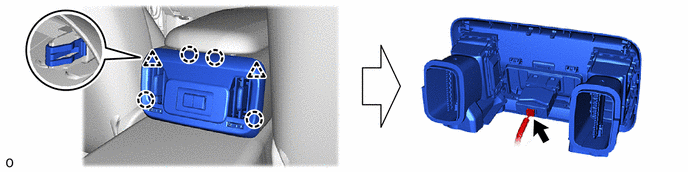
58815C
16.REMOVE CONSOLE BOX CARPET
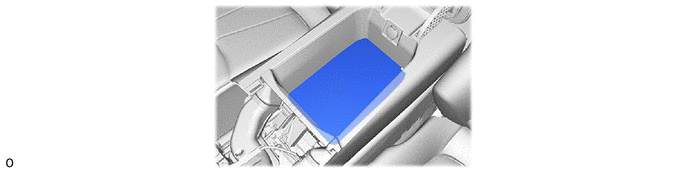
58810J
17.REMOVE CONSOLE BOX ASSEMBLY
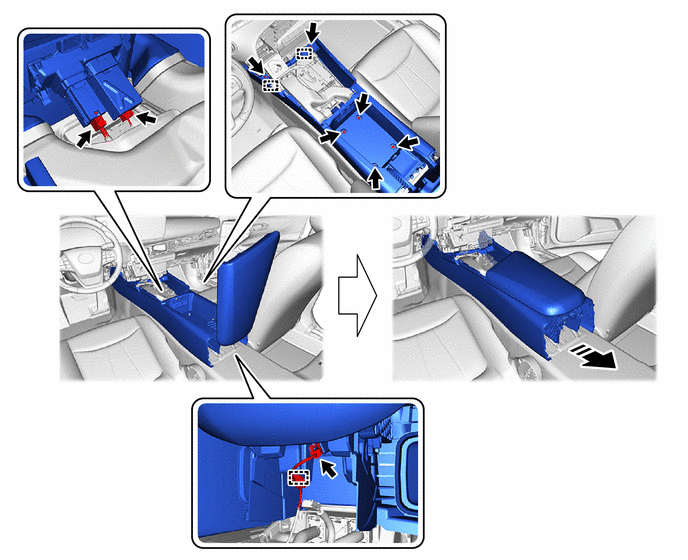
|
|
Remove in this Direction | - | - |
55054
18.REMOVE GLOVE COMPARTMENT DOOR STOPPER SUB-ASSEMBLY (for RHD)
|
|
|

55557A
19.REMOVE GLOVE COMPARTMENT DOOR CHECK CUSHION (for RHD)
|
|
|
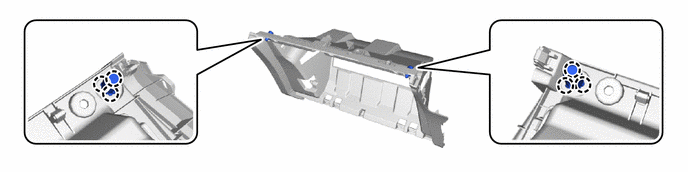
69550A
20.REMOVE GLOVE COMPARTMENT DOOR LOCK CYLINDER ASSEMBLY (for RHD)
|
|
|
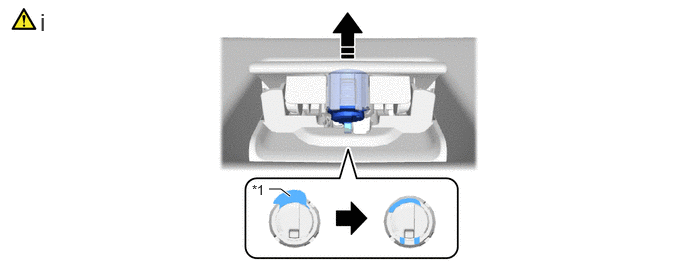
| *1 | Cylinder Lock | - | - |
|
|
Remove in this Direction | - | - |
Press the cylinder lock to release it and pull out the glove compartment door lock cylinder assembly from the glove compartment door assembly to remove it as shown in the illustration.