INTERIOR PANELS / TRIM ROOF HEADLINING REASSEMBLY
CAUTION / NOTICE / HINT
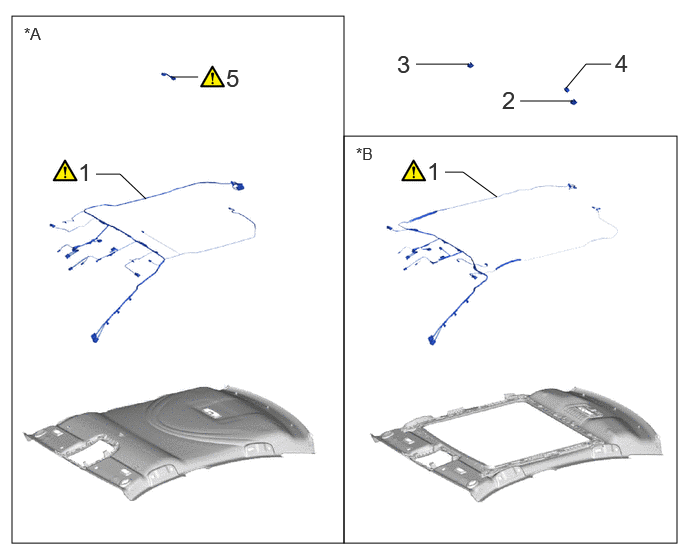
| Procedure | Part Name Code | 
|

|

|
|
|---|---|---|---|---|---|
| 1 | NO. 1 ROOF WIRE | 82171 | ( ) |
- | - |
| 2 | MICROPHONE CASE LH | 86255D | - | - | - |
| 3 | MICROPHONE CASE RH | 86255C | - | - | - |
| 4 | TELEPHONE MICROPHONE ASSEMBLY | 86730A | - | - | - |
| 5 | INTERIOR ILLUMINATION LIGHT SUB-ASSEMBLY | 81081 | ()
|
- | - |
| *A | for Normal Roof | *B | for Panoramic Moon Roof |
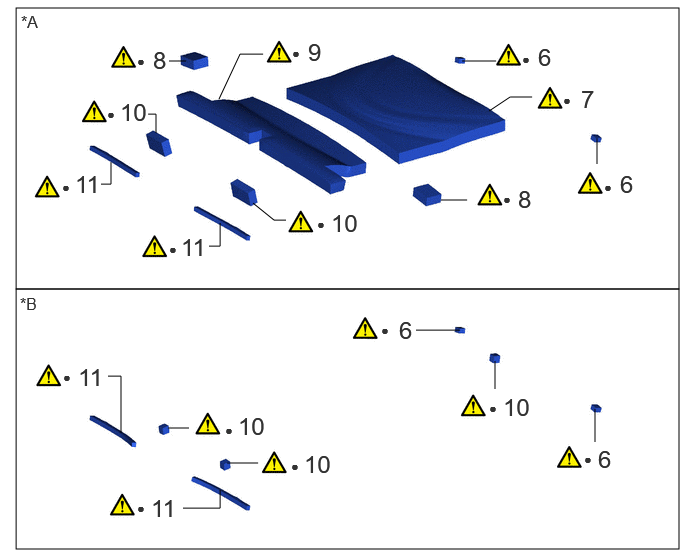
| Procedure | Part Name Code |
|
|
|
|
|---|---|---|---|---|---|
| 6 | ROOF HEADLINING PAD | 63351C | ()
|
- | - |
| 7 | NO. 2 ROOF SILENCER PAD | 63342 | ()
|
- | - |
| 8 | NO. 2 ROOF HEADLINING PAD | 63352D | ()
|
- | - |
| 9 | NO. 1 ROOF SILENCER PAD | 63341 | ()
|
- | - |
| 10 | ROOF HEADLINING PAD | 63351B | ()
|
- | - |
| 11 | FRONT ROOF HEADLINING SIDE PAD | 63354C | ()
|
- | - |
| *A | for Normal Roof | *B | for Panoramic Moon Roof |
| ● | Non-reusable part | - | - |
- HINT:
- ·
Use the same procedure for RHD and LHD vehicles.
·The procedure listed below is for LHD vehicles.
PROCEDURE

 82171
1.INSTALL NO. 1 ROOF WIRE
for Normal Roof:
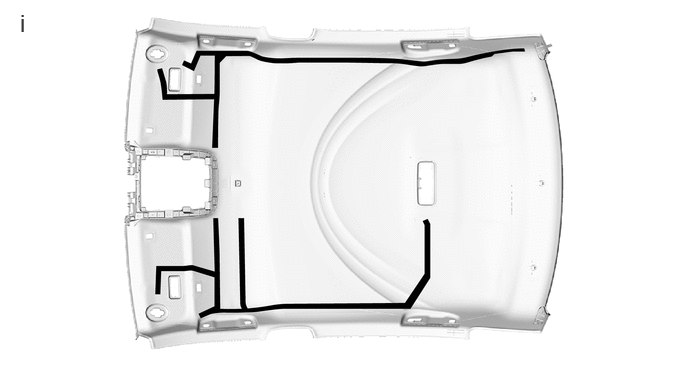

|
Butyl Tape | - | - |
Apply butyl tape to the roof headlining assembly ensuring it does not go over the marking.
for Panoramic Moon Roof:
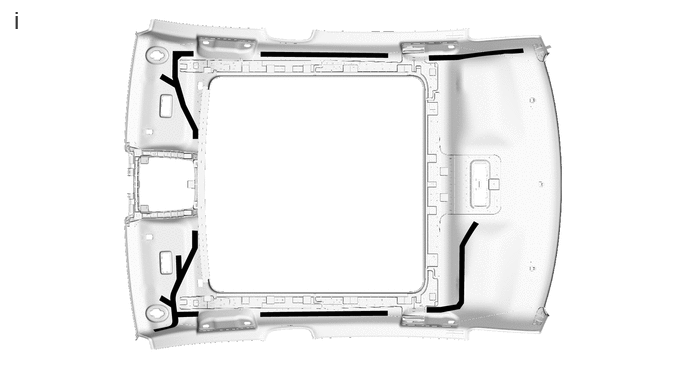
|
|
Butyl Tape | - | - |
Apply butyl tape to the roof headlining assembly ensuring it does not go over the marking.
for Normal Roof:
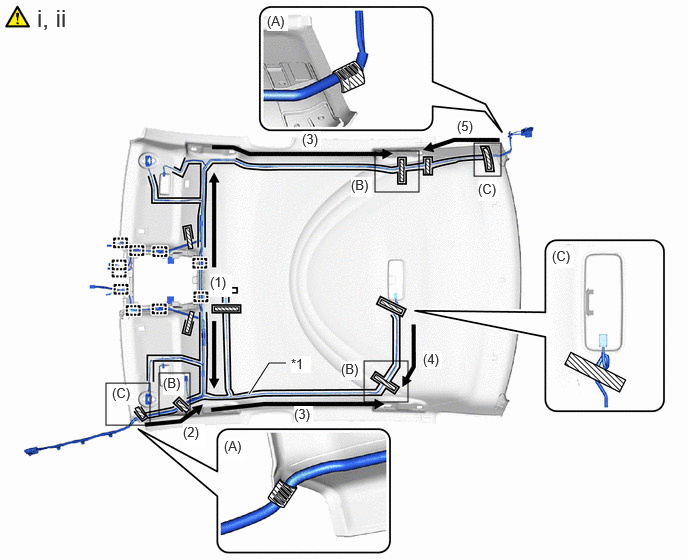
| *1 | No. 1 Roof Wire | - | - |
|
|
Positioning Tape | 
|
Fastening Tape |
Attach the No. 1 roof wire to the butyl tape in the order and direction indicated by the arrows shown in the illustration and secure the No. 1 roof wire with pieces of fastening tape.
- NOTICE:
- ·
Make sure to attach the No. 1 roof wire without leaving any of it loose.
·If any of the No. 1 roof wire is left loose, it will cause an abnormal noise.
- HINT:
- ·
Align the positioning tape of the No. 1 roof wire with the protrusion of the roof headlining assembly and wrap fastening tape around them as shown in the part of the illustration labeled (A).
·Adjust the extra length of the No. 1 roof wire in the part of the illustration labeled (B) and apply fastening tape.
·Align the positioning tape of the No. 1 roof wire with the marking on the roof headlining assembly and apply tape as shown in the part of the illustration labeled (C).
·Apply the No. 1 roof wire so that it is securely attached and not twisted.
Attach the clamp to install the No. 1 roof wire.
for Panoramic Moon Roof:
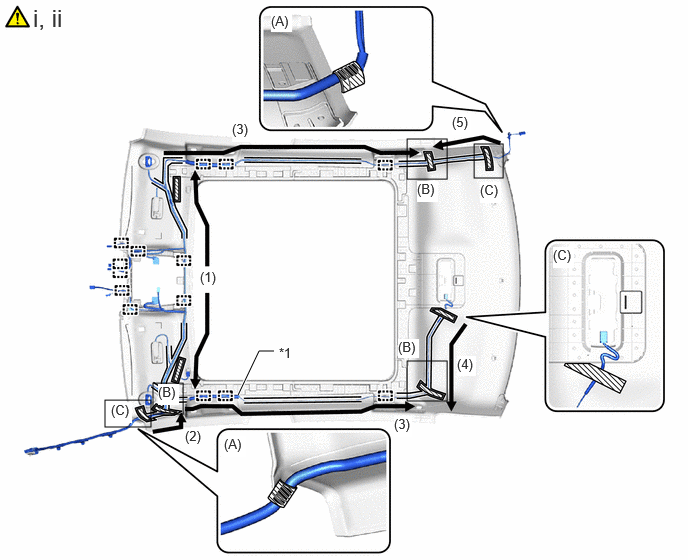
| *1 | No. 1 Roof Wire | - | - |
|
|
Positioning Tape |
|
Fastening Tape |
Attach the No. 1 roof wire to the butyl tape in the order and direction indicated by the arrows shown in the illustration and secure the No. 1 roof wire with pieces of fastening tape.
- NOTICE:
- ·
Make sure to attach the No. 1 roof wire without leaving any of it loose.
·If any of the No. 1 roof wire is left loose, it will cause an abnormal noise.
- HINT:
- ·
Align the positioning tape of the No. 1 roof wire with the protrusion of the roof headlining assembly and wrap fastening tape around them as shown in the part of the illustration labeled (A).
·Adjust the extra length of the No. 1 roof wire in the part of the illustration labeled (B) and apply fastening tape.
·Align the positioning tape of the No. 1 roof wire with the marking on the roof headlining assembly and apply tape as shown in the part of the illustration labeled (C).
·Apply the No. 1 roof wire so that it is securely attached and not twisted.
Attach the clamp to install the No. 1 roof wire.
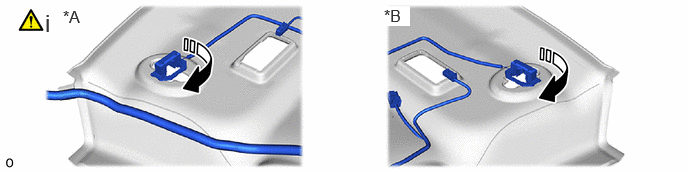
| *A | for Driver Side | *B | for Front Passenger Side |

|
Install in this Direction | - | - |
Turn the visor connectors approximately 90° clockwise and install them to the roof headlining assembly assembly.
86255D
2.INSTALL MICROPHONE CASE LH
86255C
3.INSTALL MICROPHONE CASE RH
86730A
4.INSTALL TELEPHONE MICROPHONE ASSEMBLY
81081
5.INSTALL INTERIOR ILLUMINATION LIGHT SUB-ASSEMBLY
63351C
6.INSTALL ROOF HEADLINING PAD
for Normal Roof:
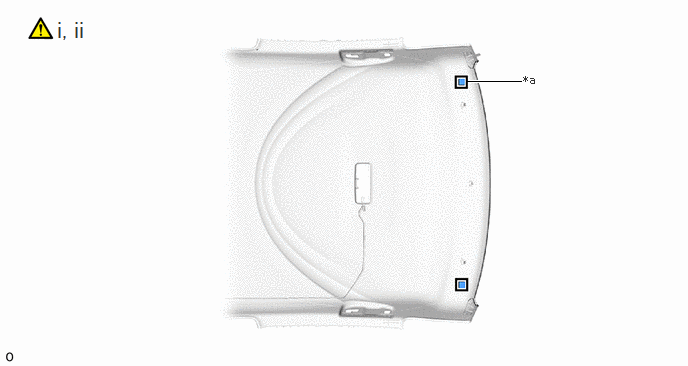
| *a | Marking | - | - |
Remove the release paper from 2 new roof headlining pads.
- HINT:
-
After removing the release paper, keep the exposed adhesive free from foreign matter.
Align the 2 roof headlining pads with the markings on the roof headlining assembly and install them as shown in the illustration.
for Panoramic Moon Roof:
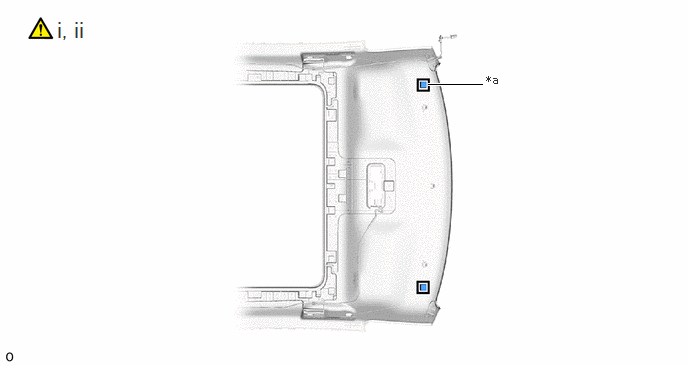
| *a | Marking | - | - |
Remove the release paper from 2 new roof headlining pads.
- HINT:
-
After removing the release paper, keep the exposed adhesive free from foreign matter.
Align the 2 roof headlining pads with the markings on the roof headlining assembly and install them as shown in the illustration.
63342
7.INSTALL NO. 2 ROOF SILENCER PAD
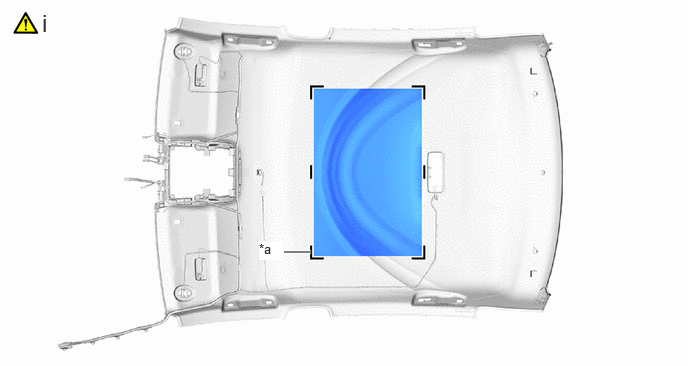
| *a | Marking | - | - |
Align a new No. 2 roof silencer pad with the silencer marking on the roof headlining assembly and install the No. 2 roof silencer pad using hot-melt glue as shown in the illustration.
63352D
8.INSTALL NO. 2 ROOF HEADLINING PAD
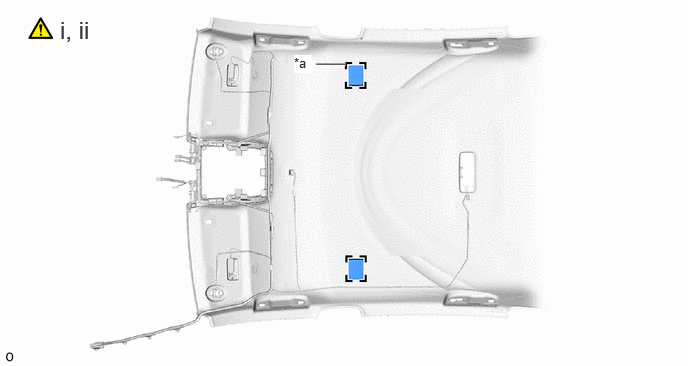
| *a | Marking | - | - |
Remove the release paper from 2 new No. 2 roof headlining pads.
- HINT:
-
After removing the release paper, keep the exposed adhesive free from foreign matter.
Align the 2 No. 2 roof headlining pads with the markings on the roof headlining assembly and install them as shown in the illustration.
63341
9.INSTALL NO. 1 ROOF SILENCER PAD
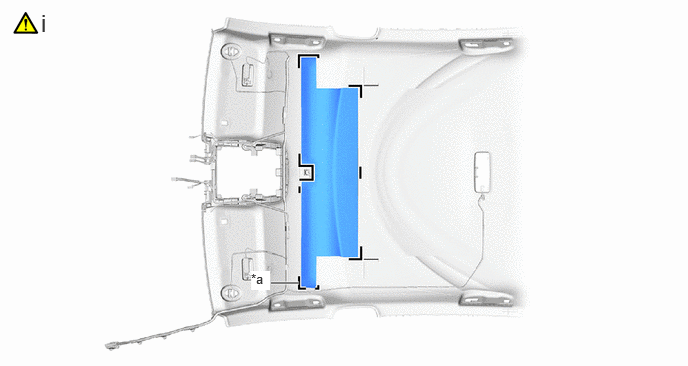
| *a | Marking | - | - |
Align a new No. 1 roof silencer pad with the silencer marking on the roof headlining assembly and install the No. 1 roof silencer pad using hot-melt glue as shown in the illustration.
63351B
10.INSTALL ROOF HEADLINING PAD
for Normal Roof:
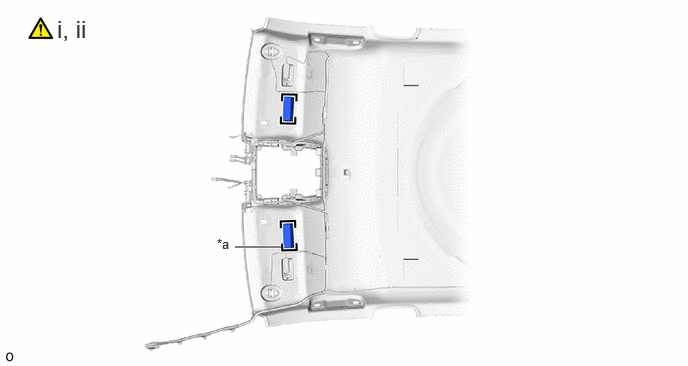
| *a | Marking | - | - |
Remove the release paper from 2 new roof headlining pads.
- HINT:
-
After removing the release paper, keep the exposed adhesive free from foreign matter.
Align the 2 roof headlining pads with the markings on the roof headlining assembly and install them as shown in the illustration.
for Panoramic Moon Roof:
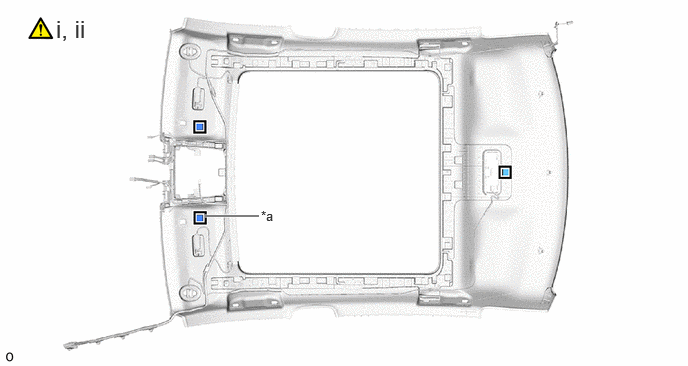
| *a | Marking | - | - |
Remove the release paper from 3 new roof headlining pads.
- HINT:
-
After removing the release paper, keep the exposed adhesive free from foreign matter.
Align the 3 roof headlining pads with the markings on the roof headlining assembly and install them as shown in the illustration.
63354C
11.INSTALL FRONT ROOF HEADLINING SIDE PAD
for Normal Roof:
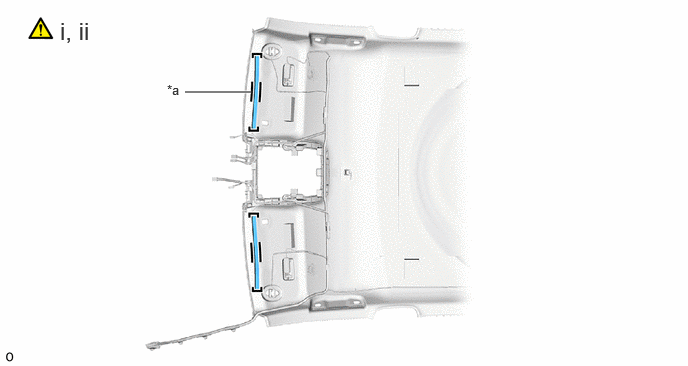
| *a | Marking | - | - |
Remove the release paper from 2 new front roof headlining side pads.
- HINT:
-
After removing the release paper, keep the exposed adhesive free from foreign matter.
Align the 2 front roof headlining side pads with the markings on the roof headlining assembly and install them as shown in the illustration.
for Panoramic Moon Roof:
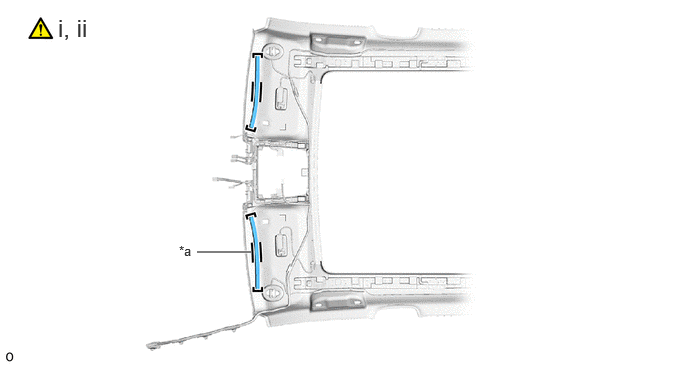
| *a | Marking | - | - |
Remove the release paper from 2 new front roof headlining side pads.
- HINT:
-
After removing the release paper, keep the exposed adhesive free from foreign matter.
Align the 2 front roof headlining side pads with the markings on the roof headlining assembly and install them as shown in the illustration.