LIGHTING (EXT) REAR COMBINATION LIGHT ASSEMBLY REMOVAL
CAUTION / NOTICE / HINT
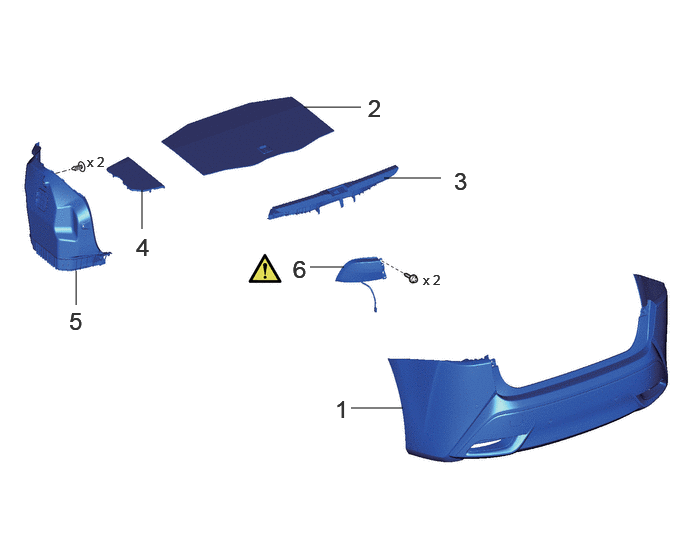
| Procedure | Part Name Code | 
|

|

|
|
|---|---|---|---|---|---|
| 1 | REAR BUMPER ASSEMBLY | - | - | - | - |
| 2 | LUGGAGE COMPARTMENT MAT SUB-ASSEMBLY | 64701 | - | - | - |
| 3 | REAR FLOOR FINISH PLATE | 58387 | - | - | - |
| 4 | LUGGAGE COMPARTMENT TRIM COVER LH | 64715D | - | - | - |
| 5 | INNER LUGGAGE COMPARTMENT TRIM COVER LH | 64722 | - | - | - |
| 6 | REAR COMBINATION LIGHT ASSEMBLY LH | - | ( ) |
- | - |
CAUTION / NOTICE / HINT
The necessary procedures (adjustment, calibration, initialization or registration) that must be performed after parts are removed, installed or replaced during the rear bumper assembly removal/installation are shown below.
| Replaced Part or Performed Procedures | Necessary Procedures | Effect/Inoperative Function when Necessary Procedures are not Performed | Link |
|---|---|---|---|
| Rear bumper assembly (Including removal and installation) | ·
Measurement of ultrasonic sensor detection angle ·
Ultrasonic sensor detection angle registration |
·
TOYOTA Parking assist- sensor system ·
Parking support brake system ·
Advanced park |
w/ Advanced Park:
( )
w/o Advanced Park: ( )
|
- HINT:
- ·
Use the same procedure for the RH and LH sides.
·The procedure described below is for the LH side.
PROCEDURE

 1.REMOVE REAR BUMPER ASSEMBLY
64701
2.REMOVE LUGGAGE COMPARTMENT MAT SUB-ASSEMBLY
58387
3.REMOVE REAR FLOOR FINISH PLATE
64715D
4.REMOVE LUGGAGE COMPARTMENT TRIM COVER LH
64722
5.REMOVE INNER LUGGAGE COMPARTMENT TRIM COVER LH
6.REMOVE REAR COMBINATION LIGHT ASSEMBLY LH
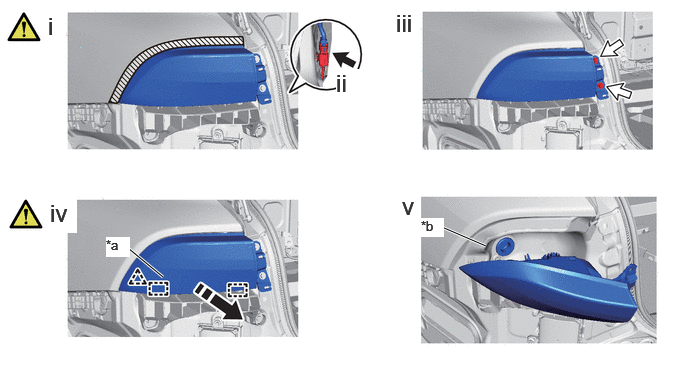

|
Remove in this Direction | 
|
Connector |

|
Screw | - | - |
| *a | Pin | *b | Grommet |
Apply protective tape around the rear combination light assembly LH.
Disconnect the connector.
Remove the 2 screws.
Detach the guide and pin and pull out the rear combination light assembly LH as shown in the illustration.
- NOTICE:
-
Lightly hold down the rear combination light sub-assembly LH so that the rear combination light assembly LH does not fall off by the springing when removed.
Detach the wire harness grommet and remove the rear combination light assembly LH.