POWER DISTRIBUTION INTEGRATION RELAY(for Front Side) INSTALLATION
CAUTION / NOTICE / HINT
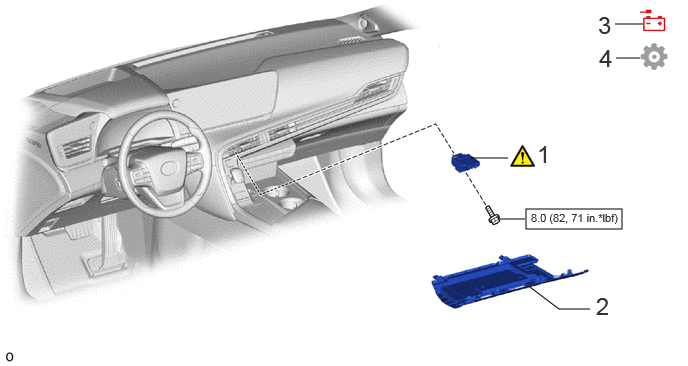
| Procedure | Part Name Code | 
|

|

|
|
|---|---|---|---|---|---|
| 1 | NO. 1 SEMICONDUCTOR POWER INTEGRATION ECU | 82644A | ( ) |
- | - |
| 2 | NO. 2 INSTRUMENT PANEL UNDER COVER SUB-ASSEMBLY | 55607 | - | - | - |
| 3 | CABLE TO NEGATIVE AUXILIARY BATTERY TERMINAL | - | - | - | - |
| 4 | INITIALIZATION AFTER RECONNECTING BATTERY TERMINAL | - | - | - | ()
|

|
N*m (kgf*cm, ft.*lbf): Specified torque | - | - |
CAUTION / NOTICE / HINT
- HINT:
- ·
Use the same procedure for RHD and LHD vehicles.
·The procedure listed below is for LHD vehicles.
PROCEDURE

 82644
1.INSTALL NO. 1 SEMICONDUCTOR POWER INTEGRATION ECU
|
|
|
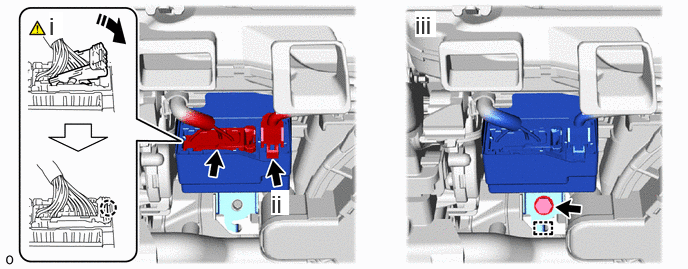

|
Install in this Direction | - | - |
Attach the claw and connect the lever connector.
- NOTICE:
- ·
When connecting the connector, make sure the waterproof film is not pinched.
·Be sure to connect the lever connector securely.
Connect the power source connector.
- NOTICE:
-
When connecting the connector, make sure the waterproof film is not pinched.
Attach the guide and install the No. 1 semiconductor power integration ECU with the bolt.
- Torque:
- 8.0 N*m (82 kgf*cm, 71 in.*lbf)
55607
2.INSTALL NO. 2 INSTRUMENT PANEL UNDER COVER SUB-ASSEMBLY
3.CONNECT CABLE TO NEGATIVE AUXILIARY BATTERY TERMINAL
4. INITIALIZATION AFTER RECONNECTING BATTERY TERMINAL
Click hereGeneral>SETUP>WHEN DISCONNECTING OR RECONNECTING BATTERY TERMINAL>WORK PROCEDURE
- HINT:
-
When disconnecting and reconnecting the battery, there is an automatic learning function that completes learning when the respective system is used.
-
Click hereGeneral>SETUP>WHEN DISCONNECTING OR RECONNECTING BATTERY TERMINAL>AUTOMATIC LEARNING CHART