INTERIOR PANELS / TRIM ROOF SUNSHADE REASSEMBLY
CAUTION / NOTICE / HINT
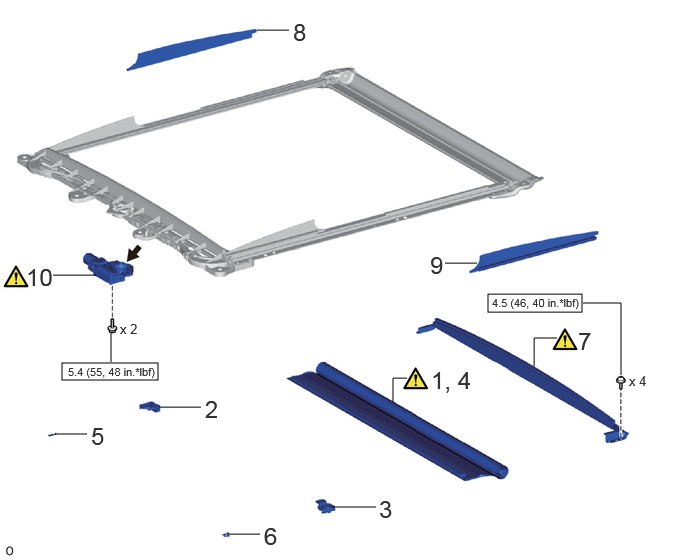
| Procedure | Part Name Code | 
|

|

|
|
|---|---|---|---|---|---|
| 1 | INSTALL SUNSHADE TRIM SUB-ASSEMBLY | 63306 | ( ) |
- | - |
| 2 | SLIDING ROOF SUNSHADE PLATE RH | - | - | - | - |
| 3 | SLIDING ROOF SUNSHADE PLATE LH | - | - | - | - |
| 4 | CONNECT SUNSHADE TRIM SUB-ASSEMBLY | 63306 | - | - | - |
| 5 | SLIDING ROOF SUNSHADE GUIDE RH | - | - | - | - |
| 6 | SLIDING ROOF SUNSHADE GUIDE LH | - | - | - | - |
| 7 | SLIDING ROOF HOUSING CENTER FRAME | - | ()
|
- | - |
| 8 | SLIDING ROOF REAR SIDE GARNISH RH | - | - | - | - |
| 9 | SLIDING ROOF REAR SIDE GARNISH LH | - | - | - | - |
| 10 | SLIDING ROOF DRIVE GEAR SUB-ASSEMBLY | 63260A | ()
|
- | - |

|
N*m (kgf*cm, ft.*lbf): Specified torque | 
|
MP grease |
PROCEDURE

 63306
1.INSTALL SUNSHADE TRIM SUB-ASSEMBLY
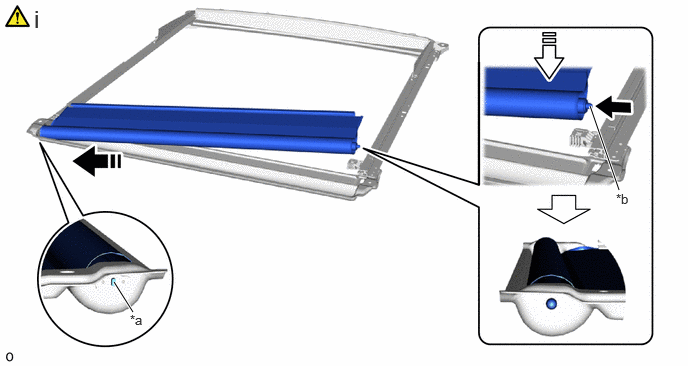
| *a | Plug Cap | *b | Retractor Cap |
|
|
Push | 
|
Install in this Direction (1) |

|
Install in this Direction (2) | - | - |
Install the plug cap and press the retractor cap down in the direction of the arrow (1) shown in the illustration. Then, insert the retractor cap to install the sunshade trim sub-assembly.
2.INSTALL SLIDING ROOF SUNSHADE PLATE RH


|
Install Here | - | - |
3.INSTALL SLIDING ROOF SUNSHADE PLATE LH
Use the same procedure described for the RH side.
63306
4.CONNECT SUNSHADE TRIM SUB-ASSEMBLY
5.INSTALL SLIDING ROOF SUNSHADE GUIDE RH
6.INSTALL SLIDING ROOF SUNSHADE GUIDE LH
7.REMOVE SLIDING ROOF HOUSING CENTER FRAME
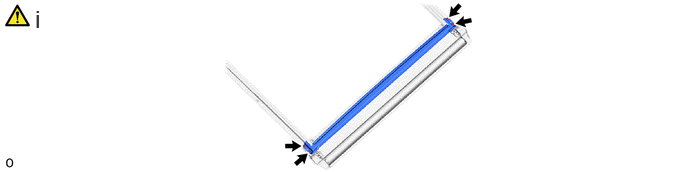
Using a T25 "TORX" socket wrench, install the sliding roof housing center frame with the 4 "TORX" screws.
- Torque:
- 4.5 N*m (46 kgf*cm, 40 in.*lbf)
8.INSTALL SLIDING ROOF REAR SIDE GARNISH RH
9.INSTALL SLIDING ROOF REAR SIDE GARNISH LH
63260A
10.INSTALL SLIDING ROOF DRIVE GEAR SUB-ASSEMBLY

| *1 | No. 1 Sliding Roof Shoe Sub-assembly | *2 | Sliding Roof Sunshade Guide |
Place the No. 1 sliding roof shoe sub-assembly in contact with the sliding roof sunshade guide as shown in the illustration.
- HINT:
-
Use the same procedure for the other side.
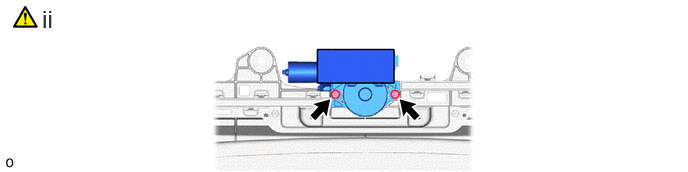
Install the sliding roof drive gear assembly with the 2 bolts.
- Torque:
- 5.4 N*m (55 kgf*cm, 48 in.*lbf)
|
|
|