RM37H0E
_59
Vehicle Exterior
_095314
DOOR / HATCH
_0452995
FUEL LID OPENER UNIT
A
DOOR / HATCH FUEL LID OPENER UNIT REMOVAL
CAUTION / NOTICE / HINT
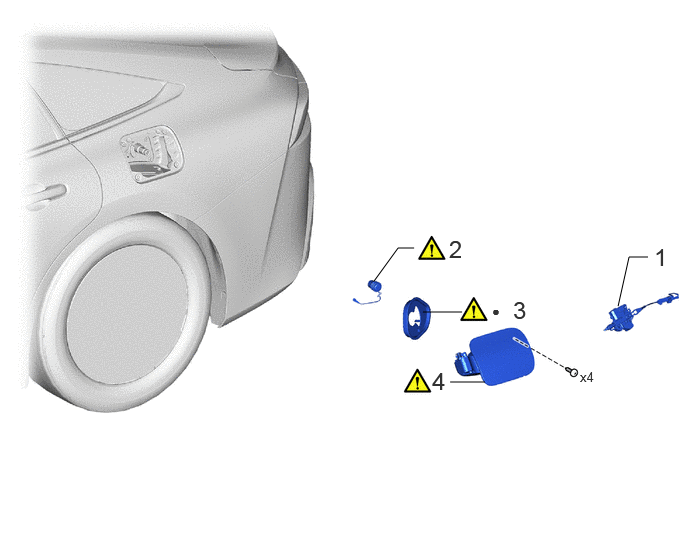
COMPONENTS (REMOVAL)
6.438,3.188 6.552,2.677
6.552,2.677 6.75,2.677
false
3.896,2.927 4.146,2.583
4.146,2.583 4.313,2.583
false
4.406,3.25 4.813,3.25
false
4.688,3.979 5.052,3.979
false
6.813,2.531 7.094,2.885
0.281,0.354
18
false
1
6.042,3.844 6.323,4.198
0.281,0.354
10
false
x4
4.677,2.448 4.958,2.802
0.281,0.354
18
false
2
4.5,3.823 4.781,4.177
0.281,0.354
18
false
4
5.344,3.083 5.635,3.365
0.292,0.281
18
false
3
5.125,3.156 5.417,3.438
0.292,0.281
10
false
●
| Procedure | Part Name Code | 
|

|

|
|
|---|---|---|---|---|---|
| 1 | FUEL LID WITH MOTOR LOCK ASSEMBLY | 77030A | - | - | - |
| 2 | HYDROGEN INLET RECEPTACLE CAP | 77AE2 | ( ) |
- | - |
| 3 | FUEL TANK FILLER PIPE SHIELD | 77291A | ()
|
- | - |
| 4 | FUEL FILLER OPENING LID SUB-ASSEMBLY | 77305A | ()
|
- | - |
PROCEDURE

 77030A
1.REMOVE FUEL LID WITH MOTOR LOCK ASSEMBLY
77AE2
2.REMOVE HYDROGEN INLET RECEPTACLE CAP
a.

3.531,0.344 3.667,0.656
0.135,0.313
18
true
i
3.958,1.104 4.125,1.375
0.167,0.271
18
true
ii

|
Remove in this Direction | - | - |
i.
Using a clip remover, disengage the clamp.
ii.
Remove the hydrogen inlet receptacle cap as shown in the illustration.
77291A
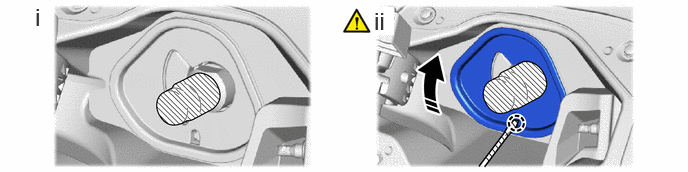
3.REMOVE FUEL TANK FILLER PIPE SHIELD
a.
0.365,0.031 0.646,0.385
0.281,0.354
18
false
i
3.896,0.073 4.104,0.365
0.208,0.292
18
true
ii
|
|
Remove in this Direction | - | - |
i.
Wrap the protective tape to the hydrogen inlet receptacle assembly.
ii.
Using a thin-bladed screwdriver with its tip wrapped in protective tape, disengage the claws to remove the fuel tank filler pipe shield.
77305A
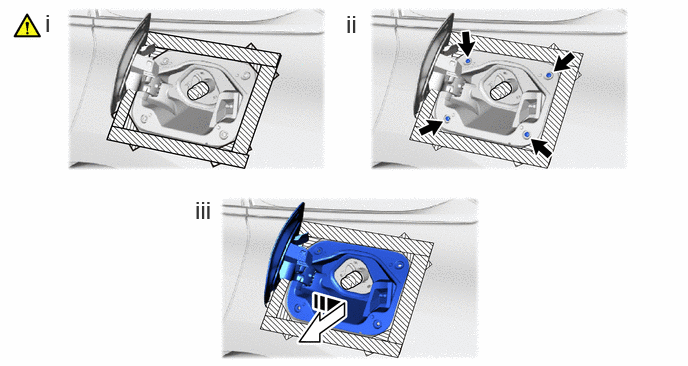
4.REMOVE FUEL FILLER OPENING LID SUB-ASSEMBLY
a.
0.469,0.094 0.75,0.448
0.281,0.354
18
false
i
3.604,0.104 3.885,0.458
0.281,0.354
18
false
ii
2.031,2.042 2.313,2.396
0.281,0.354
18
false
iii
|
|
Remove in this Direction | - | - |
i.
Remove the fuel filler opening lid sub-assembly as shown in the illustration.
ii.
Remove the 4 screws.
iii.
Apply protective tape around the fuel filler opening lid sub-assembly as shown in the illustration.