TIRE PRESSURE MONITORING TIRE PRESSURE WARNING SYSTEM ECU Power Source Circuit
DESCRIPTION
The IG circuit is the power source for the tire pressure warning ECU and receiver.
WIRING DIAGRAM
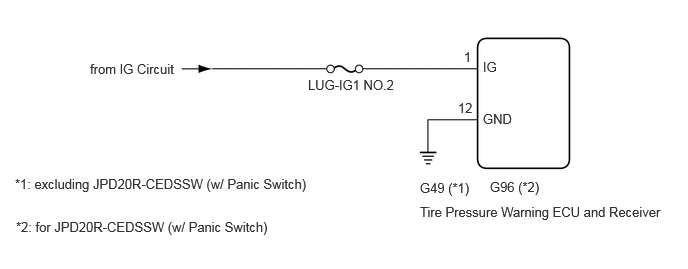
CAUTION / NOTICE / HINT
- NOTICE:
- ·
When replacing the tire pressure warning ECU and receiver, first use the GTS to record all of the current IDs and registered tires with transmitters (4 or 5 tires) of the tire pressure warning valve and transmitter registered to the tire pressure warning ECU and receiver.
·It is necessary to perform initializationSuspension>TIRE PRESSURE MONITORING>TIRE PRESSURE WARNING SYSTEM>INITIALIZATION after registrationSuspension>TIRE PRESSURE MONITORING>TIRE PRESSURE WARNING SYSTEM>REGISTRATION of the transmitter IDs into the tire pressure warning ECU and receiver if the ECU has been replaced.
- HINT:
-
Inspect the fuses for circuits related to this system before performing the following inspection procedure.
PROCEDURE
- Result:
Result Proceed to excluding JPD20R-CEDSSW (w/ Panic Switch) A for JPD20R-CEDSSW (w/ Panic Switch) B
A
B
Disconnect the G49 tire pressure warning ECU and receiver connector.
Measure the voltage according to the value(s) in the table below.
- Standard Voltage:
Tester Connection Condition Specified Condition Click Location & Routing(G49)Location & Routingewd_type=routing;type=c;code=G49
G49-1 (IG) - Body ground Ignition switch ON 10 to 16 V G49-1 (IG) - Body ground Ignition switch off Below 1 V
Measure the resistance according to the value(s) in the table below.
- Standard Resistance:
Tester Connection Condition Specified Condition Click Location & Routing(G49)Location & Routingewd_type=routing;type=c;code=G49
G49-12 (GND) - Body ground Always Below 1 Ω
- Result:
Proceed to OK NG
OK
Click hereSuspension>TIRE PRESSURE MONITORING>TIRE PRESSURE WARNING RECEIVER (for Luggage Compartment)>REMOVAL
NG
Disconnect the G96 tire pressure warning ECU and receiver connector.
Measure the voltage according to the value(s) in the table below.
- Standard Voltage:
Tester Connection Condition Specified Condition Click Location & Routing(G96)Location & Routingewd_type=routing;type=c;code=G96
Click Connector(G96)Body>Floor Wire / No. 3 Floor Wire>Tire Pressure Warning Receiver Assemblyewd_type=component;type=c;code=G96;pinno=1
G96-1 (IG) - Body ground Ignition switch ON 10 to 16 V G96-1 (IG) - Body ground Ignition switch off Below 1 V
Measure the resistance according to the value(s) in the table below.
- Standard Resistance:
Tester Connection Condition Specified Condition Click Location & Routing(G96)Location & Routingewd_type=routing;type=c;code=G96
Click Connector(G96)Body>Floor Wire / No. 3 Floor Wire>Tire Pressure Warning Receiver Assemblyewd_type=component;type=c;code=G96;pinno=12
G96-12 (GND) - Body ground Always Below 1 Ω
- Result:
Proceed to OK NG
OK
Click hereSuspension>TIRE PRESSURE MONITORING>TIRE PRESSURE WARNING RECEIVER (for Quarter Pillar)>REMOVAL
NG