METER / GAUGE / DISPLAY METER / GAUGE SYSTEM B132187 Lost Communication with EMV Missing Message
DESCRIPTION
The combination meter assembly and radio and display receiver assembly communicate via local bus communication. This allows audio and visual system information to be displayed on the multi-information display. This DTC is stored when a communication error occurs between the radio and display receiver assembly and combination meter assembly.
| DTC No. | Detection Item | DTC Detection Condition | Trouble Area | Memory | DTC Output from | Priority | Note |
|---|---|---|---|---|---|---|---|
| B132187 | Lost Communication with EMV Missing Message | Diagnosis Condition:
·
Ignition switch ON ·
IG power source voltage is 9.5 V or more Malfunction Status: No communication with radio and display receiver assembly |
·
Harness or connector ·
Radio and display receiver assembly (w/o Navigation System) ·
Radio receiver assembly (w/ Navigation System) ·
Combination meter assembly ·
Meter mirror sub-assembly (w/ Headup Display System) |
DTC stored | Combination Meter | A | - |
| Pattern | DTC Output Part Name
(Display on GTS) |
Suspected Area (Malfunction Status) | |||
|---|---|---|---|---|---|
| Combination Meter Assembly (Combination Meter) | Radio Receiver Assembly (Navigation System) | Meter Mirror Sub-assembly (Head Up Display) | |||
| Pattern 1 | B132187 | B1324 | B1325 | B132187 | Local Bus (Open or short) |
| Meter Mirror Sub-assembly (Internal malfunction) | |||||
| Combination Meter Assembly (Internal malfunction) | |||||
| Radio Receiver Assembly (Internal malfunction) | |||||
| Pattern 2 | B132187 | B1324 | - | - | Local Bus Branch Line (Open) |
| Combination Meter Assembly (Internal malfunction) | |||||
| Pattern 3 | B132187 | - | - | B132187 | Radio Receiver Assembly (Internal malfunction) |
| Pattern 4 | B132187 | - | - | - | Combination Meter Assembly (Internal malfunction) |
| Pattern | DTC Output Part Name
(Display on GTS) |
Suspected Area (Malfunction Status) | |
|---|---|---|---|
| Combination Meter Assembly (Combination Meter) | Radio Receiver Assembly (Navigation System) | ||
| Pattern 1 | B132187 | B1324 | Local Bus (Open or short) |
| Combination Meter Assembly (Internal malfunction) | |||
| Radio Receiver Assembly (Internal malfunction) | |||
| Pattern 2 | B132187 | - | Radio Receiver Assembly (Internal malfunction) |
| Combination Meter Assembly (Internal malfunction) | |||
| Pattern | DTC Output Part Name
(Display on GTS) |
Suspected Area (Malfunction Status) | |
|---|---|---|---|
| Combination Meter Assembly (Combination Meter) | Radio and Display Receiver Assembly (Navigation System) | ||
| Pattern 1 | B132187 | B1324 | Local Bus (Open or short) |
| Combination Meter Assembly (Internal malfunction) | |||
| Radio and Display Receiver Assembly (Internal malfunction) | |||
| Pattern 2 | B132187 | - | Radio and Display Receiver Assembly (Internal malfunction) |
| Combination Meter Assembly (Internal malfunction) | |||
WIRING DIAGRAM
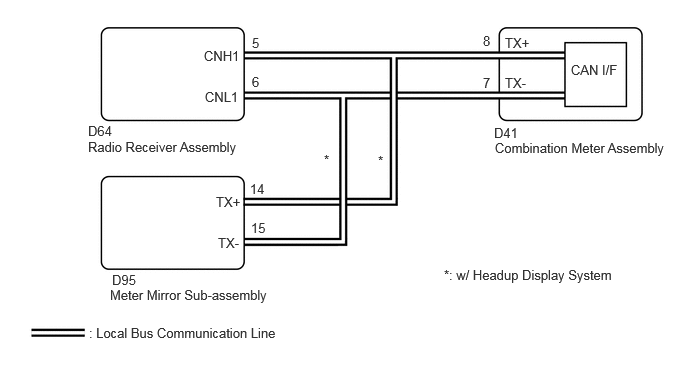
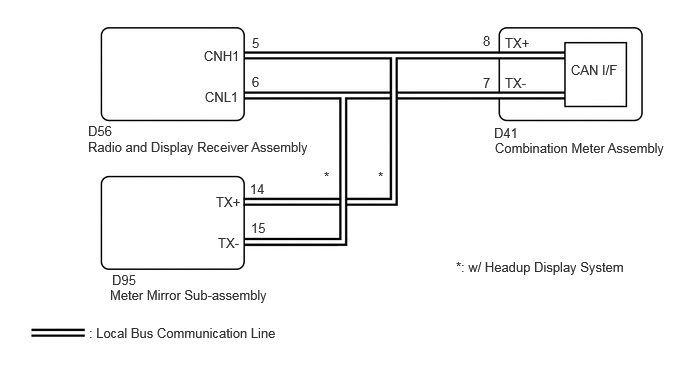
CAUTION / NOTICE / HINT
- NOTICE:
- ·
When replacing the combination meter assembly, always replace it with a new one. If a combination meter assembly which was installed to another vehicle is used, the information stored in it will not match the information from the vehicle and a DTC may be stored.
·After turning the ignition switch off, waiting time may be required before disconnecting the cable from the negative (-) auxiliary battery terminal. Therefore, make sure to read the disconnecting the cable from the negative (-) auxiliary battery terminal notices before proceeding with work.
Click hereGeneral>SETUP>WHEN DISCONNECTING OR RECONNECTING BATTERY TERMINAL>WORK PROCEDURE
·When disconnecting and reconnecting the auxiliary battery
Click hereGeneral>SETUP>WHEN DISCONNECTING OR RECONNECTING BATTERY TERMINAL>BEFORE DISCONNECTING BATTERY
- HINT:
-
When disconnecting and reconnecting the auxiliary battery, there is an automatic learning function that completes learning when the respective system is used.
-
Click hereGeneral>SETUP>WHEN DISCONNECTING OR RECONNECTING BATTERY TERMINAL>AUTOMATIC LEARNING CHART
PROCEDURE
Check vehicle condition.
- Result:
Result Proceed to w/ Navigation System with Meter Mirror Sub-assembly A w/ Navigation System without Meter Mirror Sub-assembly: B w/o Navigation System with Meter Mirror Sub-assembly C w/o Navigation System without Meter Mirror Sub-assembly D
A
B
C
D
Check if meter/gauge system DTCs are output.
- Body Electrical > Combination Meter > Trouble Codes
- 50001 409
Check if navigation system DTCs are output.
- Body Electrical > Navigation System > Trouble Codes
- 50001 212
Check if headup display system DTCs are output.
- Body Electrical > Head Up Display > Trouble Codes
- 50001 408
Check the DTCs and output pattern according to the following table.
| Pattern | DTC Output Part Name
(Display on GTS) |
|||
|---|---|---|---|---|
| Combination Meter Assembly (Combination Meter) | Radio Receiver Assembly (Navigation System) | Meter Mirror Sub-assembly (Head Up Display) | ||
| Pattern 1 | B132187 | B1324 | B1325 | B132187 |
| Pattern 2 | B132187 | B1324 | - | - |
| Pattern 3 | B132187 | - | - | B132187 |
| Pattern 4 | B132187 | - | - | - |
- Result:
Result Proceed to Pattern 1 is output A Pattern 2 is output B Pattern 3 is output C Pattern 4 is output D
A
B
C
D
Pre-procedure1
Disconnect the D95 meter mirror sub-assembly connector.
Procedure1
Clear the DTCs.
- Body Electrical > Combination Meter > Clear DTCs
- 50002 409
Check for DTCs.
- Body Electrical > Combination Meter > Trouble Codes
- 50001 409
- Result:
Result Proceed to B132187 is output A B132187 is not output B
Post-procedure1
None
A
B
Pre-procedure1
Disconnect the cable from the negative (-) auxiliary battery terminal.
Disconnect the combination meter assembly connector.
Procedure1
Measure the resistance according to the value(s) in the table below.
- Standard Resistance:
Tester Connection Condition Specified Condition Click Location & Routing(D41,D20)Location & Routingewd_type=routing;type=c,c;code=D41,D20
Click Connector(D41)Instrument Panel>Instrument Panel Wire>Combination Meter Assemblyewd_type=component;type=c;code=D41;pinno=8,7
Click Connector(D20)Instrument Panel>Instrument Panel Wire>DLC3ewd_type=component;type=c;code=D20;pinno=4,16
D41-8 (TX+) - D41-7 (TX-) Cable disconnected from negative (-) auxiliary battery terminal 108 to 132 Ω D41-8 (TX+) - D20-4 (CG) Cable disconnected from negative (-) auxiliary battery terminal 200 Ω or higher D41-7 (TX-) - D20-4 (CG) Cable disconnected from negative (-) auxiliary battery terminal 200 Ω or higher D41-8 (TX+) - D20-16 (BAT) Cable disconnected from negative (-) auxiliary battery terminal 6 kΩ or higher D41-7 (TX-) - D20-16 (BAT) Cable disconnected from negative (-) auxiliary battery terminal 6 kΩ or higher
- Result:
Proceed to OK NG
Post-procedure1
None
OK
NG
Pre-procedure1
Disconnect the cable from the negative (-) auxiliary battery terminal.
Disconnect the radio receiver assembly connector.
Procedure1
Measure the resistance according to the value(s) in the table below.
- Standard Resistance:
Tester Connection Condition Specified Condition Click Location & Routing(D64,D20)Location & Routingewd_type=routing;type=c,c;code=D64,D20
Click Connector(D64)Instrument Panel>Instrument Panel Wire>Radio Receiver Assemblyewd_type=component;type=c;code=D64;pinno=5,6
Click Connector(D20)Instrument Panel>Instrument Panel Wire>DLC3ewd_type=component;type=c;code=D20;pinno=4,16
D64-5 (CNH1) - D64-6 (CNL1) Cable disconnected from negative (-) auxiliary battery terminal 108 to 132 Ω D64-5 (CNH1) - D20-4 (CG) Cable disconnected from negative (-) auxiliary battery terminal 200 Ω or higher D64-6 (CNL1) - D20-4 (CG) Cable disconnected from negative (-) auxiliary battery terminal 200 Ω or higher D64-5 (CNH1) - D20-16 (BAT) Cable disconnected from negative (-) auxiliary battery terminal 6 kΩ or higher D64-6 (CNL1) - D20-16 (BAT) Cable disconnected from negative (-) auxiliary battery terminal 6 kΩ or higher
- Result:
Proceed to OK NG
Post-procedure1
None
OK
NG
Pre-procedure1
Disconnect the cable from the negative (-) auxiliary battery terminal.
Disconnect the combination meter assembly connector.
Procedure1
Measure the resistance according to the value(s) in the table below.
- Standard Resistance:
Tester Connection Condition Specified Condition Click Location & Routing(D41)Location & Routingewd_type=routing;type=c;code=D41
Click Connector(D41)Instrument Panel>Instrument Panel Wire>Combination Meter Assemblyewd_type=component;type=c;code=D41;pinno=8,7
D41-8 (TX+) - D41-7 (TX-) Cable disconnected from negative (-) auxiliary battery terminal 108 to 132 Ω
- Result:
Proceed to OK NG
Post-procedure1
None
OK
NG
Check if meter/gauge system DTCs are output.
- Body Electrical > Combination Meter > Trouble Codes
- 50001 409
Check if navigation system DTCs are output.
- Body Electrical > Navigation System > Trouble Codes
- 50001 212
Check the DTCs and output pattern according to the following table.
| Pattern | DTC Output Part Name
(Display on GTS) |
|
|---|---|---|
| Combination Meter Assembly (Combination Meter) | Radio Receiver Assembly (Navigation System) | |
| Pattern 1 | B132187 | B1324 |
| Pattern 2 | B132187 | - |
- Result:
Result Proceed to Pattern 1 is output A Pattern 2 is output B
A
B
Pre-procedure1
Disconnect the cable from the negative (-) auxiliary battery terminal.
Disconnect the combination meter assembly connector.
Procedure1
Measure the resistance according to the value(s) in the table below.
- Standard Resistance:
Tester Connection Condition Specified Condition Click Location & Routing(D41,D20)Location & Routingewd_type=routing;type=c,c;code=D41,D20
Click Connector(D41)Instrument Panel>Instrument Panel Wire>Combination Meter Assemblyewd_type=component;type=c;code=D41;pinno=8,7
Click Connector(D20)Instrument Panel>Instrument Panel Wire>DLC3ewd_type=component;type=c;code=D20;pinno=4,16
D41-8 (TX+) - D41-7 (TX-) Cable disconnected from negative (-) auxiliary battery terminal 108 to 132 Ω D41-8 (TX+) - D20-4 (CG) Cable disconnected from negative (-) auxiliary battery terminal 200 Ω or higher D41-7 (TX-) - D20-4 (CG) Cable disconnected from negative (-) auxiliary battery terminal 200 Ω or higher D41-8 (TX+) - D20-16 (BAT) Cable disconnected from negative (-) auxiliary battery terminal 6 kΩ or higher D41-7 (TX-) - D20-16 (BAT) Cable disconnected from negative (-) auxiliary battery terminal 6 kΩ or higher
- Result:
Proceed to OK NG
Post-procedure1
None
OK
NG
Pre-procedure1
Disconnect the cable from the negative (-) auxiliary battery terminal.
Disconnect the radio receiver assembly connector.
Procedure1
Measure the resistance according to the value(s) in the table below.
- Standard Resistance:
Tester Connection Condition Specified Condition Click Location & Routing(D64,D20)Location & Routingewd_type=routing;type=c,c;code=D64,D20
Click Connector(D64)Instrument Panel>Instrument Panel Wire>Radio Receiver Assemblyewd_type=component;type=c;code=D64;pinno=5,6
Click Connector(D20)Instrument Panel>Instrument Panel Wire>DLC3ewd_type=component;type=c;code=D20;pinno=4,16
D64-5 (CNH1) - D64-6 (CNL1) Cable disconnected from negative (-) auxiliary battery terminal 108 to 132 Ω D64-5 (CNH1) - D20-4 (CG) Cable disconnected from negative (-) auxiliary battery terminal 200 Ω or higher D64-6 (CNL1) - D20-4 (CG) Cable disconnected from negative (-) auxiliary battery terminal 200 Ω or higher D64-5 (CNH1) - D20-16 (BAT) Cable disconnected from negative (-) auxiliary battery terminal 6 kΩ or higher D64-6 (CNL1) - D20-16 (BAT) Cable disconnected from negative (-) auxiliary battery terminal 6 kΩ or higher
- Result:
Proceed to OK NG
Post-procedure1
None
OK
NG
Pre-procedure1
Disconnect the combination meter assembly connector.
Procedure1
Using an oscilloscope, check the waveform.
- OK:
Tester Connection Switch Condition Tool Setting Specified Condition Click Location & Routing(D41)Location & Routingewd_type=routing;type=c;code=D41
Click Connector(D41)Instrument Panel>Instrument Panel Wire>Combination Meter Assemblyewd_type=component;type=c;code=D41;pinno=8,7
D41-8 (TX+) - D41-7 (TX-) Ignition switch ON 1 V/DIV., 100 μs./DIV. Pulse generation
- Result:
Proceed to OK NG
Post-procedure1
None
OK
NG
Check if meter/gauge system DTCs are output.
- Body Electrical > Combination Meter > Trouble Codes
- 50001 409
Check if audio and visual system DTCs are output.
- Body Electrical > Navigation System > Trouble Codes
- 50001 212
Check if headup display system DTCs are output.
- Body Electrical > Head Up Display > Trouble Codes
- 50001 408
Check the DTCs and output pattern according to the following table.
| Pattern | DTC Output Part Name
(Display on GTS) |
|||
|---|---|---|---|---|
| Combination Meter Assembly (Combination Meter) | Radio and Display Receiver Assembly (Navigation System) | Meter Mirror Sub-assembly (Head Up Display) | ||
| Pattern 1 | B132187 | B1324 | B1325 | B132187 |
| Pattern 2 | B132187 | B1324 | - | - |
| Pattern 3 | B132187 | - | - | B132187 |
| Pattern 4 | B132187 | - | - | - |
- Result:
Result Proceed to Pattern 1 is output A Pattern 2 is output B Pattern 3 is output C Pattern 4 is output D
A
B
C
D
Pre-procedure1
Disconnect the D95 meter mirror sub-assembly connector.
Procedure1
Clear the DTCs.
- Body Electrical > Combination Meter > Clear DTCs
- 50002 409
Check for DTCs.
- Body Electrical > Combination Meter > Trouble Codes
- 50001 409
- Result:
Result Proceed to B132187 is output A B132187 is not output B
Post-procedure1
None
A
B
Pre-procedure1
Disconnect the cable from the negative (-) auxiliary battery terminal.
Disconnect the combination meter assembly connector.
Procedure1
Measure the resistance according to the value(s) in the table below.
- Standard Resistance:
Tester Connection Condition Specified Condition Click Location & Routing(D41,D20)Location & Routingewd_type=routing;type=c,c;code=D41,D20
Click Connector(D41)Instrument Panel>Instrument Panel Wire>Combination Meter Assemblyewd_type=component;type=c;code=D41;pinno=8,7
Click Connector(D20)Instrument Panel>Instrument Panel Wire>DLC3ewd_type=component;type=c;code=D20;pinno=4,16
D41-8 (TX+) - D41-7 (TX-) Cable disconnected from negative (-) auxiliary battery terminal 108 to 132 Ω D41-8 (TX+) - D20-4 (CG) Cable disconnected from negative (-) auxiliary battery terminal 200 Ω or higher D41-7 (TX-) - D20-4 (CG) Cable disconnected from negative (-) auxiliary battery terminal 200 Ω or higher D41-8 (TX+) - D20-16 (BAT) Cable disconnected from negative (-) auxiliary battery terminal 6 kΩ or higher D41-7 (TX-) - D20-16 (BAT) Cable disconnected from negative (-) auxiliary battery terminal 6 kΩ or higher
- Result:
Proceed to OK NG
Post-procedure1
None
OK
NG
Pre-procedure1
Disconnect the cable from the negative (-) auxiliary battery terminal.
Disconnect the radio and display receiver assembly connector.
Procedure1
Measure the resistance according to the value(s) in the table below.
- Standard Resistance:
Tester Connection Condition Specified Condition Click Location & Routing(D56,D20)Location & Routingewd_type=routing;type=c,c;code=D56,D20
Click Connector(D56)Instrument Panel>Instrument Panel Wire>Radio Receiver Assemblyewd_type=component;type=c;code=D56;pinno=5,6
Click Connector(D20)Instrument Panel>Instrument Panel Wire>DLC3ewd_type=component;type=c;code=D20;pinno=4,16
D56-5 (CNH1) - D56-6 (CNL1) Cable disconnected from negative (-) auxiliary battery terminal 108 to 132 Ω D56-5 (CNH1) - D20-4 (CG) Cable disconnected from negative (-) auxiliary battery terminal 200 Ω or higher D56-6 (CNL1) - D20-4 (CG) Cable disconnected from negative (-) auxiliary battery terminal 200 Ω or higher D56-5 (CNH1) - D20-16 (BAT) Cable disconnected from negative (-) auxiliary battery terminal 6 kΩ or higher D56-6 (CNL1) - D20-16 (BAT) Cable disconnected from negative (-) auxiliary battery terminal 6 kΩ or higher
- Result:
Proceed to OK NG
Post-procedure1
None
OK
NG
Pre-procedure1
Disconnect the cable from the negative (-) auxiliary battery terminal.
Disconnect the combination meter assembly connector.
Procedure1
Measure the resistance according to the value(s) in the table below.
- Standard Resistance:
Tester Connection Condition Specified Condition Click Location & Routing(D41)Location & Routingewd_type=routing;type=c;code=D41
Click Connector(D41)Instrument Panel>Instrument Panel Wire>Combination Meter Assemblyewd_type=component;type=c;code=D41;pinno=8,7
D41-8 (TX+) - D41-7 (TX-) Cable disconnected from negative (-) auxiliary battery terminal 108 to 132 Ω
- Result:
Proceed to OK NG
Post-procedure1
None
OK
NG
Check if meter/gauge system DTCs are output.
- Body Electrical > Combination Meter > Trouble Codes
- 50001 409
Check if audio and visual system DTCs are output.
- Body Electrical > Navigation System > Trouble Codes
- 50001 212
Check the DTCs and output pattern according to the following table.
| Pattern | DTC Output Part Name
(Display on GTS) |
|
|---|---|---|
| Combination Meter Assembly (Combination Meter) | Radio and Display Receiver Assembly (Navigation System) | |
| B132187 | B1324 | |
| Pattern 1 | B132187 | B1324 |
| Pattern 2 | B132187 | - |
- Result:
Result Proceed to Pattern 1 is output A Pattern 2 is output B
A
B
Pre-procedure1
Disconnect the cable from the negative (-) auxiliary battery terminal.
Disconnect the combination meter assembly connector.
Procedure1
Measure the resistance according to the value(s) in the table below.
- Standard Resistance:
Tester Connection Condition Specified Condition Click Location & Routing(D41,D20)Location & Routingewd_type=routing;type=c,c;code=D41,D20
Click Connector(D41)Instrument Panel>Instrument Panel Wire>Combination Meter Assemblyewd_type=component;type=c;code=D41;pinno=8,7
Click Connector(D20)Instrument Panel>Instrument Panel Wire>DLC3ewd_type=component;type=c;code=D20;pinno=4,16
D41-8 (TX+) - D41-7 (TX-) Cable disconnected from negative (-) auxiliary battery terminal 108 to 132 Ω D41-8 (TX+) - D20-4 (CG) Cable disconnected from negative (-) auxiliary battery terminal 200 Ω or higher D41-7 (TX-) - D20-4 (CG) Cable disconnected from negative (-) auxiliary battery terminal 200 Ω or higher D41-8 (TX+) - D20-16 (BAT) Cable disconnected from negative (-) auxiliary battery terminal 6 kΩ or higher D41-7 (TX-) - D20-16 (BAT) Cable disconnected from negative (-) auxiliary battery terminal 6 kΩ or higher
- Result:
Proceed to OK NG
Post-procedure1
None
OK
NG
Pre-procedure1
Disconnect the cable from the negative (-) auxiliary battery terminal.
Disconnect the radio and display receiver assembly connector.
Procedure1
Measure the resistance according to the value(s) in the table below.
- Standard Resistance:
Tester Connection Condition Specified Condition Click Location & Routing(D56,D20)Location & Routingewd_type=routing;type=c,c;code=D56,D20
Click Connector(D56)Instrument Panel>Instrument Panel Wire>Radio Receiver Assemblyewd_type=component;type=c;code=D56;pinno=5,6
Click Connector(D20)Instrument Panel>Instrument Panel Wire>DLC3ewd_type=component;type=c;code=D20;pinno=4,16
D56-5 (CNH1) - D56-6 (CNL1) Cable disconnected from negative (-) auxiliary battery terminal 108 to 132 Ω D56-5 (CNH1) - D20-4 (CG) Cable disconnected from negative (-) auxiliary battery terminal 200 Ω or higher D56-6 (CNL1) - D20-4 (CG) Cable disconnected from negative (-) auxiliary battery terminal 200 Ω or higher D56-5 (CNH1) - D20-16 (BAT) Cable disconnected from negative (-) auxiliary battery terminal 6 kΩ or higher D56-6 (CNL1) - D20-16 (BAT) Cable disconnected from negative (-) auxiliary battery terminal 6 kΩ or higher
- Result:
Proceed to OK NG
Post-procedure1
None
OK
NG
Pre-procedure1
Disconnect the combination meter assembly connector.
Procedure1
Using an oscilloscope, check the waveform.
- OK:
Tester Connection Switch Condition Tool Setting Specified Condition Click Location & Routing(D41)Location & Routingewd_type=routing;type=c;code=D41
Click Connector(D41)Instrument Panel>Instrument Panel Wire>Combination Meter Assemblyewd_type=component;type=c;code=D41;pinno=8,7
D41-8 (TX+) - D41-7 (TX-) Ignition switch ON 1 V/DIV., 100 μs./DIV. Pulse generation
- Result:
Proceed to OK NG
Post-procedure1
None
OK
NG