PARK ASSIST / MONITORING BLIND SPOT MONITOR SYSTEM Power Source Circuit
DESCRIPTION
This circuit provides power to operate the blind spot monitor sensor.
WIRING DIAGRAM
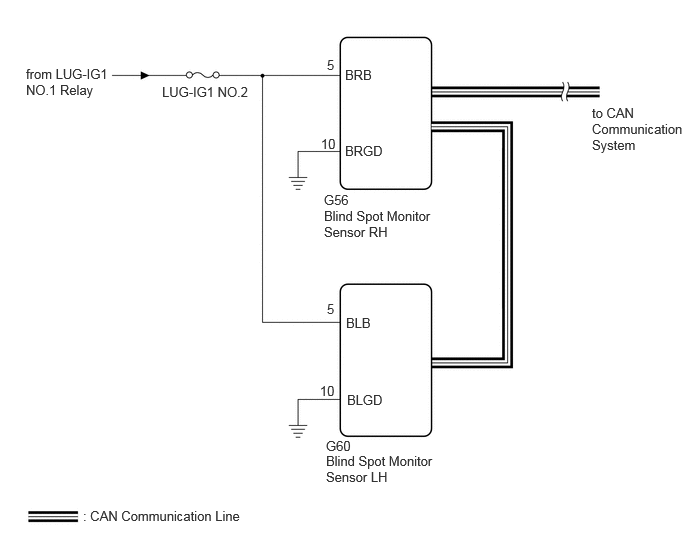
CAUTION / NOTICE / HINT
- NOTICE:
-
Inspect the fuses for circuits related to this system before performing the following procedure.
PROCEDURE
Disconnect the blind spot monitor sensor RH connector.
Measure the voltage according to the value(s) in the table below.
- Standard Voltage:
Tester Connection Switch Condition Specified Condition Click Location & Routing(G56)Location & Routingewd_type=routing;type=c;code=G56
Click Connector(G56)Body>Floor Wire / No. 3 Floor Wire>Blind Spot Monitor Sensor RHewd_type=component;type=c;code=G56;pinno=5
G56-5 (BRB) - Body ground Ignition switch ON 11 to 14 V G56-5 (BRB) - Body ground Ignition switch off Below 1 V
- Result:
Proceed to OK NG
OK
NG
Disconnect the blind spot monitor sensor RH connector.
Measure the resistance according to the value(s) in the table below.
- Standard Resistance:
Tester Connection Condition Specified Condition Click Location & Routing(G56)Location & Routingewd_type=routing;type=c;code=G56
Click Connector(G56)Body>Floor Wire / No. 3 Floor Wire>Blind Spot Monitor Sensor RHewd_type=component;type=c;code=G56;pinno=10
G56-10 (BRGD) - Body ground Always Below 1 Ω
- Result:
Proceed to OK NG
OK
NG
Disconnect the blind spot monitor sensor LH connector.
Measure the voltage according to the value(s) in the table below.
- Standard Voltage:
Tester Connection Switch Condition Specified Condition Click Location & Routing(G60)Location & Routingewd_type=routing;type=c;code=G60
Click Connector(G60)Body>Floor Wire / No. 3 Floor Wire>Blind Spot Monitor Sensor LHewd_type=component;type=c;code=G60;pinno=5
G60-5 (BLB) - Body ground Ignition switch ON 11 to 14 V G60-5 (BLB) - Body ground Ignition switch off Below 1 V
- Result:
Proceed to OK NG
OK
NG
Disconnect the blind spot monitor sensor LH connector.
Measure the resistance according to the value(s) in the table below.
- Standard Resistance:
Tester Connection Condition Specified Condition Click Location & Routing(G60)Location & Routingewd_type=routing;type=c;code=G60
Click Connector(G60)Body>Floor Wire / No. 3 Floor Wire>Blind Spot Monitor Sensor LHewd_type=component;type=c;code=G60;pinno=10
G60-10 (BLGD) - Body ground Always Below 1 Ω
- Result:
Proceed to OK NG
OK
NG