FC CONTROL CONVERTER ASSEMBLY INSTALLATION
CAUTION / NOTICE / HINT
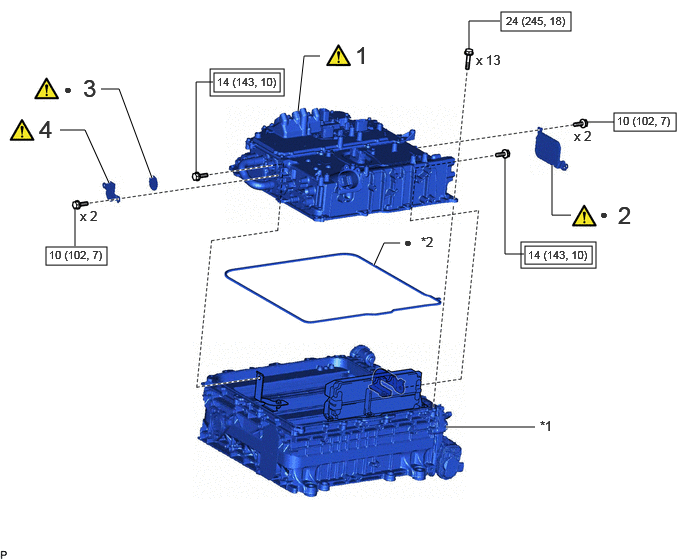
| Procedure | Part Name Code | 
|

|

|
|
|---|---|---|---|---|---|
| 1 | FC CONVERTER ASSEMBLY | G9A10 | ( ) |
- | - |
| 2 | FC CONVERTER VENT COVER | G9A74 | ()
|
- | - |
| 3 | NO. 1 FC STACK CASE PLUG | 1A19A | ()
|
- | - |
| 4 | FC CONVERTER SERVICE HOLE COVER | G9A28 | - | - | - |
| *1 | FC STACK ASSEMBLY | *2 | GASKET |

|
Tightening torque for "Major areas involving basic vehicle performance such as moving/turning/stopping": N*m (kgf*cm, ft.*lbf) | 
|
N*m (kgf*cm, ft.*lbf): Specified torque |
| ● | Non-reusable part | - | - |

| Procedure | Part Name Code |
|
|
|
|
|---|---|---|---|---|---|
| 5 | FC CONVERTER WITH FC STACK ASSEMBLY | - | - | - | - |
| 6 | UPDATE ECU SECURITY KEY | - | - | - | ()
|
PROCEDURE

 G9A10
1.INSTALL FC CONVERTER ASSEMBLY
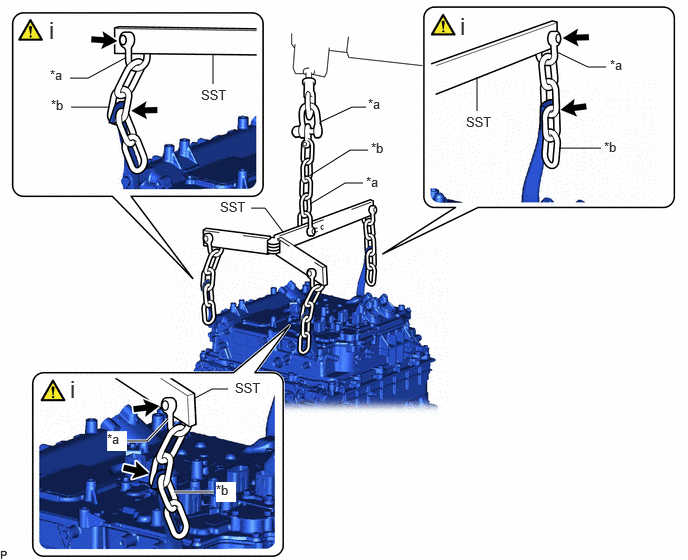
| *a | Shackle (A) (09943-01020) | *b | Chain (09941-01010) |
Set up SST and the chain block as shown in the illustration.
- SST
- 09940-78010 (09941-01010, 09943-01020)
- NOTICE:
- ·
Set up SST and the chain block so that the FC converter is level.
·Do not hoist the FC converter from points other than those shown in the illustration.
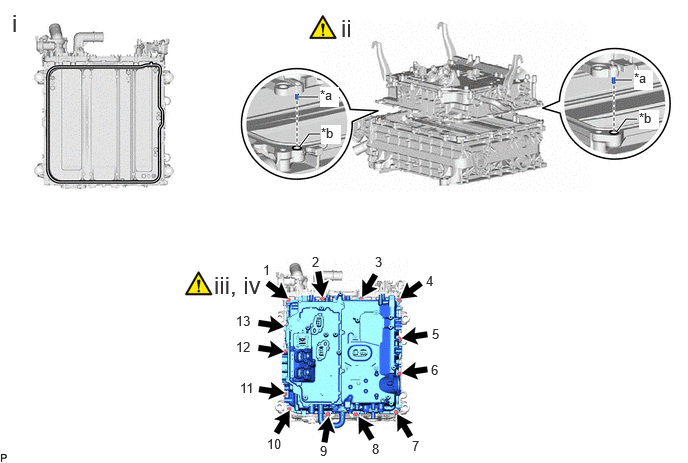
| *a | Knock Pin | *b | Pin Hole |
Install a new gasket to the FC stack assembly.
Install the FC stack by aligning the knock pin on the FC converter assembly side with the pin hole on the FC stack side.
Temporarily install the 3 bolts.
- Torque:
- 8.5 N*m (87 kgf*cm, 75 in.*lbf)
- NOTICE:
-
Temporarily install the bolts in the order of 4 → 7 → 10.
Install the FC converter assembly with the 13 bolts.
- Torque:
- 24 N*m (245 kgf*cm, 18 ft.*lbf)
- NOTICE:
-
Make sure to tighten the bolts in the order.
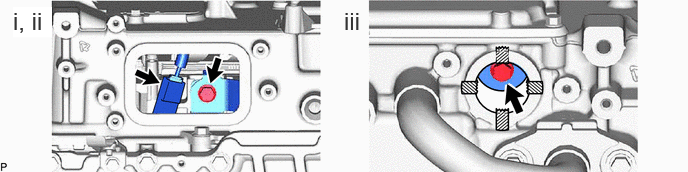
Install the bolt.
- Torque:
- 14 N*m (143 kgf*cm, 10 ft.*lbf)
Connect the connector.
Install the bolt.
- Torque:
- 14 N*m (143 kgf*cm, 10 ft.*lbf)
- NOTICE:
-
Using the paper from the removal procedure, install the paper as shown in the illustration before installing the bolts.
G9A74
2.INSTALL FC CONVERTER VENT COVER
|
|
Click here()
|
1A19A
3.INSTALL NO. 1 FC STACK CASE PLUG
|
|
Click here()
|
G9A28
4.INSTALL FRONT FC CONVERTER SERVICE HOLE COVER
5.INSTALL FC CONVERTER WITH FC STACK ASSEMBLY
6. UPDATE ECU SECURITY KEY