HEATING / AIR CONDITIONING AIR CONDITIONING SYSTEM B14B8 Refrigerant Shortage
DESCRIPTION
This DTC is stored if the amount of refrigerant in the air conditioning system is insufficient.
The air conditioning amplifier assembly receives the ambient temperature signal, refrigerant pressure signal, etc. from various sensors.
Based on these signals, the air conditioning amplifier assembly detects the amount of refrigerant.
The A/C switch indicator is turned off and the air conditioning system is stopped if the amount of refrigerant is insufficient.
| DTC No. | Detection Item | DTC Detection Condition | Trouble Area | Memory | DTC Output from | Priority |
|---|---|---|---|---|---|---|
| B14B8 | Refrigerant Shortage | Diagnosis condition:
At the time of quantity of refrigerant opinion on infringement condition establishment by the ordinary control Malfunction status:
When following condition is detected in refrigerant shortage check in normal operation; Amount of refrigerant is insufficient Detection time:
During air conditioning system operation for 10 minutes or more |
·
Refrigerant pipe line (leaks, stuck) ·
Cooler expansion valve ·
Air conditioning amplifier assembly ·
Air conditioner pressure sensor |
Memorized | Air Conditioner | A |
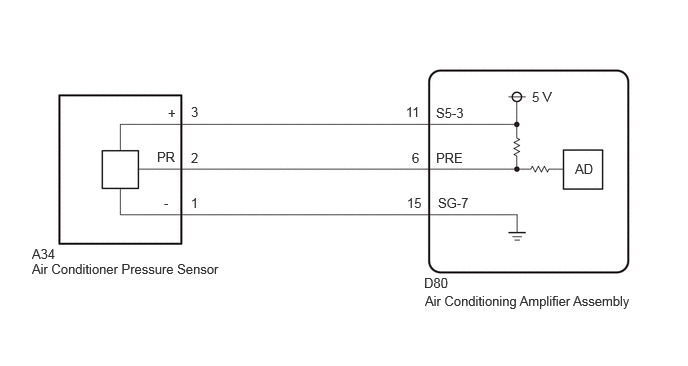
WIRING DIAGRAM
PROCEDURE
Pre-procedure1
None
Read the Data List according to the display on the GTS.
- Body Electrical > Air Conditioner > Data List
-
Tester Display Measurement Item Range Normal Condition Diagnostic Note Regulator Pressure Sensor Air conditioner pressure sensor Min.: -456.68 kPaG
Max.: 3294.37 kPaGActual refrigerant pressure displayed Air conditioner pressure sensor system malfunction
- Body Electrical > Air Conditioner > Data List
-
Tester Display Regulator Pressure Sensor - 50003 121 52
Install a manifold gauge set.
- HINT:
Procedure1
Read the manifold gauge pressure when the following conditions are met.
Prepare the vehicle according to the table below.
| Item | Condition |
|---|---|
| Door | Fully closed (windows also fully closed) |
| A/C Switch | On |
| Recirculation/fresh Control Switch | Recirculation |
| Set Temperature | MAX COLD |
| Blower Speed | HI |
| Air Conditioning Air Inlet Temperature | 25 to 35°C (77 to 95°F) |
- Standard Pressure:
- Low pressure side:
150 to 250 kPa (1.5 to 2.5 kgf/cm2, 22 to 36 psi)
- High pressure side:
1370 to 1570 kPa (14 to 16 kgf/cm2, 199 to 228 psi)
Compare the values displayed in the Data List and on the manifold gauge.
- Result:
Result Proceed to The values displayed in the Data List and on the manifold gauge match A The values displayed in the Data List and on the manifold gauge not match B
Post-procedure1
None
A
B
Pre-procedure1
Disconnect the A34 air conditioner pressure sensor connector.
Procedure1
Measure the voltage according to the value(s) in the table below.
- Standard Voltage:
Tester Connection Switch Condition Specified Condition Click Location & Routing(A34)Location & Routingewd_type=routing;type=c;code=A34
A34-3 (+) - Body ground Ignition switch ON 4.75 to 5.25 V
- Result:
Proceed to OK NG
Post-procedure1
None
OK
NG
Pre-procedure1
Disconnect the A34 air conditioner pressure sensor connector.
Procedure1
Measure the resistance according to the value(s) in the table below.
- Standard Resistance:
Tester Connection Condition Specified Condition Click Location & Routing(A39)Location & Routingewd_type=routing;type=c;code=A39
Click Connector(A39)Engine Compartment>Front Compartment Main Wire / No. 3 Front Compartment Wire / No. 4 Front Compartment Wire>Brake Booster Pump Assemblyewd_type=component;type=c;code=A39;pinno=1
A39-1 (-) - Body ground Always Below 1 Ω
- Result:
Proceed to OK NG
Post-procedure1
None
OK
NG
Pre-procedure1
Disconnect the D80 air conditioning amplifier assembly connector.
Disconnect the A34 air conditioner pressure sensor connector.
Procedure1
Measure the resistance according to the value(s) in the table below.
- Standard Resistance:
Tester Connection Condition Specified Condition Click Location & Routing(D80,A34)Location & Routingewd_type=routing;type=c,c;code=D80,A34
Click Connector(D80)Instrument Panel>Instrument Panel Wire>Air Conditioning Amplifier Assemblyewd_type=component;type=c;code=D80;pinno=6
D80-6 (PRE) - A34-2 (PR) Always Below 1 Ω D80-6 (PRE) or A34-2 (PR) - Other terminals and body ground Always 10 kΩ or higher
- Result:
Proceed to OK NG
Post-procedure1
None
OK
NG
Measure the voltage when the following conditions are met.
| Item | Condition |
|---|---|
| Door | Fully closed (windows also fully closed) |
| A/C Switch | On |
| Recirculation/fresh Control Switch | Recirculation |
| Set Temperature | MAX COLD |
| Blower Speed | HI |
| Air Conditioning Air Inlet Temperature | 25 to 35°C (77 to 95°F) |
- NOTICE:
- ·
If refrigerant pressure on the high pressure side becomes extremely high during the inspection (if the voltage exceeds 4.61 V), the fail-safe function stops compressor operation. Therefore, measure the voltage before the fail-safe operation.
·It is necessary to measure the voltage for a certain amount of time (approximately 10 minutes) because the malfunction may recur after a while.
- HINT:
-
When the outside air temperature is low (below -1.5°C (29.3°F)), the compressor stops due to operation of the thermistor assembly and the No. 1 cooler thermistor to prevent the evaporator from freezing. In this case, perform the inspection in a warm indoor environment.
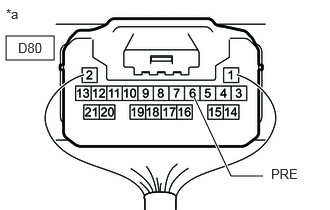
| *a | Component with harness connected
(Air Conditioning Amplifier Assembly) |
Measure the voltage according to the value(s) in the table below.
- Standard Voltage:
Tester Connection Switch Condition Specified Condition Click Location & Routing(D80)Location & Routingewd_type=routing;type=c;code=D80
Click Connector(D80)Instrument Panel>Instrument Panel Wire>Air Conditioning Amplifier Assemblyewd_type=component;type=c;code=D80;pinno=6
D80-6 (PRE) - Body ground A/C switch: On (compressor with motor assembly is driven) 0.74 to 4.61 V (While sensor voltage is 5 V)
- Result:
Proceed to NEXT
NEXT
Read the Data List according to the display on the GTS.
- Body Electrical > Air Conditioner > Data List
-
Tester Display Measurement Item Range Normal Condition Diagnostic Note Regulator Pressure Sensor Air conditioner pressure sensor Min.: -456.68 kPaG
Max.: 3294.37 kPaGActual refrigerant pressure displayed Air conditioner pressure sensor system malfunction
- Body Electrical > Air Conditioner > Data List
-
Tester Display Regulator Pressure Sensor - 50003 121 52
- OK:
The voltage and value displayed in the Data List change.
- Result:
Result Proceed to OK A NG (The voltage changes but the value displayed in the Data List does not change.) NG (The voltage does not change.) B
A
B
Pre-procedure1
Disconnect the D80 air conditioning amplifier assembly connector.
Disconnect the A34 air conditioner pressure sensor connector.
Procedure1
Measure the resistance according to the value(s) in the table below.
- Standard Resistance:
Tester Connection Condition Specified Condition Click Location & Routing(D80,A34)Location & Routingewd_type=routing;type=c,c;code=D80,A34
Click Connector(D80)Instrument Panel>Instrument Panel Wire>Air Conditioning Amplifier Assemblyewd_type=component;type=c;code=D80;pinno=15
D80-15 (SG-4) - A34-1 (-) Always Below 1 Ω D80-15 (SG-4) or A34-1 (-) - Other terminals and body ground Always 10 kΩ or higher
- Result:
Proceed to OK NG
Post-procedure1
None
OK
NG
Pre-procedure1
Disconnect the D80 air conditioning amplifier assembly connector.
Disconnect the A34 air conditioner pressure sensor connector.
Procedure1
Measure the resistance according to the value(s) in the table below.
- Standard Resistance:
Tester Connection Condition Specified Condition Click Location & Routing(D80,A34)Location & Routingewd_type=routing;type=c,c;code=D80,A34
Click Connector(D80)Instrument Panel>Instrument Panel Wire>Air Conditioning Amplifier Assemblyewd_type=component;type=c;code=D80;pinno=11
D80-11 (S 5-3) - A34-3 (+) - Other terminals and body ground Always 10 kΩ or higher
- Result:
Proceed to OK NG
Post-procedure1
None
OK
NG