HEATING / AIR CONDITIONING AIR CONDITIONING SYSTEM Cooling is Poor
DESCRIPTION
If the cooling air is poor (cooling air is discharged), the following causes are possible.
| Symptom | Factor |
|---|---|
·
Cooling is poor ·
Takes time to cool down |
·
Customize setting ·
Compressor with motor assembly malfunction ·
Excessive refrigerant ·
Quantity of refrigerant gas lack ·
Dirty cooler condenser ·
Cooling fan system malfunction ·
A/M damper servo malfunction ·
Damper and link operation (jamming) ·
Automatic light control sensor malfunction ·
Warm air flow |
WIRING DIAGRAM
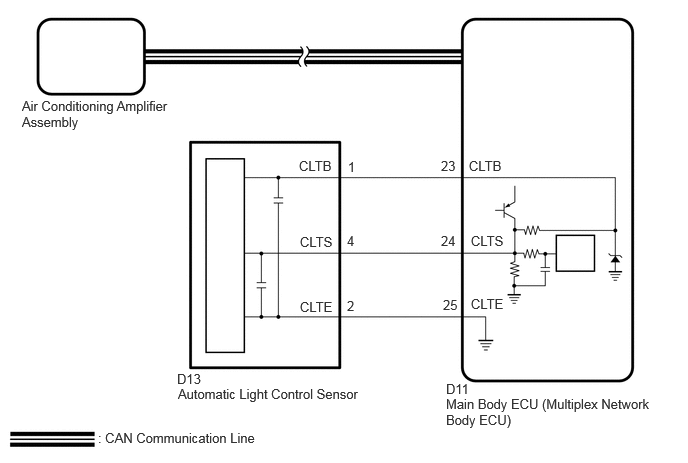
PROCEDURE
Confirm setup of the ECO drive mode and turn it off if it becomes ON.
- HINT:
- ·
When ECO drive mode is on, the air conditioning amplifier assembly ensures a minimum level of air conditioning control based on certain conditions, thereby contributing to improved fuel efficiency. Accordingly, explain to customers that the air volume will be weaker in these situations.
Control Airflow Control Automatically switches the air inlet port to the internal air circulation mode when the outside air temperature is equal to or higher than a predetermined temperature and reduces the power consumption. Air Inlet Control Sets the blower level in AUTO mode lower than normal, and suppresses the power consumption.
- Result:
Proceed to NEXT
NEXT
Prepare the vehicle according to the table below.
| Item | Condition |
|---|---|
| A/C switch | On |
| Ambient temperature*1 | 0 to 49°C (32 to 120°F) |
| Air conditioning inlet temperature*2 | 25 to 49°C (77 to 120°F) |
| Setting temperature | MAX COLD |
| Blower damper position | Recirculation |
| Outlet damper position | FACE |
| Blower speed | HI |
*1: If the ambient temperature is not within the range shown, do not perform this check.
*2: The air inlet temperature can be judged correctly only if it is within an appropriate range of 25 to 79°C (77 to 174°F). Therefore, use the heater mode to adjust the temperature so that it falls within the appropriate range and then perform the check.
Enter the following menus: Body Electrical / Air Conditioner / Utility / Refrigerant Gas Volume Check.
- Body Electrical > Air Conditioner > Utility
-
Tester Display Refrigerant Gas Volume Check - 50005 121 3186
- Result:
Result Amount of Refrigerant Refrigerant shortage Insufficient or leakage Refrigerant correct Correct
- OK:
"Refrigerant correct" is displayed on GTS.
- Result:
Proceed to OK NG
OK
NG
Click hereVehicle Interior>HEATING / AIR CONDITIONING>REFRIGERANT (for HFO-1234yf(R1234yf))>REPLACEMENT
Check the operation by referring to the table below.
- Body Electrical > Air Conditioner > Active Test
-
Tester Display Measurement Item Control Range Restrict Condition Air Mix Servo Targ Pulse(D) for LHD:No. 2 air conditioning radiator damper servo sub-assembly (driver side lower air mix) operation
for RHD:No. 1 air conditioning radiator damper servo sub-assembly (driver side lower air mix) operation
Min.: 128
Max.: 383for LHD (for Dual):Operates between 154 to 258 pulses
for LHD (for 3 Zone):Operates between 254 to 358 pulses
for RHD:Operates between 154 to 258 pulses
Air Mix Servo Targ Pulse(P) for LHD:No. 3 air conditioning radiator damper servo sub-assembly (front passenger side lower air mix) operation
for RHD:No. 2 air conditioning radiator damper servo sub-assembly (front passenger side lower air mix) operation
Min.: 128
Max.: 383for LHD:Operates between 154 to 258 pulses
for RHD (for Dual):Operates between 154 to 258 pulses
for RHD (for 3 Zone):Operates between 254 to 358 pulses
- Body Electrical > Air Conditioner > Active Test
-
Tester Display Air Mix Servo Targ Pulse(D) - 50004 121 24
- Body Electrical > Air Conditioner > Active Test
-
Tester Display Air Mix Servo Targ Pulse(P) - 50004 121 25
- OK:
Damper servo motor is operated.
- Result:
Proceed to OK NG
OK
NG
Click hereVehicle Interior>HEATING / AIR CONDITIONING>AIR CONDITIONING SYSTEM>DIAGNOSTIC TROUBLE CODE CHART
Disconnect the D13 automatic light control sensor connector.
Disconnect the D11 main body ECU (multiplex network body ECU) connector.
Measure the resistance according to the value(s) in the table below.
- Standard Resistance:
Tester Connection Condition Specified Condition Click Location & Routing(D13,D11)Location & Routingewd_type=routing;type=c,c;code=D13,D11
Click Connector(D13)Instrument Panel>Instrument Panel Wire>Automatic Light Control Sensorewd_type=component;type=c;code=D13;pinno=1,2,4
Click Connector(D11)Instrument Panel>Instrument Panel Wire>Main Body ECUewd_type=component;type=c;code=D11;pinno=23,25,24
D13-1 (CLTB) - D11-23 (CLTB) Always Below 1 Ω D13-2 (CLTE) - D11-25 (CLTE) Always Below 1 Ω D13-4 (CLTS) - D11-24 (CLTS) Always Below 1 Ω D13-1 (CLTB) or D11-23 (CLTB) - Other terminals and body ground Always 10 kΩ or higher D13-2 (CLTE) or D11-25 (CLTE) - Other terminals and body ground Always 10 kΩ or higher D13-4 (CLTS) or D11-24 (CLTS) - Other terminals and body ground Always 10 kΩ or higher
- Result:
Proceed to OK NG
OK
NG
Click hereVehicle Exterior>LIGHTING (EXT)>AUTOMATIC LIGHT CONTROL SENSOR>ON-VEHICLE INSPECTION
- Result:
Proceed to OK NG
OK
NG