FC CONTROL FC CONTROL SYSTEM P19FD73 Air Conditioner Power Supply Relay Actuator Stuck Closed
DESCRIPTION
The EV control ECU receives a power source start request from the air conditioning amplifier assembly and then operates the air conditioner power source relay.
| DTC No. | Detection Item | DTC Detection Condition | Trouble Area | Warning Indicate | DTC Output from | Priority |
|---|---|---|---|---|---|---|
| P19FD73 | Air Conditioner Power Supply Relay Actuator Stuck Closed | The air conditioning power source relay command and the operation status of the operation driver circuit do not match
(1 trip detection logic) |
·
Wire harness or connector ·
A/C relay ·
EV control ECU |
Master Warning: Comes on | EV | A |
WIRING DIAGRAM
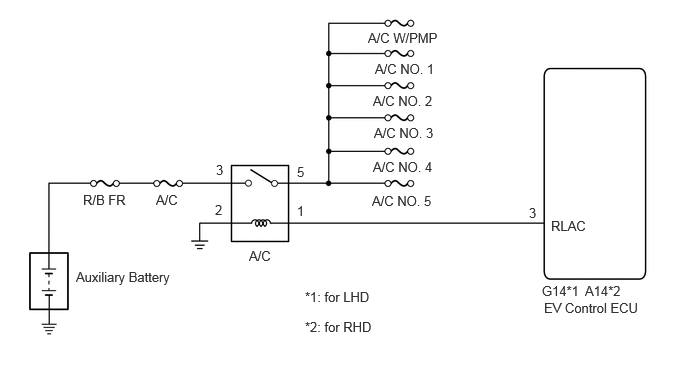
CAUTION / NOTICE / HINT
- NOTICE:
- ·
This vehicle performs FC system shutdown process after turning the ignition switch off from ON (READY). Therefore, after the ignition switch is turned off from ON (READY), do not perform any work on the electrical system for at least 10 minutes including removing connectors or disconnecting the negative (-) auxiliary battery terminal.
·When the EV control ECU determines that the temperature of FC system components is below 0°C (32°F) when the vehicle is parked with the ignition switch off, it operates the FC air compressor, hydrogen pump and FC cooling water pump for a maximum of 180 seconds to drain the FC stack assembly. When performing inspection or repairs with the ignition switch off (not ON or ON (READY)), disconnect the cable from the negative (-) auxiliary battery terminal before performing work. (If the auxiliary battery voltage is needed to conduct inspection, perform the inspection in an environment with an ambient temperature of 10°C (50°F) or higher.)
·Check that the auxiliary battery voltage is 11 V or more before performing diagnosis.
- HINT:
-
After the repair, clear the DTCs and perform the following procedure to check that DTCs are not output.
- 1.
Turn the ignition switch to ON and wait for 5 seconds or more.
2.Turn the ignition switch off and wait for 10 minutes or more.
3.Turn the ignition switch to ON.
PROCEDURE
Check the connector connections and contact pressure of the relevant terminals for the EV control ECU connectors.
- OK:
The connectors are connected securely and there are no contact pressure problems.
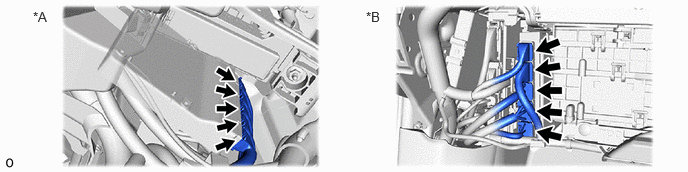
| *A | for LHD | *B | for RHD |
- Result:
Result Proceed to OK A NG (The connector is not connected securely) B NG (The terminals are not making secure contact or are deformed, or water or foreign matter exists in the connector) C
A
B
C
Choose the model to be inspected.
- Result:
Result Proceed to for LHD A for RHD B
A
B
Pre-procedure1
Remove the A/C relay from the No. 2 front compartment relay block.
Disconnect the EV control ECU connector.
Procedure1
Measure the resistance according to the value(s) in the table below.
- Standard Resistance:
Tester Connection Condition Specified Condition Click Location & Routing(G14)Location & Routingewd_type=routing;type=c;code=G14
Click Connector(G14)Instrument Panel>Floor Wire>EV Control ECUewd_type=component;type=c;code=G14;pinno=3
G14-3 (RLAC) - 1 (A/C relay) Always Below 1 Ω G14-3 (RLAC) or 1 (A/C relay) - Body ground and other terminals Always 10 kΩ or higher
Turn the ignition switch to ON.
Measure the voltage according to the value(s) in the table below.
- Standard Voltage:
Tester Connection Condition Specified Condition 1 (A/C relay) - Body ground Ignition switch ON Below 1 V
- Result:
Proceed to OK NG
Post-procedure1
Reconnect the EV control ECU connector.
Install the A/C relay.
OK
NG
Pre-procedure1
Remove the A/C relay from the No. 2 front compartment relay block.
Disconnect the EV control ECU connector.
Procedure1
Measure the resistance according to the value(s) in the table below.
- Standard Resistance:
Tester Connection Condition Specified Condition Click Location & Routing(A14)Location & Routingewd_type=routing;type=c;code=A14
Click Connector(A14)Instrument Panel>Front Compartment Main Wire>EV Control ECUewd_type=component;type=c;code=A14;pinno=3
A14-3 (RLAC) - 1 (A/C relay) Always Below 1 Ω A14-3 (RLAC) or 1 (A/C relay) - Body ground and other terminals Always 10 kΩ or higher
Turn the ignition switch to ON.
Measure the voltage according to the value(s) in the table below.
- Standard Voltage:
Tester Connection Condition Specified Condition 1 (A/C relay) - Body ground Ignition switch ON Below 1 V
- Result:
Proceed to OK NG
Post-procedure1
Reconnect the EV control ECU connector.
Install the A/C relay.
OK
NG
Pre-procedure1
Remove the A/C relay from the No. 2 front compartment relay block.
Procedure1
Measure the resistance according to the value(s) in the table below.
- Standard Resistance:
Tester Connection Condition Specified Condition 2 (A/C relay) - Body ground Always Below 1 Ω
- Result:
Proceed to OK NG
Post-procedure1
Install the A/C relay.
OK
NG
Pre-procedure1
Remove the A/C relay from the No. 2 front compartment relay block.
Procedure1
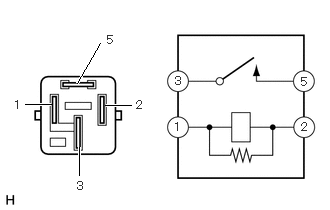
Measure the resistance according to the value(s) in the table below.
- Standard Resistance:
Tester Connection Condition Specified Condition 3 - 5 Auxiliary battery voltage not applied between terminals 1 and 2 10 kΩ or higher 3 - 5 Auxiliary battery voltage applied between terminals 1 and 2 Below 1 Ω
- Result:
Proceed to OK NG
Post-procedure1
Install the A/C relay.
OK
NG
Pre-procedure1
None
Procedure1
Clear the DTCs.
- Powertrain > EV > Clear DTCs
- 50002 397
- Result:
Proceed to NEXT
Post-procedure1
Turn the ignition switch off and wait for 10 minutes or more.
NEXT
Pre-procedure1
Turn the ignition switch to ON and wait for at least 5 seconds.
Turn the ignition switch off and wait for 10 minutes or more.
Procedure1
Check for DTCs.
- Powertrain > EV > Trouble Codes
- 50001 397
- Result:
Result Proceed to P19FD73 is output A DTCs are not output B
Post-procedure1
Turn the ignition switch off.
A
B
Click hereGeneral>INTRODUCTION>HOW TO TROUBLESHOOT ECU CONTROLLED SYSTEMS>HOW TO PROCEED WITH TROUBLESHOOTING