INTERIOR PANELS / TRIM REAR SUNSHADE SYSTEM Rear Sunshade Shift-linked Function does not Operate when Shift Lever is Moved to R Position
DESCRIPTION
The rear sunshade reverse signal is sent to the rear window shade assembly via the main body ECU (multiplex network body ECU) and operates the rear window shade assembly.
WIRING DIAGRAM
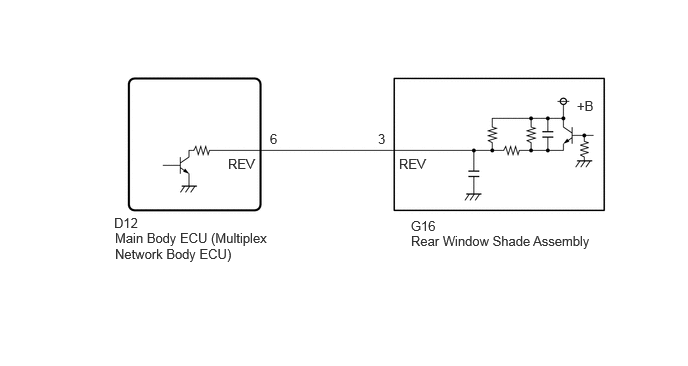
CAUTION / NOTICE / HINT
- NOTICE:
- ·
If the main body ECU (multiplex network body ECU) is replaced, refer to Service Bulletin.
·This function operates when the "R-pos to Rear Sunshade COM" item is set to "ON" using the GTS customization function (The default setting is "ON").
Click hereVehicle Interior>INTERIOR PANELS / TRIM>REAR SUNSHADE SYSTEM>CUSTOMIZE PARAMETERS
PROCEDURE
Using the GTS, perform the Active Test.
Click hereVehicle Interior>INTERIOR PANELS / TRIM>REAR SUNSHADE SYSTEM>DATA LIST / ACTIVE TEST
- Body Electrical > Main Body > Active Test
-
Tester Display Measurement Item Control Range Diagnostic Note Reverse Gear Signal Reverse signal ON/OFF -
- Body Electrical > Main Body > Active Test
-
Tester Display Reverse Gear Signal - 50004 123 24
- HINT:
-
Perform the Active Test while the rear sunshade is fully raised or a raise operation is in progress.
- OK:
Rear sunshade can be lowered.
- Result:
Proceed to OK NG
OK
NG
Disconnect the G16 rear window shade assembly connector.
Disconnect the D12 main body ECU (multiplex network body ECU) connector.
Measure the resistance according to the value(s) in the table below.
- Standard Resistance:
Tester Connection Condition Specified Condition Click Location & Routing(G16,D12)Location & Routingewd_type=routing;type=c,c;code=G16,D12
Click Connector(G16)Body>Floor Wire / No. 3 Floor Wire>Rear Window Shade Assemblyewd_type=component;type=c;code=G16;pinno=3
Click Connector(D12)Instrument Panel>Instrument Panel Wire>Main Body ECUewd_type=component;type=c;code=D12;pinno=6
G16-3 (REV) - D12-6 (REV) Always Below 1 Ω
- Result:
Proceed to OK NG
OK
NG
Disconnect the D12 main body ECU (multiplex network body ECU) connector.
Measure the voltage according to the value(s) in the table below.
- Standard Voltage:
Tester Connection Condition Specified Condition Click Location & Routing(D12)Location & Routingewd_type=routing;type=c;code=D12
Click Connector(D12)Instrument Panel>Instrument Panel Wire>Main Body ECUewd_type=component;type=c;code=D12;pinno=6
D12-6 (REV) - Body ground Always 11 to 14 V
- Result:
Proceed to OK NG
OK
NG